HP Model 744 Installing Model 744 RAM Cards - Page 2
RAM Card Removal, Installing RAM Cards
 |
View all HP Model 744 manuals
Add to My Manuals
Save this manual to your list of manuals |
Page 2 highlights
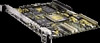
6 Gently and evenly push on the top of the connectors with both of your thumbs until the RAM cards are about 1/3 seated. 7 After the connectors are 1/3 seated, continue to push evenly with your thumbs, while pushing harder. The connectors will fully snap together. 8 Examine the connector seating from both sides of the RAM card to ensure there are no gaps between the RAM card connectors and the connectors underneath it. 9 Secure the card with a standoff, or if this is the topmost card, with the screws you removed in Step 2. 10 Install the Model 744 into its card cage and connect all cables. RAM Card Removal When removing a RAM card from the Model 744 CPU or the RAM card stack, remove the cards one at a time. Carefully lift the card by the edge near the connectors. Do not try to pry the card up with a tool. . Figure 1. Installing RAM Cards Part Number A4500-90613 Edition E1097 Printed in USA
-
 1
1 -
 2
2
 |
 |
