HP Mp3130 HP mp3130 digital projector series - Ceiling Mount Installation Card - Page 2
Setup > Projector Position
 |
UPC - 829160021447
View all HP Mp3130 manuals
Add to My Manuals
Save this manual to your list of manuals |
Page 2 highlights
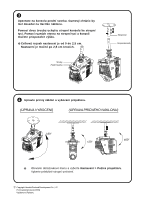
w Install the front clamp onto the ceiling bracket. The rubber bumper should fit over the tilt button. Attach the ceiling bracket to the ceiling rod with the two screws. Height adjustments can be made by using different holes on the ceiling rod and ceiling bracket. vThe total adjustment range is 0 to 1 inches (0~2.5cm). Adjustment can be made in one inch (2.5cm) increment. Screws Front Clamp Ceiling Rod Ceiling Bracket x Make necessary roll and yaw adjustments to the projector. (YAW ADJUSTMENT) (ROLL ADJUSTMENT) 180° ±20° ±60° v Open the on-screen menu and select Setup > Projector Position. Select the appropriate ceiling option. C Copyright Hewlett-Packard Development Co., L.P. First Edition (November 2003) Printed in Taiwan
-
 1
1 -
 2
2 -
 3
3 -
 4
4 -
 5
5 -
 6
6 -
 7
7 -
 8
8 -
9
-
10
-
11
-
12
-
13
-
14
-
15
-
16
-
17
-
18
-
19
-
20
-
21
-
22
-
23
-
24
 |
 |

Make necessary roll and yaw adjustments to the projector.
(
Y
A
W
ADJUSTMENT)
v
v
v
v
v
Open the on-screen menu and select
Setup > Projector Position
. Select the
appropriate ceiling option.
x
(
ROLL ADJUSTMENT)
±20°
±60°
w
Copyright Hewlett-Packard Development Co., L.P.
First Edition (November 2003)
Printed in Taiwan
C
Front Clamp
Ceiling
Bracket
Install the front clamp onto the ceiling bracket. The rubber bumper
should fit over the tilt button.
Attach the ceiling bracket to the ceiling rod with the two screws.
Height adjustments can be made by using different holes on the
ceiling rod and ceiling bracket.
v
The total adjustment range is 0 to 1 inches
(0~2.5cm).
Adjustment can be made in one
inch (2.5cm) increment.
180°
Screws
Ceiling Rod