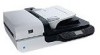
HP N6350 HP Scanjet N6350 User Guide
HP N6350 - ScanJet Networked Document Flatbed Scanner Manual
 |
UPC - 884420551898
View all HP N6350 manuals
Add to My Manuals
Save this manual to your list of manuals |
HP N6350 manual content summary:
- HP N6350 | HP Scanjet N6350 User Guide - Page 1
HP Scanjet N6350 User Guide - HP N6350 | HP Scanjet N6350 User Guide - Page 2
- HP N6350 | HP Scanjet N6350 User Guide - Page 3
Contents 1 Use the scanner HP scanning software overview 4 Scanner overview...5 Scanner control panel...6 Automatic document feeder (ADF 7 Transparent materials adapter (TMA 7 Scanner settings...7 Language...8 Power Mode...8 Tools...8 Network...8 Restore Defaults...8 Load originals...9 Use the - HP N6350 | HP Scanjet N6350 User Guide - Page 4
the automatic document feeder (ADF 32 HP Scanner Tools Utility scanner maintenance information 34 Replace the feed roller and separation pad 35 Order maintenance and scanner supplies 35 5 Troubleshooting Basic troubleshooting tips...36 Scanner LEDs...37 Scanner installation troubleshooting 37 - HP N6350 | HP Scanjet N6350 User Guide - Page 5
glass 44 Issues with scanning documents or text (OCR 44 Scanner button issues...45 Buttons do not work...45 An unexpected program opens when a button is pressed 45 Wrong shortcut is used when the Scan button is pressed 46 Automatic document feeder (ADF) problems 46 Scanned image is fuzzy...47 - HP N6350 | HP Scanjet N6350 User Guide - Page 6
topics describe the HP Scanjet scanner as well as how to scan or copy original documents. • HP scanning software overview • Scanner overview • Scanner settings • Load originals • Start a scan • Make copies HP scanning software overview When you install the HP scanning software, the following - HP N6350 | HP Scanjet N6350 User Guide - Page 7
See also • "Load originals" on page 9 • "Use the HP scanning software" on page 16 • "Make copies" on page 18 Scanner overview 1 Scanner control panel 2 Automatic document feeder (ADF) 3 ADF input tray 4 ADF output tray 5 Transparent materials adapter (TMA) 6 Power supply input 7 TMA/ADF cable input - HP N6350 | HP Scanjet N6350 User Guide - Page 8
menus on the LCD. Starts a scan. Turns the scanner on and off. Allows you to enter network address information and PIN when your scanner is networked. Allows you to set preferences for the behavior of the scanner and enter network connection specifications. Displays the previous menu on the - HP N6350 | HP Scanjet N6350 User Guide - Page 9
Starts a copy, displaying the HP Copy dialog box on the computer. See also • "Start a scan" on page 15 • "Make copies" on page 18 • "Scanner settings" on page 7 • "Scanner LEDs" on page 37 • "Configure and manage the scanner on a network" on page 19 Automatic document feeder (ADF) You can use the - HP N6350 | HP Scanjet N6350 User Guide - Page 10
associate any button-aware application with the Scan ( ) and Copy ( ) buttons, monitor usage of certain scanner parts for maintenance purposes, and access network options. NOTE: You can also start the HP Scanner Tools Utility by double-clicking the HP Scanner Tools Utility icon on the desktop. See - HP N6350 | HP Scanjet N6350 User Guide - Page 11
feeder (ADF) supports the following paper types. Width: Length: Weight: 148-216 mm (5.8-8.5 in) 148-356 mm (5.8-14 in) 50-120 g/m2 (13-32 lb) • Scanning the following types of documents with the ADF might result in paper jams or damage to the documents. To scan these documents, use the scanner - HP N6350 | HP Scanjet N6350 User Guide - Page 12
all of the documents are the same width. • When loading pages in landscape orientation, make sure that the top of the pages point toward the back of the scanner. Doing so ensures that the scanner automatically rotates the page correctly, if you have set the HP scanning software to rotate landscape - HP N6350 | HP Scanjet N6350 User Guide - Page 13
that will be pointing into the ADF in one direction, and then fan that same edge in the opposite direction. 3. Align the edges of the documents by tapping the bottom of the stack against the table top. Rotate the stack 90 degrees and repeat. 4. Place the stack in the middle of - HP N6350 | HP Scanjet N6350 User Guide - Page 14
loading tips" on page 9 • "Automatic document feeder (ADF) problems" on page 46 • "Start a scan" on page 15 Use the scanner glass Place items that do not meet the specifications for the automatic document feeder (ADF) directly onto the scanner glass. Minimum size: Maximum size: No minimum - HP N6350 | HP Scanjet N6350 User Guide - Page 15
TIP: To scan multiple pictures at the same time, arrange the pictures that you want to scan on the scanner glass with at least 6 mm (0.25 in) of space between items. See also "Start a scan" on page 15 Load originals 13 - HP N6350 | HP Scanjet N6350 User Guide - Page 16
To load slides or negatives in the TMA, follow these steps: 1. Open the scanner lid. 2. Remove the negative strip holder from the slide holder. 3. Do one of the following to load the slides or negatives: • If you are scanning slides, place the slides into the slide holder. Insert the slides with the - HP N6350 | HP Scanjet N6350 User Guide - Page 17
image to approximately 6.7 x 10 cm (2.64 x 4 in). If you want the final image to be larger or smaller, start the scan with the HP scanning software and then use the Resize tool in the HP Scanning preview window to set the scaling to the final size that you want. The scanner will scan the item to the - HP N6350 | HP Scanjet N6350 User Guide - Page 18
the Device, and then close the HP Scanning software. For more information about uploading scan shortcuts, see the printed Getting Started Guide. 4. Use and to select the scan shortcut. 5. Press the Scan ( ) button on the scanner control panel. The scanner sends the scan to the computer. Tips on - HP N6350 | HP Scanjet N6350 User Guide - Page 19
so, insert the installation CD that came with your scanner and select the EMC ISIS/TWAIN option. When scanning documents, select the HP Scanjet N6350 Doc TWAIN driver from the application. However, when scanning images from other software programs, select the HP Scanjet N6350 TWAIN driver. See also - HP N6350 | HP Scanjet N6350 User Guide - Page 20
scan an original and send it to a printer. To make copies, follow these steps: 1. Load the originals. 2. If your scanner is networked: a. Use and press OK. on the scanner dialog box. b. Make the changes you want in the HP Copy dialog box. c. Click Start. The copy is sent to the printer. - HP N6350 | HP Scanjet N6350 User Guide - Page 21
to install the HP Scanjet N6350 on a network, where it can be shared by up to 20 computers. The following topics describe how to configure and manage your networked scanner. • Connect the scanner to a network • Change the scanner name • Connect to additional network scanners • Install the scanner - HP N6350 | HP Scanjet N6350 User Guide - Page 22
, and then follow the onscreen instructions. If you have not installed the HP scanning software, insert the scanning software CD into the CD drive and complete the network connection. a. When you see the Found Network Scanner dialog box, select the scanner you are installing, and then click Next - HP N6350 | HP Scanjet N6350 User Guide - Page 23
from the list and continue with the network installation. 1. Decide what software to install. • If you will be using the scanner with document-management or scanning software that you already own, you only need to install the HP Scanjet drivers and Scanner Tools Utility. • If you do not already - HP N6350 | HP Scanjet N6350 User Guide - Page 24
set the language and power mode, access the HP Scanner Tools Utility, and view and set network settings. Manage: Use to scan pictures and documents, access help and troubleshooting information, access HP Scanning preview window to edit scans before saving them, scan slides and negatives, and modify - HP N6350 | HP Scanjet N6350 User Guide - Page 25
to HP, point to Scanjet, point to HP Scanjet N6350, and then click Scanner Tools Utility. From the HP Scanner Tools Utility icon on the desktop: 1. Double-click the HP Scanner Tools Utility icon. 2. If prompted, highlight the HP Scanjet N6350 scanner you want, and then click OK. Network settings - HP N6350 | HP Scanjet N6350 User Guide - Page 26
Chapter 2 • Gateway • Link Speed: Automatic, 10-Full, 10-Half, 100-Full, 100-Half • Type: DCHP or Static • Hostname See also • "HP Scanner Tools Utility" on page 22 • "Network settings" on page 23 • "Embedded Web Server" on page 25 Change network setup type Use the Network Setup menu on the control - HP N6350 | HP Scanjet N6350 User Guide - Page 27
press OK again to confirm the IP address change. If you selected Manual, complete the following steps: NOTE: If you press OK without entering HP Scanjet N6350 scanner is connected to a network, you can use the Embedded Web Server to view status information, change settings, and manage the scanner - HP N6350 | HP Scanjet N6350 User Guide - Page 28
support from the Embedded Web Server. • Your computer must be on the same subnet as the HP Scanjet N6350 to be able to discover, connect to, and scan from the device. NOTE: You can use the Embedded Web Server to manage the HP Scanjet N6350 from any computer on the network View network settings Network - HP N6350 | HP Scanjet N6350 User Guide - Page 29
Description • Power Options • Device Services Shows network status and allows you to change the network settings that have been configured for the device. NOTE: Network pages only appear if the device is connected to a network. • Device Host Name • Wired (802.3) Interface • Advanced settings - HP N6350 | HP Scanjet N6350 User Guide - Page 30
. NOTE: You must upload your scan shortcuts to each network scanner on which you wish to have the shortcuts available. Automatically rotate landscape pages By default, document pages fed through the automatic document feeder (ADF) or placed on the scanner glass appear in the scan output in the same - HP N6350 | HP Scanjet N6350 User Guide - Page 31
Type in the HP Scanning preview window, select Black and White. 4. In the image toolbar, select Adjust Black and White, select the color to drop out, and then click Finish. For more information on dropping out colors, see the scanner software Help. Scan without reviewing To scan with minimal user - HP N6350 | HP Scanjet N6350 User Guide - Page 32
Chapter 3 If you are shown a scan preview when you scan from the Scan ( ) button, complete the following steps: 1. Double-click the HP Scanning icon on your desktop to start the HP Scanning software. 2. On the HP Scanning shortcuts dialog box, click the Options menu, and then click Button Settings. - HP N6350 | HP Scanjet N6350 User Guide - Page 33
(TMA) • Clean the automatic document feeder (ADF) • HP Scanner Tools Utility scanner maintenance information • Replace the feed roller and separation pad • Order maintenance and scanner supplies Occasional cleaning of your scanner helps ensure higher-quality scans. The amount of care necessary - HP N6350 | HP Scanjet N6350 User Guide - Page 34
scanner. For instructions on how to clean the underside of the scanner glass, see www.hp.com/support. Clean the transparent materials adapter (TMA) Clean the TMA with a dry, soft cloth. If necessary, lightly spray the cloth with glass cleaner and wipe the TMA. Clean the automatic document feeder - HP N6350 | HP Scanjet N6350 User Guide - Page 35
the USB or Ethernet cable and power cable from the scanner. 2. Open the scanner lid. 3. Clean the white strip on the inside of the scanner cover and the clear scanning strip on the scanner bed. Wipe these items with a clean, damp, lint-free cloth. Clean the automatic document feeder (ADF) 33 - HP N6350 | HP Scanjet N6350 User Guide - Page 36
Maintenance tab, follow these steps: 1. On the Windows taskbar, click Start, point to Programs or All Programs, point to HP, point to Scanjet, point to HP Scanjet N6350, and then click Scanner Tools Utility. 2. Click the Maintenance tab on the HP Scanner Tools Utility dialog box. TIP: You can also - HP N6350 | HP Scanjet N6350 User Guide - Page 37
Streaks on scans or paper jams occur repeatedly and cleaning the automatic document feeder does not help. • The HP Scanner Tools Utility Maintenance tab indicates that maintenance is due. The feed roller replacement kit contains a feed roller, separation pad, and installation instructions. To order - HP N6350 | HP Scanjet N6350 User Guide - Page 38
problems • Scanner button issues • Automatic document feeder (ADF) problems • Slides, negatives, and TMA issues • Networking problems • Additional troubleshooting information For additional troubleshooting, see the online help for the scanning software that you are using or see www.hp.com/support - HP N6350 | HP Scanjet N6350 User Guide - Page 39
Scanner LEDs The scanner has two LEDs on the control panel that indicate scanner functions and error scanner is on and ready to scan. Both LEDs are off. There is no power to the scanner. Scanner installation troubleshooting This section contains solutions for installation and setup problems - HP N6350 | HP Scanjet N6350 User Guide - Page 40
software, follow these steps: 1. Click Start, click Settings, and then click Control Panel (in Windows XP and Vista, click Start, and then click Control Panel). 2. Click Add or Remove Programs (in Windows Vista, the Programs and Features tool) and then select HP Scanjet N6350. 38 Troubleshooting - HP N6350 | HP Scanjet N6350 User Guide - Page 41
licenses, see www.hp.com, search on your scanner model, find the product overview page, and then click the Specifications or Accessories tab. Scanner initialization or hardware problems If the scanner does not work after installation or if the scanner has stopped working correctly, you might - HP N6350 | HP Scanjet N6350 User Guide - Page 42
between the scanner and a network router, Ethernet jack, or Ethernet switch. If the problem persists scanner from working correctly. If the scanner does not work, uninstall and then reinstall the HP scanning software. See also "Uninstall and reinstall the software" on page 38 Check that the scanner - HP N6350 | HP Scanjet N6350 User Guide - Page 43
cables" on page 38 Reset the scanner If you receive an error message similar to Scanner initialization failed or Scanner not found when trying to use the scanner, you should reset the scanner. To reset the scanner, follow these steps: 1. Close the HP scanning software, if it is open. 2. Disconnect - HP N6350 | HP Scanjet N6350 User Guide - Page 44
HP Scanjet N6350. c. Click Remove. d. Click Add or Remove Programs (in Windows Vista, the Programs and Features tool) and then select the HP Photosmart software. e. Click Remove. 5. Reinstall using the HP Scanning Software CD that came with your scanner. When you insert the CD, an installation - HP N6350 | HP Scanjet N6350 User Guide - Page 45
document feeder (ADF) input tray, when Instant Warm-up is turned on, and when Energy Savings is turned off. Scanner does not start scan right away Make sure the scanner is turned on. If the scanner has not been used recently, the scanner your custom scan shortcut names. To solve this problem, use - HP N6350 | HP Scanjet N6350 User Guide - Page 46
might be out of toner or ink. Print a non-scanned item such as a file, or scan the same original to a scan destination other than the printer. If you still see the problem, clean the automatic document feeder, scanner glass, or TMA (if scanning slides or negatives). See also • "Clean the automatic - HP N6350 | HP Scanjet N6350 User Guide - Page 47
when you install the HP scanning software during scanner setup. If you use the Custom option when installing the software, you can choose not to install the OCR software. Try reinstalling the software using the default install options. Scanner button issues • Buttons do not work • An unexpected - HP N6350 | HP Scanjet N6350 User Guide - Page 48
is pressed If you are using the HP scanning software, you can change the scan shortcut assigned to the Scan ( ) button. See the scanner software Help for information on assigning scan shortcuts to the Scan ( ) button. Automatic document feeder (ADF) problems Use this section to help resolve issues - HP N6350 | HP Scanjet N6350 User Guide - Page 49
documents" on page 10 • "Care and maintenance" on page 31 Scanned image is fuzzy When scanning with the automatic document feeder (ADF), follow these steps: 1. Verify that the document original is not fuzzy. 2. Check for any obstructions in the scanner paper path and make sure that the paper guides - HP N6350 | HP Scanjet N6350 User Guide - Page 50
. See also "Load originals" on page 9 Scanned images are not straight When scanning with the automatic document feeder (ADF), make sure that the paper guides touch the edges of the original. Make sure that all documents are of the same width. When scanning from the scanner glass, the item might have - HP N6350 | HP Scanjet N6350 User Guide - Page 51
jammed pages from inside the ADF. 4. Remove any jammed pages from the ADF output tray. 5. Close the ADF roller cover and access door. 6. At the scan destination, examine the scan output to determine which page was the last to be completely scanned. Automatic document feeder (ADF) problems 49 - HP N6350 | HP Scanjet N6350 User Guide - Page 52
scanner, and then turn on the scanner. ◦ Try to scan another page through the ADF. The bottom of the scanned image is cut off By default, the scanner can scan paper that is up to 356 mm (14 in) long. For longer pages, the end of the document is not included in the scanned image. 50 Troubleshooting - HP N6350 | HP Scanjet N6350 User Guide - Page 53
on before you click Scan or Finish. • The bulb in the TMA light source might be broken or not working. If the bulb is broken, service is required. • work at all The cable might not be connected correctly. Ensure that the TMA/ADF cable is connected securely to the TMA port on the back of the scanner - HP N6350 | HP Scanjet N6350 User Guide - Page 54
network status If you are not able to scan to a network scanner, check the network status using the HP Scanner Tools Utility. 1. Double-click the HP Scanner Tools Utility icon on your desktop. 2. If prompted, highlight the HP Scanjet N6350 scanner you want, and then click OK. 52 Troubleshooting - HP N6350 | HP Scanjet N6350 User Guide - Page 55
. See also "Basic troubleshooting tips" on page 36 "Change network setup type" on page 24 Additional troubleshooting information For additional troubleshooting information, see the following resources: • To look for updated information about the scanner, see www.hp.com/support. ◦ Select your country - HP N6350 | HP Scanjet N6350 User Guide - Page 56
the following HP support offerings: 1. See the product documentation that came with the product. • Review the troubleshooting section in this user guide. • Review the scanner software help (click Start, point to Programs or All Programs, point to HP, point to Scanjet, point to N6350, point to - HP N6350 | HP Scanjet N6350 User Guide - Page 57
document feeder (ADF) 7 B Back button 6 black scans, troubleshoot 48 blank pages 29 bottom of image missing 44 buttons scanner control panel 6 troubleshoot 45 C cables troubleshoot 38 Cancel button 6 Care Pack Services 54 CDs, software install 21 change IP address 24 change network settings - HP N6350 | HP Scanjet N6350 User Guide - Page 58
Defaults 8 rotate pages 28 S scan files too large 44 from the HP scanning software 16 from WIA or TWAIN software 17 start 15 with one button press 29 Scan button scan from 15 troubleshoot 45, 46 scan shortcuts troubleshoot 46 scanner automatic document feeder 7 control panel 6 features 5 hardware - HP N6350 | HP Scanjet N6350 User Guide - Page 59
43 streaks 47 test scanner hardware 41 TMA 51 USB connection 39 white lines 44 white scans 48 troubleshooting 36 turn on, troubleshoot 43 TWAIN scan from 17 U uninstall software 38 USB cable troubleshoot 38 useful scanning features 28 V vertical white stripes troubleshoot 44 view network settings 23 - HP N6350 | HP Scanjet N6350 User Guide - Page 60
58
-
 1
1 -
 2
2 -
 3
3 -
 4
4 -
 5
5 -
 6
6 -
 7
7 -
8
-
9
-
10
-
11
-
12
-
13
-
14
-
15
-
16
-
17
-
18
-
19
-
20
-
21
-
22
-
23
-
24
-
25
-
26
-
27
-
28
-
29
-
30
-
31
-
32
-
33
-
34
-
35
-
36
-
37
-
38
-
39
-
40
-
41
-
42
-
43
-
44
-
45
-
46
-
47
-
48
-
49
-
50
-
51
-
52
-
53
-
54
-
55
-
56
-
57
-
58
-
59
-
60
 |
 |

HP Scanjet N6350
User Guide