HP Officejet J3600 User Guide - Page 145
Troubleshoot installation issues, Hardware installation suggestions, To extend your phone cord
 |
View all HP Officejet J3600 manuals
Add to My Manuals
Save this manual to your list of manuals |
Page 145 highlights
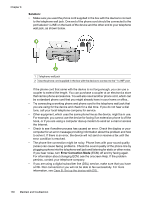
TIP: If the device came with a 2-wire phone cord adaptor, you can use it with a 4-wire phone cord to extend the length. For information on using the 2-wire phone cord adaptor, see the documentation that came with it. To extend your phone cord 1. Using the phone cord supplied in the box with the device, connect one end to the coupler, then connect the other end to the port labeled 1-LINE on the back of the device. 2. Connect another phone cord to the open port on the coupler and to the telephone wall jack. Troubleshoot installation issues If the following topics do not help, see Support and warranty for information about HP support. • Hardware installation suggestions • Software installation suggestions Hardware installation suggestions Check the device • Make sure that all packing tape and material have been removed from outside and inside the device. • Make sure that the device is loaded with paper. • Make sure that no lights are on or blinking except the Ready light, which should be on. If the Attention light is blinking, check for messages on the control panel. Check the hardware connections • Make sure that any cords and cables that you are using are in good working order. • Make sure that the power cord is connected securely to both the device and to a working power outlet. • Make sure that the phone cord is connected to the 1-LINE port. Check the print cartridges • Make sure the tape is removed from the print cartridges. • Make sure that the print cartridges are firmly installed in their correct slot. Press down firmly on each one to ensure proper contact. The HP Officejet J3500 supports a black print cartridge only. Check the device to ensure the following: • Power light is on and not blinking. When the device is first turned on, it takes approximately 45 seconds to warm up. • The device is in the Ready state, and no other lights on the control panel are lit or blinking. If lights are lit or blinking, see the message on the control panel. Troubleshoot installation issues 141
-
 1
1 -
2
-
3
-
4
-
5
-
6
-
7
-
8
-
9
-
10
-
11
-
12
-
13
-
14
-
15
-
16
-
17
-
18
-
19
-
20
-
21
-
22
-
23
-
24
-
25
-
26
-
27
-
28
-
29
-
30
-
31
-
32
-
33
-
34
-
35
-
36
-
37
-
38
-
39
-
40
-
41
-
42
-
43
-
44
-
45
-
46
-
47
-
48
-
49
-
50
-
51
-
52
-
53
-
54
-
55
-
56
-
57
-
58
-
59
-
60
-
61
-
62
-
63
-
64
-
65
-
66
-
67
-
68
-
69
-
70
-
71
-
72
-
73
-
74
-
75
-
76
-
77
-
78
-
79
-
80
-
81
-
82
-
83
-
84
-
85
-
86
-
87
-
88
-
89
-
90
-
91
-
92
-
93
-
94
-
95
-
96
-
97
-
98
-
99
-
100
-
101
-
102
-
103
-
104
-
105
-
106
-
107
-
108
-
109
-
110
-
111
-
112
-
113
-
114
-
115
-
116
-
117
-
118
-
119
-
120
-
121
-
122
-
123
-
124
-
125
-
126
-
127
-
128
-
129
-
130
-
131
-
132
-
133
-
134
-
135
-
136
-
137
-
138
-
139
-
 140
140 -
 141
141 -
 142
142 -
 143
143 -
 144
144 -
 145
145 -
 146
146 -
 147
147 -
 148
148 -
 149
149 -
 150
150 -
151
-
152
-
153
-
154
-
155
-
156
-
157
-
158
-
159
-
160
-
161
-
162
-
163
-
164
-
165
-
166
-
167
-
168
-
169
-
170
-
171
-
172
-
173
-
174
-
175
-
176
-
177
-
178
-
179
-
180
-
181
-
182
-
183
-
184
-
185
-
186
 |
 |
