HP P3015d HP LaserJet P3010 Series Embedded Web Server - User Guide - Page 34
E-mail Server, Configuring outgoing e-mail, Alerts, AutoSend, Enable Outgoing E-mail, SMTP Server
 |
UPC - 884420455080
View all HP P3015d manuals
Add to My Manuals
Save this manual to your list of manuals |
Page 34 highlights
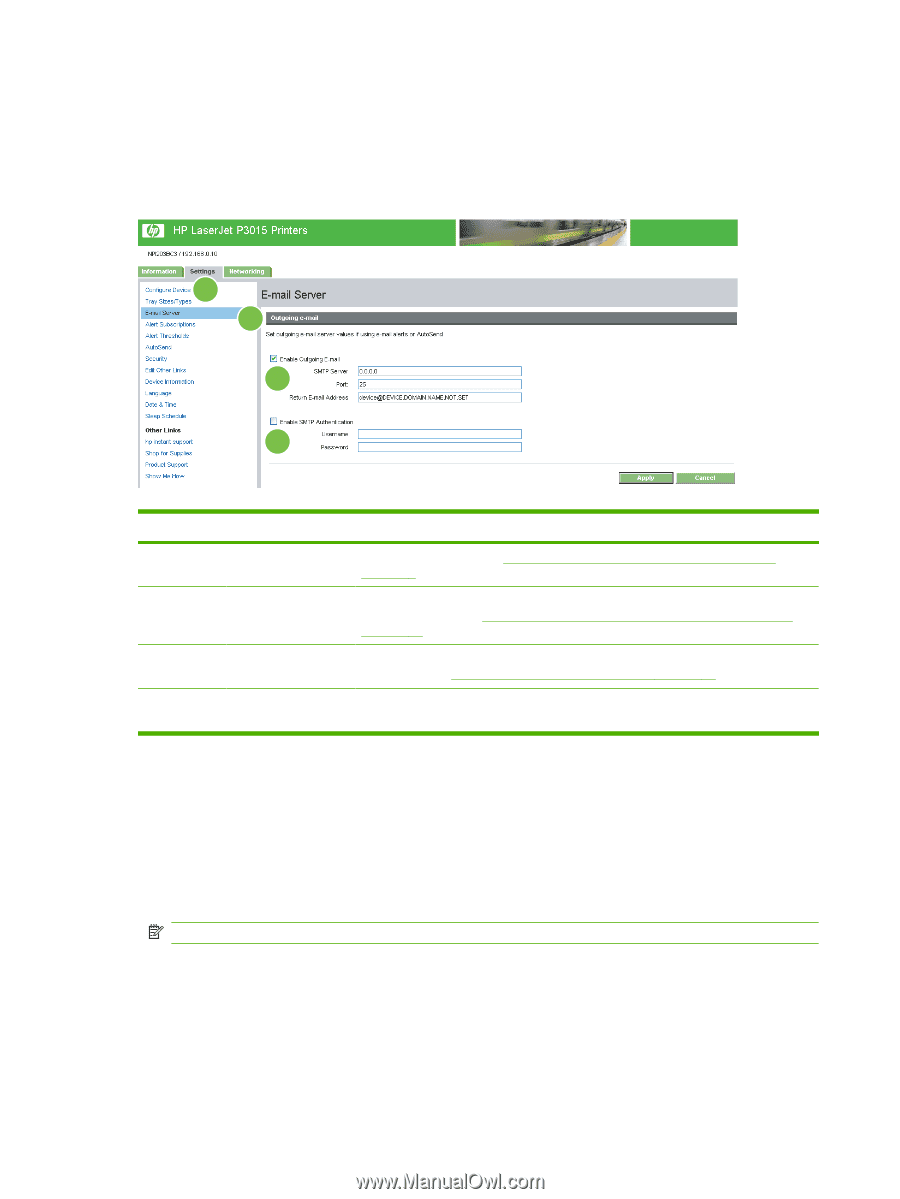
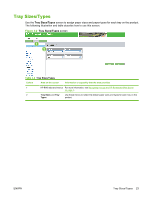
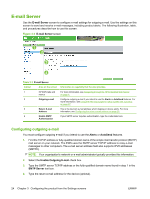
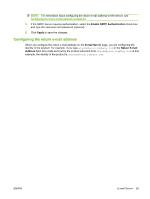
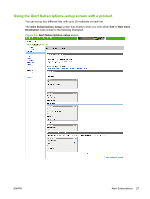
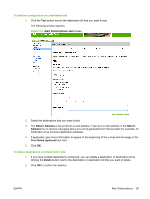
E-mail Server Use the E-mail Server screen to configure e-mail settings for outgoing e-mail. Use the settings on this screen to send and receive e-mail messages, including product alerts. The following illustration, table, and procedures describe how to use this screen. Figure 3-3 E-mail Server screen 1 2 3 4 Table 3-3 E-mail Server Callout Area on the screen Information or capability that the area provides 1 HP EWS tabs and For more information, see Navigating through the HP Embedded Web Server menus on page 4. 2 Outgoing e-mail Configure outgoing e-mail if you intend to use the Alerts or AutoSend features. For more information, see Using the Alert Subscriptions-setup screen with a product on page 27. 3 Return E-mail This is the device's e-mail address which displays in device alerts. For more Address information, see Configuring the return e-mail address on page 25. 4 Enable SMTP If your SMTP server requires authentication, type the credentials here. Authentication Configuring outgoing e-mail You must configure outgoing e-mail if you intend to use the Alerts or AutoSend features. 1. Find the TCP/IP address or fully-qualified domain name of the simple mail transfer protocol (SMTP) mail server on your network. The EWS uses the SMTP server TCP/IP address to relay e-mail messages to other computers. The e-mail server address field also supports IPV6 addresses (SMTP6). NOTE: Your organization's network or e-mail administrator typically provides this information. 2. Select the Enable Outgoing E-mail check box. 3. Type the SMTP server TCP/IP address or the fully-qualified domain name found in step 1 in the SMTP Server text box. 4. Type the return e-mail address for the device (optional). 24 Chapter 3 Configuring the product from the Settings screens ENWW
-
 1
1 -
2
-
3
-
4
-
5
-
6
-
7
-
8
-
9
-
10
-
11
-
12
-
13
-
14
-
15
-
16
-
17
-
18
-
19
-
20
-
21
-
22
-
23
-
24
-
25
-
26
-
27
-
28
-
 29
29 -
 30
30 -
 31
31 -
 32
32 -
 33
33 -
 34
34 -
 35
35 -
 36
36 -
 37
37 -
 38
38 -
 39
39 -
40
-
41
-
42
-
43
-
44
-
45
-
46
-
47
-
48
-
49
-
50
-
51
-
52
-
53
-
54
-
55
-
56
-
57
-
58
-
59
-
60
-
61
-
62
-
63
-
64
-
65
-
66
-
67
-
68
-
69
-
70
-
71
-
72
-
73
-
74
 |
 |