HP PSC 2100 HP PSC 2100 Series all-in-one - (English) Windows Setup Poster - Page 1
HP PSC 2100 - All-in-One Printer Manual
 |
View all HP PSC 2100 manuals
Add to My Manuals
Save this manual to your list of manuals |
Page 1 highlights
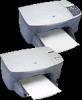
hp psc 2100 series all-in-one Windows setup poster/Poster d'installation Windows Make sure you are using the correct side of the poster. Windows users: Follow the steps in order. Do not connect the USB cable until instructed to do so. See your box for exact contents and system requirements. Assurez-vous que vous utilisez la face appropriée du poster. Utilisateurs Windows : Suivez les différentes étapes selon l'ordre indiqué. Ne branchez pas le câble USB tant que vous n'y êtes pas invité. Reportez-vous au carton d'emballage pour connaître le contenu exact et la configuration système. 1 Install the software first Installez d'abord le logiciel a Turn your PC on. b You must wait for the Windows desktop to appear, and then insert the HP PSC disc. Windows desktop Bureau Windows a Mettez votre PC sous tension. b Attendez que le bureau Windows apparaisse puis insérez la disquette HP PSC. After three minutes, the screen to the right should appear. (You may also see screens related to the minimum requirements or system cleanup. Follow the onscreen instructions, and then continue with the poster.) If nothing happens, go to the Windows task bar, click Start, and then choose Run. In the Run dialog box type d:\setup.exe (d= your PC's CD ROM driver letter). Après trois minutes, l'écran de droite doit apparaître. (D'autres écrans liés à la configuration système minimale ou au nettoyage du système peuvent apparaître également. Suivez les instructions en ligne puis poursuivez l'installation comme indiqué sur le poster.) Si rien ne s'affiche, allez dans la barre des tâches Windows, cliquez sur Démarrer puis sur Exécuter. Dans la boîte de dialogue Exécuter, tapez d:\setup.exe (d correspond à la lettre du pilote CD-ROM de votre PC). a Follow the onscreen instructions until you see the Plug in the Device Now screen. b Go to step 2. a Suivez les instructions en ligne jusqu'à l'apparition de l'écran Plug in the Device now. b Passez à l'étape 2. 2 Attach the cover Installez le couvercle a b a Insert the bottom tabs of the cover into the slots on the unit. b Tilt the cover down and press firmly. Make sure the tabs lock into place and the cover is even with the unit. 3 Remove output tray and load paper Retirez le bac de sortie et placez-y du papier Use plain white paper to prepare for print alignment. Utilisez du papier blanc ordinaire pour préparer l'alignement de l'impression. a Insérez les taquets inférieurs du couvercle dans les emplacements prévus sur l'unité. b Inclinez le couvercle vers le bas et appuyez fermement. Assurez-vous que les 1 taquets sont bien en place et que le couvercle s'intègre parfaitement à l'unité. 2 3 4 5 6 7 4 Connect the USB cable Connectez le câble USB 5 Connect the power cord Branchez le cordon d'alimentation Make sure you have completed step 1 before this step. Assurez-vous d'avoir correctement procédé à l'étape 1 avant de passer à cette étape. 6 Turn on your hp psc Mettez votre HP PSC sous tension 7 Set language and country/region Définissez la langue et le pays ou la région a Press the right arrow key to scroll through the languages. Press Enter to confirm your selection. b Press the right arrow key to scroll through the countries. Press Enter to confirm your selection. a Appuyez sur la flèche orientée vers la droite pour faire défiler les langues disponibles. Appuyez sur Entrée pour confirmer votre choix. b Appuyez sur la flèche orientée vers la droite pour faire défiler les pays disponibles. Appuyez sur Entrée pour confirmer votre choix. 8 Insert and align the print cartridges Insérez et alignez les cartouches d'impression Make sure to remove any packing material from inside the unit. latches loquets Assurez-vous d'avoir ôté tout élément servant à emballer et protéger l'appareil à l'intérieur de l'unité. label étiquette c a e b a Lift the print carriage door up until it catches. Wait for the print carriage to move to the center. Lift the blue and gray latches. a Soulevez la porte d'accès au chariot d'impression. Attendez que le chariot d'impression se place vers le centre de l'appareil. Soulevez les loquets bleu et gris. b Remove the bright pink tape from the print cartridges. Do not touch the gold-colored contacts. b Retirez le ruban adhésif rose des cartouches d'impression. Ne touchez pas les contacts en cuivre. d c Hold the black print cartridge with the label on top. Slide the cartridge into the right(gray) side of the print carriage. d Hold the tri-color print cartridge with the label on top. Slide the cartridge into the left(blue) side of the print carriage. c Placez la cartouche d'impression noir, étiquette vers le haut. Faites-la glisser dans le compartiment de droite (gris) du chariot d'impression. d Placez la cartouche d'impression trichromique, étiquette vers le haut. Faites-la glisser dans le compartiment de gauche (bleu) du chariot d'impression. e Pull the end of the gray latch toward you, press down until it stops, and then release. Make sure the latch catches below the bottom tabs. Repeat with blue latch. e Tirez le bout du loquet gris dans votre direction, appuyez fermement jusqu'à ce qu'il soit bloqué, puis relâchez-le. Assurez-vous que le loquet est bien accroché au taquet inférieur. Effectuez la même opération avec le loquet bleu. g f f Make sure both latches are locked into position. Close the door. f Assurez-vous que les deux loquets sont bien enclenchés. Fermez la porte du chariot. g Press Enter to begin alignment. Two pages print. Follow the instructions on the text page. Place the pattern page on the glass, and then press Enter. g Appuyez sur Entrée pour commencer l'alignement. Deux pages s'impriment. Suivez les instructions de la première page [texte]. Placez la seconde page [motif] sur la vitre puis appuyez sur Entrée. 9 Finish software setup Fin de l'installation du logiciel Make sure the Device Setup complete screen appears. If you do not see this screen, check the reference guide for troubleshooting setup. The software may prompt you to restart. Note: You can adjust the view angle on the display. See the reference guide for details. Assurez-vous que l'ensemble de l'écran d'installation du périphérique s'affiche. Si vous ne voyez pas cet écran, consultez le guide de référence pour l'installation du dépannage. Le logiciel peut vous demander de relancer votre ordinateur. Remarque : Vous pouvez ajuster l'angle de vue sur l'écran. Consultez le guide de référence pour plus de détails. 10 Try your new HP PSC Vous pouvez essayer votre nouveau HP PSC What's next? Take the product tour. Use the Director. Check the reference guide for other ways to get started with your HP PSC. Remember to fill out the product registration. Quelles sont les prochaines étapes ? Effectuez la visite guidée Utilisez le Directeur. Consultez le guide de référence pour connaître les différentes façons de démarrer votre HP PSC. N'oubliez pas de remplir la fiche produit. www.officejetsupport.com Copyright Hewlett-Packard Company 2002 printed in USA, Mexico, Germany and Singapore.
-
 1
1
 |
 |