HP Pavilion 24-a100 Memory Module Replacement Instructions 1 - Page 2
Remove the five Phillips screws that secure the system
 |
View all HP Pavilion 24-a100 manuals
Add to My Manuals
Save this manual to your list of manuals |
Page 2 highlights
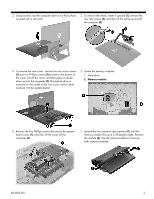
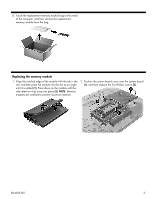
2. Using caution, lay the computer down on a flat surface covered with a soft cloth. 3. To remove the stand, rotate it upward (1), remove the four hex screws (2), and then lift the stand up and off the computer (3). 4. To remove the rear cover, remove the two screw covers (1) and two Phillips screws (2) located in the bottom of the cover. Lift off the cover, and then place it upside down next to the computer (3). The optical drive is mounted on the inside of the rear cover, and a cable connects it to the system board. 5. Locate the memory modules: 1. Hard drive 2. Memory modules 6. Remove the five Phillips screws that secure the system board cover (1), and then lift the cover off the computer (2). 7. Spread the two retention clips outward (1) until the memory module tilts up at a 45-degree angle. Remove the module (2). Use the same procedure to remove both memory modules. 854285-001 2
-
 1
1 -
 2
2 -
 3
3 -
 4
4
 |
 |
