HP Pavilion t100 HP Pavilion Desktop PCs - (English) Upgrading and Servicing G
HP Pavilion t100 - Desktop PC Manual
 |
View all HP Pavilion t100 manuals
Add to My Manuals
Save this manual to your list of manuals |
HP Pavilion t100 manual content summary:
- HP Pavilion t100 | HP Pavilion Desktop PCs - (English) Upgrading and Servicing G - Page 1
hp pavilion home pc upgrading and servicing the pc - HP Pavilion t100 | HP Pavilion Desktop PCs - (English) Upgrading and Servicing G - Page 2
any kind with regard to this material, including, but not limited to, the implied warranties of merchantability and fitness for a particular purpose. HP shall not be liable for errors contained herein or for incidental or consequential damages in connection with the furnishing, performance, or use - HP Pavilion t100 | HP Pavilion Desktop PCs - (English) Upgrading and Servicing G - Page 3
26 Add-In Cards 27 Removing an Add-In Card 28 Installing an Add-In Card 29 Replacing the Battery 30 Index 31 Upgrading and Servicing the PC iii - HP Pavilion t100 | HP Pavilion Desktop PCs - (English) Upgrading and Servicing G - Page 4
iv HP Pavilion home PC - HP Pavilion t100 | HP Pavilion Desktop PCs - (English) Upgrading and Servicing G - Page 5
before plugging your PC into an AC power outlet. Install the computer near an AC outlet. The AC power cord is your HP Pavilion PC's main AC have a qualified person repair or replace it. All other components are user-serviceable. Electrostatic discharge (ESD) can damage disk drives, add-in cards, and - HP Pavilion t100 | HP Pavilion Desktop PCs - (English) Upgrading and Servicing G - Page 6
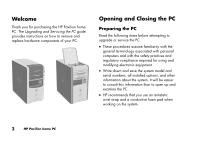
for purchasing the HP Pavilion home PC. The Upgrading and Servicing the PC guide provides instructions on how to remove and replace hardware components of your PC. Opening and Closing the PC Preparing the PC Read the following items before attempting to upgrade or service the PC: These procedures - HP Pavilion t100 | HP Pavilion Desktop PCs - (English) Upgrading and Servicing G - Page 7
the power cord and all other attached cables (such as the keyboard, mouse, and monitor). 2 Reconnect the modem/telephone cable. 3 Turn on the PC and all peripherals. 4 If you installed an add-in card, install any software drivers supplied by the card manufacturer. Upgrading and Servicing the PC 3 - HP Pavilion t100 | HP Pavilion Desktop PCs - (English) Upgrading and Servicing G - Page 8
Removing the Side Panel 1 See "Before Opening the PC" on page 3. 2 Loosen the two thumbscrews on the right side of the back panel. The first time you loosen these it aside. Note: You do not need to remove the other side panel to replace the hardware listed in this guide. 4 HP Pavilion home PC - HP Pavilion t100 | HP Pavilion Desktop PCs - (English) Upgrading and Servicing G - Page 9
the side panel forward on the frame until it locks into place, and then tighten the thumbscrews on the side panel. 3 See "After Closing the PC" on page 3. Upgrading and Servicing the PC 5 - HP Pavilion t100 | HP Pavilion Desktop PCs - (English) Upgrading and Servicing G - Page 10
Locating Components Inside the PC A Upper optical drive bay A B Lower optical drive bay B C Diskette (Floppy) drive C D D 6-In-1 memory card reader (may not disk drive H I G Expansion bay for second hard disk drive H Lithium battery I PCI/AGP Add-in card slots 6 HP Pavilion home PC - HP Pavilion t100 | HP Pavilion Desktop PCs - (English) Upgrading and Servicing G - Page 11
away from the center of the chassis. Press the top, the middle, and the bottom tab, and then gently remove the front panel. B A Upgrading and Servicing the PC 7 - HP Pavilion t100 | HP Pavilion Desktop PCs - (English) Upgrading and Servicing G - Page 12
the tab on the bottom of the front panel is inserted into the slot on the bottom of the chassis. 2 Guide the three small tabs (B) on both sides of the front panel into the correct holes, until the panel snaps the release tab points to lock when it is in the lock position. A 8 HP Pavilion home PC - HP Pavilion t100 | HP Pavilion Desktop PCs - (English) Upgrading and Servicing G - Page 13
XP Home Edition operating system. Also, make sure you have the correct software and drivers for the optical drive to work with the operating system. Your PC model may come with: One or two optical drives (CD, DVD, CD- an expansion bay for a second hard disk drive. Upgrading and Servicing the PC 9 - HP Pavilion t100 | HP Pavilion Desktop PCs - (English) Upgrading and Servicing G - Page 14
with all models) D E E Memory sockets F F Primary hard disk drive G G Expansion bay for second hard disk H drive I H Lithium battery I PCI/AGP Add-in card slots 10 HP Pavilion home PC - HP Pavilion t100 | HP Pavilion Desktop PCs - (English) Upgrading and Servicing G - Page 15
out through the front of the PC (D). D 2 Remove the front panel. See page 7. 3 Gently lay the PC on its side. 4 Pull Push the drive partway out through the front of C the PC (D). 5 Make a note of each cable and plug orientation PC models may have a sound cable. If so, disconnect the sound - HP Pavilion t100 | HP Pavilion Desktop PCs - (English) Upgrading and Servicing G - Page 16
tabs on each side of the drive cover, and then pulling it toward you and out of the PC. 4 Make sure the jumper on the new drive is in the CS (Cable Select) position. cable to the back of the optical drive. Some PC models may have a sound cable. If so, connect the sound cable. 12 HP Pavilion home PC - HP Pavilion t100 | HP Pavilion Desktop PCs - (English) Upgrading and Servicing G - Page 17
drive fits properly into the HP Pavilion, be sure to purchase the replacement diskette drive from HP. Refer to the Support Guide for the telephone number of the HP Customer Care Center. 8 Replace the front panel. See page 8. 9 Replace the side panel. See page 5. Upgrading and Servicing the PC 13 - HP Pavilion t100 | HP Pavilion Desktop PCs - (English) Upgrading and Servicing G - Page 18
card reader drive or the diskette drive: 1 Remove the side panel that has thumbscrews. See page 4. 2 Gently lay the PC on its side. 3 Make a note of each cable attached to the drive you want to replace. 4 Push down on attached to the back of the drives in the drive cage. 14 HP Pavilion home PC F E - HP Pavilion t100 | HP Pavilion Desktop PCs - (English) Upgrading and Servicing G - Page 19
(Floppy) Drive" on page 13. 2 Slide the replacement drive into the drive cage until the two screw holes on each side are aligned. Upgrading and Servicing the PC 15 - HP Pavilion t100 | HP Pavilion Desktop PCs - (English) Upgrading and Servicing G - Page 20
optical drive bracket. Slide the latches into the four holes on the drive cage, pushing the drive E cage forward until it snaps into place. 16 HP Pavilion home PC - HP Pavilion t100 | HP Pavilion Desktop PCs - (English) Upgrading and Servicing G - Page 21
the preinstalled hard drive: 1 Remove the side panel that has thumbscrews. See page 4. 2 Gently lay the PC on its side. 3 Make a note of each cable attached to the hard drive before removing the cables. Remove then pull it out of the hard drive bracket (J). H J Upgrading and Servicing the PC 17 - HP Pavilion t100 | HP Pavilion Desktop PCs - (English) Upgrading and Servicing G - Page 22
the hard drive until it snaps into place (K). 3 Push the release tab on the top of the hard drive bracket into the locked position (L). L 18 HP Pavilion home PC - HP Pavilion t100 | HP Pavilion Desktop PCs - (English) Upgrading and Servicing G - Page 23
hard drive, make sure the IDE cable labeled Slave is connected to the second hard drive. If the IDE cable is not connected correctly, the PC will not be able to locate the hard drives and data may be lost. 5 Replace the side panel. See page 5. MASTER SLAVE To CPU Upgrading - HP Pavilion t100 | HP Pavilion Desktop PCs - (English) Upgrading and Servicing G - Page 24
the side panel. See page 4. 2 Remove the front panel. See page 7. 3 Gently lay the PC on its side. 4 See "Removing the Preinstalled Hard Drive" on page 17. Note: You do regular 6/32 Phillips screws (not included with your PC) to secure the hard drive to the front of the PC. 20 HP Pavilion home PC - HP Pavilion t100 | HP Pavilion Desktop PCs - (English) Upgrading and Servicing G - Page 25
hard drive, make sure the IDE cable labeled Slave is connected to the second hard drive. If the IDE cable is not connected correctly, the PC will not be able to locate the hard drives and data may be lost. MASTER SLAVE To CPU Upgrading and - HP Pavilion t100 | HP Pavilion Desktop PCs - (English) Upgrading and Servicing G - Page 26
bracket (R). 14 Replace the preinstalled hard drive. See page 18. 15 Replace the front panel. See page 8. Q 16 Replace the side panel. See page 5. 22 HP Pavilion home PC - HP Pavilion t100 | HP Pavilion Desktop PCs - (English) Upgrading and Servicing G - Page 27
1 Remove the side panel. See page 4. 2 Remove the front panel. See page 7. 3 Gently lay the PC on its side. 4 See "Removing the Preinstalled Hard Drive" on page 17. Note: You do not need to front of the chassis (P). Pull the hard drive out of the chassis. N O P Upgrading and Servicing the PC 23 - HP Pavilion t100 | HP Pavilion Desktop PCs - (English) Upgrading and Servicing G - Page 28
arrow to the right of the drop-down list, and then click the support & drivers link. 5 Click HP technical support. 6 Search for your PC model number, and then search for "upgrading memory" to find out your : Using the wrong type of memory module could damage the system. 24 HP Pavilion home PC - HP Pavilion t100 | HP Pavilion Desktop PCs - (English) Upgrading and Servicing G - Page 29
must be 184-pin unbuffered DDR SDRAM (double data rate synchronous dynamic random access memory). The HP Pavilion ships with one or more memory modules, but you can replace the existing memory modules with the socket. Store it in its antistatic packaging. Upgrading and Servicing the PC 25 - HP Pavilion t100 | HP Pavilion Desktop PCs - (English) Upgrading and Servicing G - Page 30
the notches with the bumps. Warning: Do not pull the memory module out of the socket. Use the retaining clips to eject the module. 26 HP Pavilion home PC - HP Pavilion t100 | HP Pavilion Desktop PCs - (English) Upgrading and Servicing G - Page 31
At some point, you may want to add a PCI or an AGP card to the PC to accommodate a new component, such as a scanner, or to upgrade an existing card designed to provide 2 amps (average) of +5 V power for each board/card in the PC. The total +5 V current draw in a fully loaded system (one with all add- - HP Pavilion t100 | HP Pavilion Desktop PCs - (English) Upgrading and Servicing G - Page 32
Removing an Add-In Card 1 Remove the side panel that has thumbscrews. See page 4. 2 Gently lay the PC on its side. 3 To prepare an empty card slot for a new card, loosen the screw of the of the expansion slot. Warning: Be careful of the sharp edges on the expansion slot cover. 28 HP Pavilion home PC - HP Pavilion t100 | HP Pavilion Desktop PCs - (English) Upgrading and Servicing G - Page 33
: If the new card or device isn't working, read through the card manufacturer's installation instructions, and recheck all connections, including those to the card, power supply, keyboard, and monitor. If the problem still exists, run the BIOS setup program and load the default settings, and then - HP Pavilion t100 | HP Pavilion Desktop PCs - (English) Upgrading and Servicing G - Page 34
. Discard used batteries according to the manufacturer's instructions. To replace the battery: 1 Remove the side panel that has the thumbscrews. See page 4. 2 Gently lay the PC on its side. 3 Remove any cabling, battery in the socket, with the positive (+) side facing up. 30 HP Pavilion home PC - HP Pavilion t100 | HP Pavilion Desktop PCs - (English) Upgrading and Servicing G - Page 35
reader installing, 15 locating, 9 removing, 13 A add-in cards installing, 27, 29 removing, 28 troubleshooting, 29 AGP cards, adding, 27 B battery replacing, 30 type, 30 C Cable Select jumper setting L locating 6-In-1 memory card reader, 9 drives, 9 expansion bay, 9 Upgrading and Servicing the PC 31 - HP Pavilion t100 | HP Pavilion Desktop PCs - (English) Upgrading and Servicing G - Page 36
drives. See installing front panel, 8 side panels, 5 S side panels removing, 4 replacing, 5 T troubleshooting add-in cards, 29 W warnings add-in cards, 27 operating PC with cover off, 1 power safety, 1 removing memory module, 26 removing PC cover, 2 voltage setting, 1 32 HP Pavilion home PC
-
 1
1 -
 2
2 -
 3
3 -
 4
4 -
 5
5 -
 6
6 -
 7
7 -
8
-
9
-
10
-
11
-
12
-
13
-
14
-
15
-
16
-
17
-
18
-
19
-
20
-
21
-
22
-
23
-
24
-
25
-
26
-
27
-
28
-
29
-
30
-
31
-
32
-
33
-
34
-
35
-
36
 |
 |

hp
pavilion home pc
upgrading and
servicing the pc