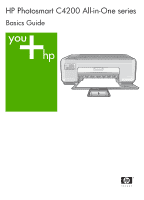
HP Photosmart C4200 Basics Guide
HP Photosmart C4200 - All-in-One Printer Manual
 |
View all HP Photosmart C4200 manuals
Add to My Manuals
Save this manual to your list of manuals |
HP Photosmart C4200 manual content summary:
- HP Photosmart C4200 | Basics Guide - Page 1
HP Photosmart C4200 All-in-One series Basics Guide - HP Photosmart C4200 | Basics Guide - Page 2
such products and services. Nothing herein should be construed as constituting an additional warranty. HP shall not be liable for technical or editorial errors or omissions contained herein. © 2007 Hewlett-Packard Development Company, L.P. Windows, Windows 2000, and Windows XP are U.S. registered - HP Photosmart C4200 | Basics Guide - Page 3
and load paper...4 Avoid paper jams...5 Make a copy...6 Scan an image...6 Print 10 x 15 cm (4 x 6 inch) photos 6 Replace the print cartridges...7 Clean the HP All-in-One...10 Clean the glass...10 Clean the lid backing...10 2 Troubleshooting and support Uninstall and reinstall the software 12 - HP Photosmart C4200 | Basics Guide - Page 4
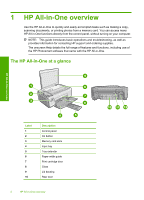
guide introduces basic operations and troubleshooting, as well as provides information for contacting HP support and ordering supplies. The onscreen Help details the full range of features and functions, including use of the HP Photosmart software that came with the HP All-in-One. The HP All-in-One - HP Photosmart C4200 | Basics Guide - Page 5
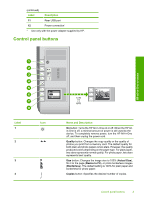
) Label Description 11 Rear USB port 12 Power connection* * Use only with the power adapter supplied by HP. Control panel buttons HP All-in-One overview Label 1 2 3 4 Icon Name and Description On button: Turns the HP All-in-One on or off. When the HP Allin-One is off, a minimal amount - HP Photosmart C4200 | Basics Guide - Page 6
The Setup Guide provides instructions for setting up the HP All-in-One and installing software. Make sure you follow the steps in the Setup Guide in order. If you have problems during setup, see Troubleshooting in the last section of the Setup Guide, or see "Troubleshooting and support" on page 12 - HP Photosmart C4200 | Basics Guide - Page 7
. Do not overload the input tray; make sure the stack of paper fits within the input tray and is no higher than the top of the paper-width guide. Avoid paper jams To help avoid paper jams, follow these guidelines. • Remove printed papers from the output tray frequently. • Prevent curled or wrinkled - HP Photosmart C4200 | Basics Guide - Page 8
of the HP All-in-One to a computer. To use the scan features, the HP All-in-One and computer must be connected and turned on. The HP Photosmart Software must also be installed and running on your computer prior to scanning. To verify that the HP Photosmart Software is running on a Windows computer - HP Photosmart C4200 | Basics Guide - Page 9
cartridges. Following these instructions might also help solve print quality issues related to the cartridges. NOTE: When the ink level for the print cartridge is low, a message appears on your computer screen. You can also check the ink levels by using the software installed with the HP All-in-One - HP Photosmart C4200 | Basics Guide - Page 10
on the right. HP All-in-One overview 1 Print cartridge slot for the tri-color print cartridge 2 Print cartridge slot for the black and photo print cartridges 5. Pull the print cartridge toward you out of its slot. 6. If you are removing the black print cartridge in order to install the photo print - HP Photosmart C4200 | Basics Guide - Page 11
HP All-in-One overview 1 Copper-colored contacts 2 Plastic tape with pink pull tab (must be removed before installing) 3 Ink nozzles under tape CAUTION: Do not touch the copper-colored contacts or ink nozzles. Touching these parts can result in clogs, ink failure, and bad electrical connections. 8. - HP Photosmart C4200 | Basics Guide - Page 12
in the input tray when you align the print cartridges, the alignment will fail. Load unused plain white paper into the input tray, and then try the alignment again. 11. Place the page print side down on the scanner glass and then press the button next to OK to scan the page. When the On button stops - HP Photosmart C4200 | Basics Guide - Page 13
the backing thoroughly with a damp cloth to remove any residual alcohol. CAUTION: Be careful not to spill alcohol on the glass or exterior of the HP Allin-One, as this might damage the device. 5. Plug in the power cord, and then turn on the - HP Photosmart C4200 | Basics Guide - Page 14
shows the essential icons (Scan Picture and Scan Document), the software has been properly installed. Hardware setup troubleshooting Use this section to solve any problems you might encounter while setting up the HP All-in-One hardware. Troubleshooting and support 12 Troubleshooting and support - HP Photosmart C4200 | Basics Guide - Page 15
installation, do not plug in the USB cable until prompted by the onscreen instructions. Once you have installed the software, connecting your computer to the HP All-in-One with a USB cable is straightforward. Simply plug one end of the USB cable into the back of your Hardware setup troubleshooting - HP Photosmart C4200 | Basics Guide - Page 16
the back of the HP All-in-One. You can connect to any USB port on the back of your computer. Troubleshooting and support For more information on installing the software and connecting the USB cable, see the Setup Guide that came with the HP All-in-One. The HP All-in-One does not print Solution - HP Photosmart C4200 | Basics Guide - Page 17
, remove and then install the software you installed with the HP All-in-One again. For more information on setting up the HP All-in-One and connecting it to your computer, see the Setup Guide that came with the HP All-in-One. Clear paper jams If the HP All-in-One has a paper jam, first check the - HP Photosmart C4200 | Basics Guide - Page 18
online support specialists • Software and driver updates for the HP All-in-One • Valuable HP All-in-One and troubleshooting information for common problems • Proactive device updates, support alerts, and HP newsgrams that are available when you register the HP All-in-One 3. Call HP support. Support - HP Photosmart C4200 | Basics Guide - Page 19
the HP Web site at www.hp.com/support. Paper specifications • Input tray capacity: Plain paper sheets: Up to 100 (20 lb./75 gsm. paper) • Output tray capacity: Plain paper sheets: Up to 50 (20 lb./75 gsm. paper) NOTE: For a complete list of supported media sizes, see the printer software. Physical - HP Photosmart C4200 | Basics Guide - Page 20
assigned a Regulatory Model Number. The Regulatory Model Number for your product is SNPRB-0721. This regulatory number should not be confused with the marketing name (HP Photosmart C4200 All-in-One series, etc.) or product numbers (CC200A, etc.). Technical information 18 Technical information - HP Photosmart C4200 | Basics Guide - Page 21
Warranty Warranty 19 Technical information - HP Photosmart C4200 | Basics Guide - Page 22
Chapter 3 Technical information 20 Technical information - HP Photosmart C4200 | Basics Guide - Page 23
-
 1
1 -
 2
2 -
 3
3 -
 4
4 -
 5
5 -
 6
6 -
 7
7 -
8
-
9
-
10
-
11
-
12
-
13
-
14
-
15
-
16
-
17
-
18
-
19
-
20
-
21
-
22
-
23
 |
 |

HP Photosmart C4200 All-in-One series
Basics Guide