HP Photosmart C6100 Setup Guide
HP Photosmart C6100 - All-in-One Printer Manual
 |
View all HP Photosmart C6100 manuals
Add to My Manuals
Save this manual to your list of manuals |
HP Photosmart C6100 manual content summary:
- HP Photosmart C6100 | Setup Guide - Page 1
(10 x 15 cm) photo paper USB cable* Mac CD adapter control panel faceplate (may be pre-attached) Documentation CD This CD may be included for some languages where help is not available through the software. power cord ink cartridges phone cord HP Photosmart C6100 All-in-One series Setup Guide - HP Photosmart C6100 | Setup Guide - Page 2
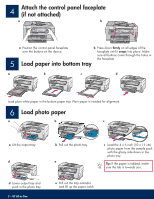
on all edges of the over the buttons on the device. faceplate until it snaps into place. Make sure b Pull out the photo tray. e c Load the 4 x 6 inch (10 x 15 cm) photo paper from the sample pack with the glossy side down in HP All-in-One e Pull out the tray extender and lift up the paper catch. - HP Photosmart C6100 | Setup Guide - Page 3
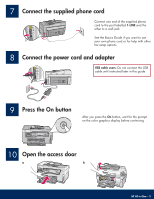
phone cord Connect one end of the supplied phone cord to the port labelled 1-LINE and the other to a wall jack. See the Basics Guide if you want adapter USB cable users: Do not connect the USB cable until instructed later in this guide. 9 Press the On button After you press the On button, - HP Photosmart C6100 | Setup Guide - Page 4
on the left. Close the latch. b Repeat with each of the color ink cartridges. b c Make sure each latch is secure. Note: Use only the ink cartridges that came with the printer. The ink in these cartridges is specially formulated to mix with the ink in the print head assembly at first-time setup - HP Photosmart C6100 | Setup Guide - Page 5
and then press OK to start the process. The device initializes the ink cartridges and aligns the printer. This takes approximately 5 minutes. CAUTION: Do not disconnect or turn off the b HP All-in-One during this time. You may hear the device making noises. b After the alignment page is printed - HP Photosmart C6100 | Setup Guide - Page 6
. For an Ethernet cable connection, go to Section B (page 9) for instructions. C: Wireless Network 6 • HP All-in-One Use this connection type if you want a wireless (802.11 b or g) connection between the HP All-in-One and your network. Equipment needed: wireless router*. For a wireless network - HP Photosmart C6100 | Setup Guide - Page 7
on your computer, login if necessary, and then wait for the desktop to appear. b Locate the HP All-in-One Mac CD. c Continue to the next page. c Follow the onscreen instructions to install the software. d On the Connection Type screen, make sure to select directly to this computer. Continue to the - HP Photosmart C6100 | Setup Guide - Page 8
USB port on the back of the device. b Double-click the HP All-in-One Installer icon. c Make sure you complete all screens, including the Setup Assistant. b Follow the onscreen instructions to complete the software installation. A3 Congratulations! Go to step 18 of this Setup Guide 8 • HP All-in - HP Photosmart C6100 | Setup Guide - Page 9
of the Ethernet cable to the Ethernet port on the back of the device. d Connect the other end of the Ethernet cable to the router. Important: Your computer and the HP All-in-One must be on the same active, working network. c If you are using a DSL or cable modem, make sure you - HP Photosmart C6100 | Setup Guide - Page 10
through the network. Follow the onscreen instructions. Mac Users: a Turn on your computer, login if necessary, and then wait for the desktop to appear. b Insert the HP All-in-One Mac CD. c Double-click the HP All-in-One installer icon. e Your firewall software may provide prompts on your computer - HP Photosmart C6100 | Setup Guide - Page 11
to your HP device, you supports SecureEasySetup. IMPORTANT: Use this method only if you have previously used SecureEasySetup to setup your network. Otherwise your network settings may be reset problems connecting to the network, see the Basics Guide for additional setup information. HP All-in-One • 11 - HP Photosmart C6100 | Setup Guide - Page 12
in the list, you can enter it manually. Press to highlight Enter New Network Name Troubleshooting on page 15. Note: If your router provides 4 WEP keys, make sure you use the first one HP Photosmart C6100 All-in-One series Basics Guide If you have problems connecting to the network, see the Basics - HP Photosmart C6100 | Setup Guide - Page 13
for the desktop to appear. b Insert the HP All-in-One Windows CD Mac Users: a Turn on your computer, login if HP logo, and then double-click setup.exe. b Insert the HP All-in-One Mac CD. c Double-click the HP All-in-One installer icon. c Follow the onscreen instructions to install the software - HP Photosmart C6100 | Setup Guide - Page 14
correct HP All-in-One CD for each installation. Follow the onscreen instructions. Make sure that you choose the connection types between the network and your HP All-in-One (not between your computer and the network). 17 Go to step 18 at the back of this setup guide Troubleshooting Problem: A Paper - HP Photosmart C6100 | Setup Guide - Page 15
hp.com/support. Enter Photosmart C6100, and then search for Network Setup. Problem: You are trying to set up a wireless connection through the control panel, and the HP All-in-One Wizard. HP Photosmart C6100 All-in-One series Basics Guide See the Basics Guide for more troubleshooting and - HP Photosmart C6100 | Setup Guide - Page 16
slot and press the Photosmart Express button. The Photosmart Express menu appears on the One makes a print of the photo on your memory card. Tip: To learn about printing photos from memory cards, and other features, see the User Guide and online help. For additional help, see www.hp.com/support
-
 1
1 -
 2
2 -
 3
3 -
 4
4 -
 5
5 -
 6
6 -
 7
7 -
8
-
9
-
10
-
11
-
12
-
13
-
14
-
15
-
16
 |
 |
1
2
3
* May need to be purchased
separately.
*
*
Basics Guide
HP Photosmart C6100 All-in-One series
a
b
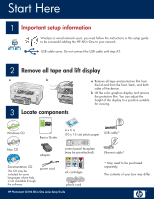
Start Here
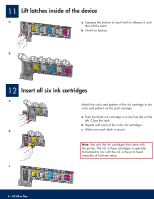
USB cable users: Do not connect the USB cable until step A2.
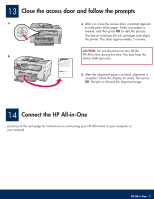
Remove all tape and lift display
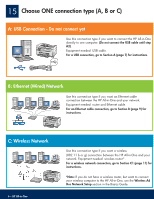
Locate components
Wireless or wired network users: you must follow the instructions in this setup guide
to be successful adding the HP All-in-One to your network.
HP Photosmart C6100 All-in-One series Setup Guide
a
Remove all tape and protective film from
the lid and from the front, back, and both
sides of the device.
b
Lift the color graphics display and remove
the protective film. You can adjust the
height of the display to a position suitable
for viewing.
The contents of your box may differ.
4 x 6 in
(10 x 15 cm) photo paper
Mac CD
Windows CD
Basics Guide
adapter
control panel faceplate
(may be pre-attached)
ink cartridges
power cord
phone cord
Documentation CD
This CD may be
included for some
languages where help
is not available through
the software.
Important setup information
USB cable
Ethernet cable