HP Photosmart C6100 Setup Guide - Page 2
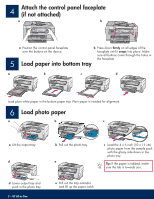
Attach the control panel faceplate, if not attached, Load paper into bottom tray, Load photo paper
 |
View all HP Photosmart C6100 manuals
Add to My Manuals
Save this manual to your list of manuals |
Page 2 highlights
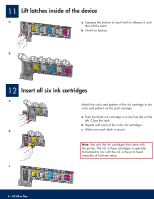
4 Attach the control panel faceplate (if not attached) a b a Position the control panel faceplate b Press down firmly on all edges of the over the buttons on the device. faceplate until it snaps into place. Make sure all buttons come through the holes in the faceplate. 5 Load paper into bottom tray a b c d Load plain white paper in the bottom paper tray. Plain paper is needed for alignment. 6 Load photo paper a b c a Lift the output tray. d b Pull out the photo tray. e c Load the 4 x 6 inch (10 x 15 cm) photo paper from the sample pack with the glossy side down in the photo tray. Tip: If the paper is tabbed, make sure the tab is towards you. d Lower output tray and push in the photo tray. 2 • HP All-in-One e Pull out the tray extender and lift up the paper catch.
-
 1
1 -
 2
2 -
 3
3 -
 4
4 -
 5
5 -
 6
6 -
 7
7 -
 8
8 -
9
-
10
-
11
-
12
-
13
-
14
-
15
-
16
 |
 |
