HP Photosmart E217 Quick Start Guide
HP Photosmart E217 Manual
 |
View all HP Photosmart E217 manuals
Add to My Manuals
Save this manual to your list of manuals |
HP Photosmart E217 manual content summary:
- HP Photosmart E217 | Quick Start Guide - Page 1
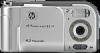
English Lee_Jackie_QSG_e_ok.fm Page 1 Tuesday, March 29, 2005 1:22 PM HP Photosmart E217/E317 Digital Camera Quick Start Guide 1 - HP Photosmart E217 | Quick Start Guide - Page 2
/environment/recycle/index.html For future reference, please enter the following information: Model Number (on the front of the camera) Serial Number (10-digit number on the bottom of the camera) Date the camera was purchased Printed in China 2 HP Photosmart E217/E317 Quick Start Guide - HP Photosmart E217 | Quick Start Guide - Page 3
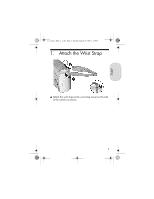
English Lee_Jackie_QSG_e_ok.fm Page 3 Tuesday, March 29, 2005 1:22 PM 1. Attach the Wrist Strap S Attach the wrist strap to the wrist strap mount on the side of the camera as shown. 3 - HP Photosmart E217 | Quick Start Guide - Page 4
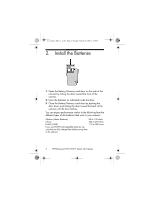
batteries that work in your camera: Alkaline (Starter Batteries) 80 to 130 shots Lithium 260 to 490 shots NiMH (1800) 110 to 280 shots If you use NiMH (rechargeable) batteries, be sure that you fully charge them before using them in the camera. 4 HP Photosmart E217/E317 Quick Start Guide - HP Photosmart E217 | Quick Start Guide - Page 5
on, slide the lens cover open until it clicks, uncovering the lens. The Power/Memory light on the back of the camera turns on solid green. The HP logo also displays on the Image Display as the camera powers up. CAUTION: When sliding the lens cover, keep your fingers clear of the lens. Fingerprints - HP Photosmart E217 | Quick Start Guide - Page 6
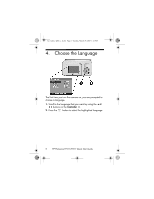
, 2005 1:22 PM 4. Choose the Language The first time you turn the camera on, you are prompted to choose a language. 1. Scroll to the language that you want by using the buttons on the Controller . 2. Press the button to select the highlighted language. 6 HP Photosmart E217/E317 Quick Start Guide - HP Photosmart E217 | Quick Start Guide - Page 7
English Lee_Jackie_QSG_e_ok.fm Page 7 Tuesday, March 29, 2005 1:22 PM 5. Set the Date and Time You are now prompted to set the date and time. 1. The first item highlighted is the date and time format. If you want to change the date and time format, use the buttons. If the date and time format is - HP Photosmart E217 | Quick Start Guide - Page 8
side of the camera. 2. Insert the memory card in the small slot behind the batteries, with the notched side of the card going in first, as shown. Make sure the memory card snaps into place. 3. Close the Battery/Memory card door and turn on the camera. 8 HP Photosmart E217/E317 Quick Start Guide - HP Photosmart E217 | Quick Start Guide - Page 9
appears in the Image Display while the camera is formatting the memory card. When the camera has completed the formatting, the Total Images Summary screen is displayed. To remove the memory card from the camera, first turn the camera off. Then open the Battery/Memory card door, press down on the top - HP Photosmart E217 | Quick Start Guide - Page 10
down to take the picture. The camera beeps after taking the picture. The image appears for several seconds on the Image Display. TIP: Hold the camera with both hands when pressing the Shutter button to reduce camera shake and prevent blurry pictures. 10 HP Photosmart E217/E317 Quick Start Guide - HP Photosmart E217 | Quick Start Guide - Page 11
frame the subject for your picture in the Image Display. 2. To start recording video, press and release the Video button on the top of the camera. 3. To stop recording video, press and release the Video button again; otherwise, the video will continue recording until the - HP Photosmart E217 | Quick Start Guide - Page 12
Lee_Jackie_QSG_e_ok.fm Page 12 Tuesday, March 29, 2005 1:22 PM 9. Review Images and Video Clips You will use Playback to review images and video clips. 1. Press the Live View/Playback button until first frame of the video clip displays for 2 seconds. 12 HP Photosmart E217/E317 Quick Start Guide - HP Photosmart E217 | Quick Start Guide - Page 13
Software The HP Image Zone software allows you to transfer images from the camera, and then view, edit, print, or e-mail them. If you have trouble installing or using the HP Image Zone software, see the HP Customer Support website for more information: www.hp.com/support. Windows To install the HP - HP Photosmart E217 | Quick Start Guide - Page 14
-click the CD icon on the computer desktop. 4. Double-click the installer icon, and then follow the on- screen instructions. 5. When the HP Image Zone software has finished installing, re-enable the virus protection software that you disabled in Step 1. 14 HP Photosmart E217/E317 Quick Start Guide - HP Photosmart E217 | Quick Start Guide - Page 15
29, 2005 1:22 PM 11. Transfer Images to a Computer 1. Turn off the camera, then connect the camera to the computer through the USB cable provided. 2. Turn on the camera. 3. Follow the on-screen instructions to have the software transfer the images from the camera to the computer. 4. Disconnect the - HP Photosmart E217 | Quick Start Guide - Page 16
manual. • For an interactive learning experience (in English) that will guide you through the most-used features of your camera and provide basic digital photography tips, please install and run the Interactive User's Guide program from your software CD. 16 HP Photosmart E217/E317 Quick Start Guide - HP Photosmart E217 | Quick Start Guide - Page 17
Français Lee_Jackie_QSG_fra.fm Page 1 Tuesday, March 29, 2005 11:09 AM Appareil photo numérique HP Photosmart E217/E317 Guide de démarrage 1 - HP Photosmart E217 | Quick Start Guide - Page 18
Hewlett-Packard Development Company, L.P. Les informations contenues dans ce document sont sujettes à modification sans préavis. Les seules garanties pour les produits et les services HP sous l'appareil) Date d'achat de l'appareil photo Imprimé en Chine 2 Guide de démarrage HP Photosmart E217/E317 - HP Photosmart E217 | Quick Start Guide - Page 19
Français Lee_Jackie_QSG_fra.fm Page 3 Tuesday, March 29, 2005 11:09 AM 1. Fixation de la sangle S Fixez la sangle à l'attache prévue à cet effet située sur le côté de l'appareil, comme indiqué. 3 - HP Photosmart E217 | Quick Start Guide - Page 20
chargées avant de les insérer dans l'appareil photo. 80 à 130 prises de vue 260 à 490 prises de vue 110 à 280 prises de vue 4 Guide de démarrage HP Photosmart E217/E317 - HP Photosmart E217 | Quick Start Guide - Page 21
jusqu'à ce qu'il s'enclenche et que l'objectif se déploie. Le voyant Alimentation/Mémoire situé au dos de l'appareil s'allume en vert. Le logo HP s'affiche également à l'écran lors de la mise en marche de l'appareil. ATTENTION : Lorsque vous procédez à ces opérations, évitez de poser les doigts - HP Photosmart E217 | Quick Start Guide - Page 22
, vous êtes invité à choisir une langue. 1. Sélectionnez la langue à l'aide des boutons du Sélecteur . 2. Appuyez sur le bouton en surbrillance. pour activer la langue mise 6 Guide de démarrage HP Photosmart E217/E317 - HP Photosmart E217 | Quick Start Guide - Page 23
Français Lee_Jackie_QSG_fra.fm Page 7 Tuesday, March 29, 2005 11:09 AM 5. Réglage de la date et de l'heure Vous êtes invité à définir la date et l'heure. 1. Le premier élément apparaissant en surbrillance correspond au format de la date et de l'heure. Pour modifier le format de la date et de l' - HP Photosmart E217 | Quick Start Guide - Page 24
en premier, comme illustré. Assurez-vous que la carte mémoire est bien positionnée. 3. Fermez le volet du compartiment des piles/mémoire et allumez l'appareil photo. 8 Guide de démarrage HP Photosmart E217/E317 - HP Photosmart E217 | Quick Start Guide - Page 25
Lee_Jackie_QSG_fra.fm Page 9 Tuesday, March 29, 2005 11:09 AM Pour empêcher la corruption des cartes et des images, vous devez formater les cartes mémoire avant de les utiliser pour la première fois. Pour formater une carte mémoire : 1. Appuyez sur le bouton , puis sur le bouton pour accéder au - HP Photosmart E217 | Quick Start Guide - Page 26
l'écran actif. CONSEIL : Tenez l'appareil photo des deux mains lorsque vous enfoncez le déclencheur, afin de réduire les tremblements et d'éviter les photos floues. 10 Guide de démarrage HP Photosmart E217/E317 - HP Photosmart E217 | Quick Start Guide - Page 27
Français Lee_Jackie_QSG_fra.fm Page 11 Tuesday, March 29, 2005 11:09 AM 8. Enregistrement d'un clip vidéo 1. Appuyez sur le bouton Prévisualisation/Lecture jusqu'à ce que l'icône Prévisualisation apparaisse dans l'angle supérieur gauche de l'écran, puis cadrez le sujet de votre photo à l'aide de - HP Photosmart E217 | Quick Start Guide - Page 28
parcourir vos images et vos La lecture des clips vidéo débute automatiquement après l'affichage de la première image du clip vidéo pendant 2 secondes. 12 Guide de démarrage HP Photosmart E217/E317 - HP Photosmart E217 | Quick Start Guide - Page 29
Web de l'assistance clientèle HP pour plus d'informations : www.hp.com/support. Windows Pour installer le logiciel HP Image Zone, votre ordinateur doit disposer de 64 Mo de mémoire RAM au minimum, être équipé de Windows 2000, XP, 98, 98 SE ou Me et d'Internet Explorer 5.5 Service Pack 2 ou supérieur - HP Photosmart E217 | Quick Start Guide - Page 30
le logiciel HP Image Zone, votre ordinateur Macintosh doit disposer d'un port USB intégré, instructions qui s'affichent à l'écran. 5. Une fois le logiciel HP Image Zone installé, réactivez les logiciels antivirus que vous aviez désactivés à l'étape 1. 14 Guide de démarrage HP Photosmart E217/E317 - HP Photosmart E217 | Quick Start Guide - Page 31
2005 11:09 AM 11. Transfert d'images vers l'ordinateur 1. Eteignez l'appareil photo et connectez-le à l'ordinateur avec le câble USB fourni. 2. Allumez l'appareil photo. 3. Suivez les instructions apparaissant à l'écran pour que le logiciel transfère les images de l'appareil photo vers l'ordinateur - HP Photosmart E217 | Quick Start Guide - Page 32
conseils de base pour la photographie numérique, veuillez installer et exécuter le manuel de l'utilisateur interactif sur le CD-ROM du logiciel. 16 Guide de démarrage HP Photosmart E217/E317 - HP Photosmart E217 | Quick Start Guide - Page 33
Lee_Jackie_QSG.fm Page 1 Tuesday, March 29, 2005 11:29 AM HP Photosmart E217/E317 Fotocamera digitale Guida introduttiva 1 Italiano - HP Photosmart E217 | Quick Start Guide - Page 34
2005 Hewlett-Packard Development Company, LP Le informazioni contenute in questo documento sono soggette a modifica senza preavviso. Le uniche garanzie per i prodotti e i servizi HP sono definite Data di acquisto della fotocamera Stampato in Cina 2 Guida introduttiva di HP Photosmart E217/E317 - HP Photosmart E217 | Quick Start Guide - Page 35
Lee_Jackie_QSG.fm Page 3 Tuesday, March 29, 2005 11:29 AM 1. Fissaggio della cinghietta da polso S Fissare la cinghietta da polso all'apposito attacco sul lato della fotocamera, come mostrato nella figura. 3 Italiano - HP Photosmart E217 | Quick Start Guide - Page 36
NiMH (ricaricabili) Da 110 a 280 scatti Se si utilizzano le batterie NiMH ricaricabili, assicurarsi di caricarle completamente prima di utilizzarle nella fotocamera. 4 Guida introduttiva di HP Photosmart E217/E317 - HP Photosmart E217 | Quick Start Guide - Page 37
/ della memoria sul retro della fotocamera diventa verde fissa. Non appena la fotocamera si accende, sul display LCD viene visualizzato anche il logo HP. ATTENZIONE: Quando si fa scorrere il coperchio, prestare attenzione a non toccare l'obiettivo con le dita. La presenza di eventuali impronte pu - HP Photosmart E217 | Quick Start Guide - Page 38
di scegliere una lingua. 1. Scorrere l'elenco fino alla lingua desiderata utilizzando i pulsanti del controller . 2. Premere il pulsante evidenziata. per selezionare la lingua 6 Guida introduttiva di HP Photosmart E217/E317 - HP Photosmart E217 | Quick Start Guide - Page 39
Lee_Jackie_QSG.fm Page 7 Tuesday, March 29, 2005 11:29 AM 5. Impostazione della data e dell'ora Verrà richiesto di impostare la data e l'ora. 1. Il primo elemento evidenziato è il formato della data e dell'ora. Per modificare il formato della data e dell'ora, utilizzare i pulsanti . Se il formato - HP Photosmart E217 | Quick Start Guide - Page 40
figura. Accertarsi che la scheda di memoria scatti in posizione. 3. Chiudere lo sportello del vano batteria/scheda di memoria e accendere la fotocamera. 8 Guida introduttiva di HP Photosmart E217/E317 - HP Photosmart E217 | Quick Start Guide - Page 41
Lee_Jackie_QSG.fm Page 9 Tuesday, March 29, 2005 11:29 AM Per evitare di danneggiare schede e immagini, formattare le schede di memoria prima di utilizzarle per la prima volta. Per formattare la scheda di memoria: 1. Premere il pulsante , quindi utilizzare il pulsante per spostarsi sul menu - HP Photosmart E217 | Quick Start Guide - Page 42
con entrambe le mani al momento della pressione del pulsante Otturatore per evitare movimenti che potrebbero essere causa di foto sfuocate. 10 Guida introduttiva di HP Photosmart E217/E317 - HP Photosmart E217 | Quick Start Guide - Page 43
Lee_Jackie_QSG.fm Page 11 Tuesday, March 29, 2005 11:29 AM 8. Registrazione di un video clip 1. Premere il pulsante Vista dal vivo/Riproduzione finché non appare l'icona Vista dal vivo nell'angolo superiore sinistro del display LCD, quindi inquadrare il soggetto per la foto nel display LCD. 2. Per - HP Photosmart E217 | Quick Start Guide - Page 44
le immagini I video clip vengono riprodotti automaticamente dopo aver visualizzato il primo fotogramma del video clip per un periodo di 2 secondi. 12 Guida introduttiva di HP Photosmart E217/E317 - HP Photosmart E217 | Quick Start Guide - Page 45
Web Assistenza clienti HP all'indirizzo: www.hp.com/support. Windows Per installare il software HP Image Zone in modo corretto, è necessario che il computer disponga di almeno 64 MB di RAM e che vi siano installati Windows 2000, XP, 98, 98 SE o Me e Internet Explorer 5.5 Service Pack 2 o versione - HP Photosmart E217 | Quick Start Guide - Page 46
Macintosh Per installare il software HP Image Zone in modo corretto, è necessario che il computer Macintosh disponga di un'interfaccia USB incorporata, 128 MB di del software HP Image Zone, riattivare il software antivirus disattivato nel passo 1. 14 Guida introduttiva di HP Photosmart E217/E317 - HP Photosmart E217 | Quick Start Guide - Page 47
2005 11:29 AM 11. Trasferimento di immagini su computer 1. Spegnere la fotocamera, quindi collegarla al computer utilizzando il cavo USB fornito. 2. Accendere la fotocamera. 3. Seguire le istruzioni visualizzate per trasferire le immagini dalla fotocamera al computer. 4. Scollegare la fotocamera dal - HP Photosmart E217 | Quick Start Guide - Page 48
il punto di riferimento unico grazie al quale è possibile ottenere assistenza sui prodotti, supporto diagnostico e i driver necessari. Per usufruire 24 ore al giorno della rinomata assistenza HP, visitare il sito Web all'indirizzo www.hp.com/support. 16 Guida introduttiva di HP Photosmart E217/E317 - HP Photosmart E217 | Quick Start Guide - Page 49
Lee_Jackie_QSG.fm Page 17 Tuesday, March 29, 2005 11:29 AM • Per informazioni sul software HP Image Zone, vedere il manuale online di HP Image Zone. • Installare ed eseguire il programma del manuale dell'utente interattivo (in lingua inglese) dal CD per avere informazioni sulle funzioni della - HP Photosmart E217 | Quick Start Guide - Page 50
TahitiUM.book Page 4 Sunday, January 4, 2004 2:47 PM - HP Photosmart E217 | Quick Start Guide - Page 51
Lee_Jackie_QSG.fm Page 1 Tuesday, March 29, 2005 11:13 AM HP Photosmart E217/E317 Digitalkamera Kurzanleitung 1 Deutsch - HP Photosmart E217 | Quick Start Guide - Page 52
2005 Hewlett-Packard Development Company, L.P. Die Informationen in diesem Dokument können ohne vorherige Ankündigung geändert werden. Für HP Produkte zum Recycling von HP Produkten finden Sie auf folgender Website: www.hp.com/hpinfo/globalcitizenship/ 2 HP Photosmart E217/E317 Kurzübersicht - HP Photosmart E217 | Quick Start Guide - Page 53
Lee_Jackie_QSG.fm Page 3 Tuesday, March 29, 2005 11:13 AM 1. Befestigen der Halteschlaufe S Befestigen Sie die Halteschlaufe, wie in der Abbildung dargestellt, seitlich an der Kamera. 3 Deutsch - HP Photosmart E217 | Quick Start Guide - Page 54
vor dem Einsetzen in die Kamera sicher, dass diese vollständig aufgeladen sind. 80 bis 130 Fotos 260 bis 490 Fotos 110 bis 280 Fotos 4 HP Photosmart E217/E317 Kurzübersicht - HP Photosmart E217 | Quick Start Guide - Page 55
freigegeben. Die Netz-/ Speicherkontrollleuchte auf der Rückseite der Kamera leuchtet permanent grün. Beim Einschalten der Kamera wird außerdem das HP Logo auf der Bildanzeige angezeigt. ACHTUNG: Vermeiden Sie beim Verschieben der Objektivabdeckung Fingerabdrücke auf dem Objektiv. Fingerabdrücke auf - HP Photosmart E217 | Quick Start Guide - Page 56
ättern Sie mit Hilfe der Tasten oder Steuertaste zur gewünschten Sprache. an der 2. Drücken Sie die Taste , um die hervorgehobene Sprache auszuwählen. 6 HP Photosmart E217/E317 Kurzübersicht - HP Photosmart E217 | Quick Start Guide - Page 57
Lee_Jackie_QSG.fm Page 7 Tuesday, March 29, 2005 11:13 AM 5. Einstellen von Datum und Zeit Als Nächstes werden Sie aufgefordert, das Datum und die Uhrzeit einzustellen. 1. Die zuerst hervorgehobene Option ist das Datums- und Uhrzeitformat. Zum Ändern des Datums- und Uhrzeitformats verwenden Sie die - HP Photosmart E217 | Quick Start Guide - Page 58
Lee_Jackie_QSG.fm Page 8 Tuesday, March 29, 2005 11:13 AM Bestätigungsanzeige werden Sie gefragt, ob Datum und Uhrzeit korrekt eingestellt wurden. Wenn Datum und Uhrzeit korrekt sind, drücken Sie die Taste , um die Option Ja auszuwählen. 8 HP Photosmart E217/E317 Kurzübersicht - HP Photosmart E217 | Quick Start Guide - Page 59
Lee_Jackie_QSG.fm Page 9 Tuesday, March 29, 2005 11:13 AM 6. Einsetzen und Formatieren einer Speicherkarte (optional) Ihre Digitalkamera wird mit internem Speicher ausgeliefert, auf dem Sie Bilder und Videoclips speichern können. Sie können jedoch auch eine (separat erhältliche) Speicherkarte - HP Photosmart E217 | Quick Start Guide - Page 60
Batterie-/Speicherkartenfachs und drücken Sie von oben auf die Speicherkarte. Die Verriegelung wird gelöst und die Karte springt aus dem Steckplatz heraus. 10 HP Photosmart E217/E317 Kurzübersicht - HP Photosmart E217 | Quick Start Guide - Page 61
Lee_Jackie_QSG.fm Page 11 Tuesday, March 29, 2005 11:13 AM 7. Aufnehmen eines Einzelbildes 1. Drücken Sie die Taste Vorschau/Wiedergabe , bis das Symbol Vorschau links oben in der Bildanzeige erscheint. Erfassen Sie danach das gewünschte Motiv für Ihr Bild mit der Bildanzeige. 2. Drücken Sie - HP Photosmart E217 | Quick Start Guide - Page 62
Videoaufnahme drücken Sie erneut die Taste Video und lassen sie dann wieder los. Andernfalls wird die Videoaufnahme fortgesetzt, bis der Speicher voll ist. 12 HP Photosmart E217/E317 Kurzübersicht - HP Photosmart E217 | Quick Start Guide - Page 63
Lee_Jackie_QSG.fm Page 13 Tuesday, March 29, 2005 11:13 AM 9. Anzeigen von Bildern und Videoclips Deutsch Zum Anzeigen von Bildern und Videoclips verwenden Sie die Wiedergabe. 1. Drücken Sie die Taste Vorschau/Wiedergabe , bis das Symbol Wiedergabe in der linken oberen Ecke der Bildanzeige - HP Photosmart E217 | Quick Start Guide - Page 64
Probleme auftreten, finden Sie weitere Informationen auf der HP Customer Support Website unter: www.hp.com/support. Windows Damit die HP Image Zone-Software installiert werden kann, muss Ihr Computer über mindestens 64 MB RAM, Windows 2000, XP, 98, 98 SE oder ME und Internet Explorer 5.5 Service - HP Photosmart E217 | Quick Start Guide - Page 65
Image Zone aktivieren Sie wieder die Virenschutzsoftware, die in Schritt 1 deaktiviert wurde. Macintosh Damit die HP Image Zone-Software erfolgreich installiert werden kann, muss Ihr Macintosh-Computer über integriertes USB, 128 MB physischen RAM, Mac OS X, Version 10.2 oder höher, und 250 MB freien - HP Photosmart E217 | Quick Start Guide - Page 66
sie dann über das beiliegende USB-Kabel an den Computer an. 2. Schalten Sie die Kamera ein. 3. Befolgen Sie die angezeigten Anweisungen, um die Bilder von der Kamera auf den Computer zu übertragen. 4. Trennen Sie die Verbindung zwischen Kamera und Computer. 16 HP Photosmart E217/E317 Kurzübersicht - HP Photosmart E217 | Quick Start Guide - Page 67
der HP Image Zone-Software in das CD-ROM-Laufwerk Ihres Computers ein. 2. Unter Windows: HP Image Zone-Software-CD im Ordner docs. Weitere Produktunterstützung • Tipps und Tools zur effizienten Nutzung Ihrer Kamera finden Sie unter www.hp.com/photosmart. • Der Online-Service und -Support von HP - HP Photosmart E217 | Quick Start Guide - Page 68
TahitiUM.book Page 4 Sunday, January 4, 2004 2:47 PM - HP Photosmart E217 | Quick Start Guide - Page 69
Español Lee_Jackie_QSG.fm Page 1 Tuesday, March 29, 2005 10:57 AM Cámara digital HP Photosmart E217/E317 Guía de comienzo rápido 1 - HP Photosmart E217 | Quick Start Guide - Page 70
Copyright 2005 Hewlett-Packard Development Company, L.P. La información que aparece en este documento está sujeta a cambios sin previo aviso. Las únicas garantías de los productos y servicios de HP se detallan en ón de la cámara Impreso en China 2 Guía de comienzo rápido de HP Photosmart E217/E317 - HP Photosmart E217 | Quick Start Guide - Page 71
Español Lee_Jackie_QSG.fm Page 3 Tuesday, March 29, 2005 10:57 AM 1. Fijación de la muñequera S Ajuste la muñequera en el soporte para la muñeca de la parte lateral de la cámara, como se muestra en la ilustración. 3 - HP Photosmart E217 | Quick Start Guide - Page 72
a 280 fotografías Si utiliza pilas de NiMH (recargables), asegúrese de cargarlas completamente antes de utilizarlas en la cámara. 4 Guía de comienzo rápido de HP Photosmart E217/E317 - HP Photosmart E217 | Quick Start Guide - Page 73
quede al descubierto. El indicador de alimentación/memoria de la parte trasera de la cámara se enciende en verde. Al encenderse la cámara, el logotipo HP aparece en la pantalla de imagen. PRECAUCIÓN: Al deslizar la tapa del objetivo, procure no tocar el objetivo con los dedos. Las huellas de dedos - HP Photosmart E217 | Quick Start Guide - Page 74
idioma. 1. Desplácese hasta el idioma deseado con los botones del controlador . 2. Presione el botón resaltado. para seleccionar el idioma 6 Guía de comienzo rápido de HP Photosmart E217/E317 - HP Photosmart E217 | Quick Start Guide - Page 75
Lee_Jackie_QSG.fm Page 7 Tuesday, March 29, 2005 10:57 AM 5. Ajuste de fecha y hora Español Se le pedirá que ajuste la fecha y la hora. 1. El primer elemento que aparece resaltado es el formato de la fecha y la hora. Si desea cambiar el formato de la fecha y la hora, utilice los botones . Si el - HP Photosmart E217 | Quick Start Guide - Page 76
2005 10:57 AM 6. Instalación y formateado de una tarjeta de memoria (opcional) La cámara digital dispone de memoria interna que le permite almacenar imágenes y videoclips. Sin embargo, también puede Cierre la tapa y encienda la cámara. 8 Guía de comienzo rápido de HP Photosmart E217/E317 - HP Photosmart E217 | Quick Start Guide - Page 77
Español Lee_Jackie_QSG.fm Page 9 Tuesday, March 29, 2005 10:57 AM Para evitar que se dañen las tarjetas y las imágenes, deberá formatear las tarjetas antes de utilizarlas por primera vez. Para formatear la tarjeta de memoria: 1. Presione el botón y después utilice para abrir el Menú Reproducción . - HP Photosmart E217 | Quick Start Guide - Page 78
manos cuando presione el disparador para reducir el movimiento de la cámara y evitar que las fotografías salgan movidas. 10 Guía de comienzo rápido de HP Photosmart E217/E317 - HP Photosmart E217 | Quick Start Guide - Page 79
Español Lee_Jackie_QSG.fm Page 11 Tuesday, March 29, 2005 10:57 AM 8. Grabación de un videoclip 1. Presione el botón Vista en directo/Reproducción hasta que aparezca el icono Vista en directo en la esquina superior izquierda de la pantalla de imagen y, a continuación, encuadre el sujeto de la - HP Photosmart E217 | Quick Start Guide - Page 80
ágenes Cuando se muestra el primer fotograma de un videoclip durante dos segundos, el videoclip se reproduce automáticamente. 12 Guía de comienzo rápido de HP Photosmart E217/E317 - HP Photosmart E217 | Quick Start Guide - Page 81
sitio Web de asistencia técnica al cliente de HP: www.hp.com/support. Windows Para instalar el software HP Image Zone, deberá disponer en su equipo de al menos 64 MB de RAM y tener instalado Windows 2000, XP, 98, 98 SE o Me, e Internet Explorer 5.5 Service Pack 2 o posterior. Si el equipo reúne los - HP Photosmart E217 | Quick Start Guide - Page 82
Macintosh Para instalar correctamente el software HP Image Zone, deberá disponer en su equipo Macintosh de USB incorporado, 128 MB de RAM software HP Image Zone se haya instalado, vuelva a activar el programa antivirus que desactivó en el paso 1. 14 Guía de comienzo rápido de HP Photosmart E217/E317 - HP Photosmart E217 | Quick Start Guide - Page 83
. Transferencia de imágenes al equipo 1. Apague la cámara y luego conéctela al equipo mediante el cable USB provisto. 2. Encienda la cámara. 3. Siga las instrucciones mostradas en la pantalla para que el software transfiera las imágenes de la cámara al equipo. 4. Desconecte la cámara del equipo. 15 - HP Photosmart E217 | Quick Start Guide - Page 84
a la semana, en www.hp.com/support. • Si necesita ayuda para el software HP Image Zone, consulte el manual en línea de HP Image Zone. • Si desea fotografía digital, instale y ejecute el programa Guía interactiva de usuario del CD de software. 16 Guía de comienzo rápido de HP Photosmart E217/E317 - HP Photosmart E217 | Quick Start Guide - Page 85
Português Lee_Jackie_QSG.fm Page 1 Tuesday, March 29, 2005 11:44 AM HP Photosmart E217/E317 Câmera digital Guia de Início Rápido 1 - HP Photosmart E217 | Quick Start Guide - Page 86
Hewlett-Packard Development Company, L.P. As informações aqui contidas estão sujeitas a alterações sem aviso prévio. As únicas garantias a produtos e serviços HP . A HP se isenta de responsabilidade por erros técnicos ou editorais ou omissões aqui contidas. Windows® é uma da HP Photosmart E217/E317 - HP Photosmart E217 | Quick Start Guide - Page 87
Português Lee_Jackie_QSG.fm Page 3 Tuesday, March 29, 2005 11:44 AM 1. Prenda a alça S Prenda a alça no respectivo suporte na lateral da câmera, como mostrado. 3 - HP Photosmart E217 | Quick Start Guide - Page 88
de carregá-las completamente antes de usá-las na câmera. 80 a 130 fotos 260 a 490 fotos 110 a 280 fotos 4 Guia de Início Rápido da HP Photosmart E217/E317 - HP Photosmart E217 | Quick Start Guide - Page 89
a tampa da lente até ouvir o clique, descobrindo a lente. A luz de alimentação/ memória na parte traseira da câmera fica verde. O logotipo HP também é exibido no Visor da imagem enquanto a câmera é ligada. CUIDADO: Ao deslizar a tampa, mantenha os dedos afastados da lente. Impressões digitais - HP Photosmart E217 | Quick Start Guide - Page 90
de um idioma. 1. Procure o idioma desejado usando os botões do Controlador . 2. Pressione o botão para selecionar o idioma realçado. 6 Guia de Início Rápido da HP Photosmart E217/E317 - HP Photosmart E217 | Quick Start Guide - Page 91
Português Lee_Jackie_QSG.fm Page 7 Tuesday, March 29, 2005 11:44 AM 5. Ajuste a Data e a Hora Você será solicitado a definir a data e a hora. 1. O primeiro item realçado é o formato de data e hora. Se quiser alterar o formato de data e hora, use os botões . Se o formato da data e hora estiver - HP Photosmart E217 | Quick Start Guide - Page 92
se o cartão de memória está fixo no lugar. 3. Feche a porta do cartão de memória/bateria da câmera. 8 Guia de Início Rápido da HP Photosmart E217/E317 - HP Photosmart E217 | Quick Start Guide - Page 93
Português Lee_Jackie_QSG.fm Page 9 Tuesday, March 29, 2005 11:44 AM Para evitar danos aos cartões e às imagens, sempre formate os cartões de memória antes de usá-los pela primeira vez. Para formatar o cartão de memória: 1. Pressione o botão e use o botão para ir até o menu Reproduzir . 2. Pressione - HP Photosmart E217 | Quick Start Guide - Page 94
: Segure a câmera com ambas as mãos ao pressionar o botão Obturador para reduzir o movimento da câmera e evitar fotos tremidas. 10 Guia de Início Rápido da HP Photosmart E217/E317 - HP Photosmart E217 | Quick Start Guide - Page 95
Português Lee_Jackie_QSG.fm Page 11 Tuesday, March 29, 2005 11:44 AM 8. Grave um clipe de vídeo 1. Pressione o botão Exibição ao vivo/Reproduzir até exibir o ícone Exibição ao vivo no canto esquerdo superior do Visor da imagem e enquadre a imagem no Visor da imagem. 2. Para iniciar a gravação de ví - HP Photosmart E217 | Quick Start Guide - Page 96
e clipes Clipes de vídeo são reproduzidos automaticamente após o primeiro quadro do clipe de vídeo ter sido exibido durante 2 segundos. 12 Guia de Início Rápido da HP Photosmart E217/E317 - HP Photosmart E217 | Quick Start Guide - Page 97
Image Zone, consulte o site de Suporte ao Cliente HP: www.hp.com/support. Windows Para que o software HP Image Zone seja instalado com êxito, o computador deve ter um mínimo de 64 MB de RAM, Windows 2000, XP, 98, 98 SE ou Me e Internet Explorer 5.5 Service Pack 2 ou superior. Se o computador atender - HP Photosmart E217 | Quick Start Guide - Page 98
de trabalho do computador, clique duas vezes no ícone do CD. 4. Clique duas vezes no ícone instalador e siga as instruções da tela. 5. Quando o software HP Image Zone estiver instalado, ative novamente o software antivírus desativado na Etapa 1. 14 Guia de Início Rápido da HP Photosmart E217/E317 - HP Photosmart E217 | Quick Start Guide - Page 99
11:44 AM 11. Transfira imagens para um computador 1. Desligue a câmera e conecte-a ao computador por meio do cabo USB fornecido. 2. Ligue a câmera. 3. Siga as instruções da tela para que o software transfira as imagens diretamente da câmera para o computador. 4. Desconecte a câmera do computador. 15 - HP Photosmart E217 | Quick Start Guide - Page 100
Zone. • Para ter uma experiência de aprendizado interativo (em inglês) que o guiará pelos recursos mais usados da câmera e fornecerá dicas básicas de fotografia digital, instale e execute o programa Interactive User's Guide pelo CD do software. 16 Guia de Início Rápido da HP Photosmart E217/E317
-
 1
1 -
 2
2 -
 3
3 -
 4
4 -
 5
5 -
 6
6 -
 7
7 -
8
-
9
-
10
-
11
-
12
-
13
-
14
-
15
-
16
-
17
-
18
-
19
-
20
-
21
-
22
-
23
-
24
-
25
-
26
-
27
-
28
-
29
-
30
-
31
-
32
-
33
-
34
-
35
-
36
-
37
-
38
-
39
-
40
-
41
-
42
-
43
-
44
-
45
-
46
-
47
-
48
-
49
-
50
-
51
-
52
-
53
-
54
-
55
-
56
-
57
-
58
-
59
-
60
-
61
-
62
-
63
-
64
-
65
-
66
-
67
-
68
-
69
-
70
-
71
-
72
-
73
-
74
-
75
-
76
-
77
-
78
-
79
-
80
-
81
-
82
-
83
-
84
-
85
-
86
-
87
-
88
-
89
-
90
-
91
-
92
-
93
-
94
-
95
-
96
-
97
-
98
-
99
-
100
 |
 |
1
English
HP Photosmart
E217/E317
Digital Camera
Quick Start Guide
Lee_Jackie_QSG_e_ok.fm Page 1
Tuesday, March 29, 2005
1:22 PM