HP Photosmart Ink Advantage e- Printer - K510 Reference Guide - Page 6
Networked printer setup and use
 |
View all HP Photosmart Ink Advantage e- Printer - K510 manuals
Add to My Manuals
Save this manual to your list of manuals |
Page 6 highlights
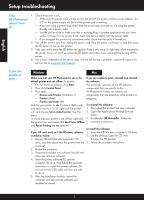
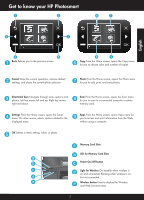
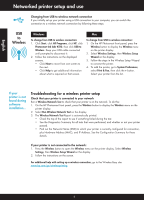
English Networked printer setup and use Changing from USB to wireless network connection If you initially set up your printer using a USB connection to your computer, you can switch the connection to a wireless network connection by following these steps. USB to Wireless Windows Mac To change from USB to wireless connection: 1. Click Start, click All Programs, click HP, click Photosmart Ink Adv K510, then click USB to Wireless. Keep your USB cable connected until prompted to disconnect it. 2. Follow the instructions on the displayed screens. •• Click Next to move from one screen to the next. •• Click Help to get additional information about what is required on that screen. To change from USB to wireless connection: 1. On the HP Photosmart front panel, press the Wireless button to display the Wireless menu on the printer display. 2. Select Wireless Settings, then Wireless Setup Wizard on the display. 3. Follow the steps in the Wireless Setup Wizard to connect the printer. 4. To add the printer, go to System Preferences, select Print & Fax, then click the + button. Select your printer from the list. If your printer is not found during software installation... Troubleshooting for a wireless printer setup Check that your printer is connected to your network Run a Wireless Network Test to check that your printer is on the network. To do this: 1. On the HP Photosmart front panel, press the Wireless button to display the Wireless menu on the printer display. 2. Select Run Wireless Network Test on the display. 3. The Wireless Network Test Report is automatically printed. •• Check the top of the report to see if something failed during the test. •• See the Diagnostics Summary for all tests that were performed, and whether or not your printer passed. •• Find out the Network Name (SSID) to which your printer is currently configured for connection, plus Hardware Address (MAC), and IP Address. See the Configuration Summary for these details. If your printer is not connected to the network: 1. Press the Wireless button to open the Wireless menu on the printer display. Select Wireless Settings, then Wireless Setup Wizard on the display. 2. Follow the instructions on the screen. For additional help with setting up a wireless connection, go to the Wireless Easy site: www.hp.com/go/wirelessprinting 6
-
 1
1 -
 2
2 -
 3
3 -
 4
4 -
 5
5 -
 6
6 -
 7
7 -
 8
8 -
 9
9 -
 10
10 -
 11
11 -
 12
12 -
13
-
14
-
15
-
16
-
17
-
18
-
19
-
20
-
21
-
22
-
23
-
24
-
25
-
26
-
27
-
28
-
29
-
30
-
31
-
32
-
33
-
34
-
35
-
36
-
37
-
38
-
39
-
40
 |
 |
