HP Photosmart Premium Fax e-All-in-One Printer - C410 Reference Guide - Page 2
English - printer
 |
View all HP Photosmart Premium Fax e-All-in-One Printer - C410 manuals
Add to My Manuals
Save this manual to your list of manuals |
Page 2 highlights
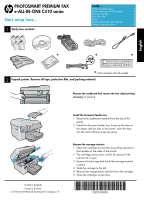
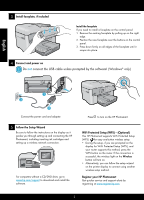
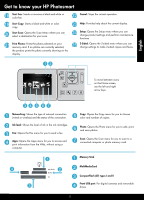
English 3 Install faceplate, if included Install the faceplate If you need to install a faceplate on the control panel: 1. Remove the existing faceplate by pulling up on the right edge. 2. Position the new faceplate over the buttons on the control panel. 3. Press down firmly on all edges of the faceplate until it snaps into place. 4 Connect and power on Do not connect the USB cable unless prompted by the software! (Windows® only) Connect the power cord and adapter. 5 Follow the Setup Wizard Be sure to follow the instructions on the display as it guides you through setting up and connecting the HP Photosmart, including inserting ink cartridges and setting up a wireless network connection. For computers without a CD/DVD drive, go to www.hp.com/support to download and install the software. Press to turn on the HP Photosmart. WiFi Protected Setup (WPS) - (Optional) This HP Photosmart supports WiFi Protected Setup (WPS) for easy one-button wireless setup. • During the setup, if you are prompted on the display for Wi-Fi Protected Setup (WPS), and your router supports this method, press the WPS button on the router. If the connection is successful, the wireless light on the Wireless button will turn on. • Alternatively, you can follow the setup wizard on the printer display to connect using another wireless setup method. Register your HP Photosmart Get quicker service and support alerts by registering at www.register.hp.com. 2
-
 1
1 -
 2
2 -
 3
3 -
 4
4 -
 5
5 -
 6
6 -
 7
7 -
 8
8 -
9
-
10
-
11
-
12
-
13
-
14
-
15
-
16
-
17
-
18
-
19
-
20
-
21
-
22
-
23
-
24
 |
 |
