HP Photosmart c500 HP PhotoSmart C500 Digital Camera User’s Guide - C
HP Photosmart c500 Manual
 |
View all HP Photosmart c500 manuals
Add to My Manuals
Save this manual to your list of manuals |
HP Photosmart c500 manual content summary:
- HP Photosmart c500 | HP PhotoSmart C500 Digital Camera User’s Guide - C - Page 1
set up your new HP PhotoSmart C500 Digital Camera, including installing the batteries, using an AC power adapter, installing the memory card, setting the date and time, changing the language, turning the camera on and off, and using the camera modes, color LCD and menus. Camera Parts The following - HP Photosmart c500 | HP PhotoSmart C500 Digital Camera User’s Guide - C - Page 2
adapter connection Viewfinder indicator light Viewfinder Eye Start sensors Menu button Overlay button Zoom control Color LCD 4-way arrow button Color LCD on/off button Soft keys Memory card door latch Back Wrist strap attachment Memory card door HP PhotoSmart C500 Digital Camera User - HP Photosmart c500 | HP PhotoSmart C500 Digital Camera User’s Guide - C - Page 3
C500 Digital Camera comes with a wrist strap and lens cover leash. The wrist strap and lens cover leash has three loops: 1. A short loop to attach to the camera. 2. A long thin loop to attach to the lens cover. 3. The main wrist strap loop. 2 1 3 HP PhotoSmart C500 Digital Camera User's Guide - HP Photosmart c500 | HP PhotoSmart C500 Digital Camera User’s Guide - C - Page 4
Remove the lens cover from the camera. 2. Thread the long, thin loop through the hole in the lens cover. 3. Pull the lens cover through the loop, and then pull the knot tight. 4. Replace the lens cover on the camera. Setting Up Your Camera 3 4 2 HP PhotoSmart C500 Digital Camera User's Guide 6 - HP Photosmart c500 | HP PhotoSmart C500 Digital Camera User’s Guide - C - Page 5
3. Insert three batteries, making sure the +/- electrodes are facing the proper direction (see the diagram inside the battery compartment). 4. Close the main battery compartment door. HP PhotoSmart C500 Digital Camera User's Guide 7 - HP Photosmart c500 | HP PhotoSmart C500 Digital Camera User’s Guide - C - Page 6
camera, a coin battery is already installed. Follow these directions if you need to install a new coin battery. Caution: Use only a CR2025 or equivalent 3 volt coin battery. Always follow instructions cover and turn it clockwise until it stops. HP PhotoSmart C500 Digital Camera User's Guide 8 - HP Photosmart c500 | HP PhotoSmart C500 Digital Camera User’s Guide - C - Page 7
adapter that HP has approved for use with the HP PhotoSmart C500 Digital Camera. • Limit your use of the color LCD, except when using an AC power adapter. • Do not leave batteries in the charger for an extended period of time (such as several days). HP PhotoSmart C500 Digital Camera User's Guide - HP Photosmart c500 | HP PhotoSmart C500 Digital Camera User’s Guide - C - Page 8
soft key) to see the camera status. The coin battery icon appears on the color LCD only if the battery level is low, or if there is no coin battery installed in the camera. 5. Press the Exit button (right soft key) to exit the Status screen. HP PhotoSmart C500 Digital Camera User's Guide 10 - HP Photosmart c500 | HP PhotoSmart C500 Digital Camera User’s Guide - C - Page 9
the Memory Card The "film" used in the HP PhotoSmart C500 Digital Camera is a removable, reusable CompactFlash memory card. To install the memory card: 1. Slide the memory card door latch down to open the memory card door. Memory card door latch HP PhotoSmart C500 Digital Camera User's Guide 11 - HP Photosmart c500 | HP PhotoSmart C500 Digital Camera User’s Guide - C - Page 10
pinholes is placed into the camera first. 4. Gently push the memory card all the way into the camera until it stops. 5. Close the memory card door. Tip: If you cannot close the memory card door, you may not have inserted the memory card correctly. HP PhotoSmart C500 Digital Camera User's Guide 12 - HP Photosmart c500 | HP PhotoSmart C500 Digital Camera User’s Guide - C - Page 11
the number of photos remaining. The Status menu displays the memory card inserted icon on the color LCD. (See "Using the Color LCD" on page 33 for more information about the Status menu.) Memory card status Photos remaining Memory card inserted HP PhotoSmart C500 Digital Camera User's Guide 13 - HP Photosmart c500 | HP PhotoSmart C500 Digital Camera User’s Guide - C - Page 12
turn the camera on. The camera can be in any mode. If the memory card is not formatted, the color LCD displays a message asking if you want to format the memory card. 2. Press the Format button (left soft key). The camera formats the memory card. HP PhotoSmart C500 Digital Camera User's Guide 14 - HP Photosmart c500 | HP PhotoSmart C500 Digital Camera User’s Guide - C - Page 13
you see it when you look through the viewfinder. To turn the camera power off: • Press the on/off button to turn the camera power off. The camera lens automatically retracts and the status LCD goes blank. Camera Basics Status LCD On/off button HP PhotoSmart C500 Digital Camera User's Guide 15 - HP Photosmart c500 | HP PhotoSmart C500 Digital Camera User’s Guide - C - Page 14
off and retracts the lens after 10 minutes with battery power, and after 30 minutes with AC adapter power. For more information about the sleep and shutoff times, see "Setting Auto Shutoff" on page 64. To "wake up" the camera: • Press any button. HP PhotoSmart C500 Digital Camera User's Guide 16 - HP Photosmart c500 | HP PhotoSmart C500 Digital Camera User’s Guide - C - Page 15
Burst, Timelapse, and grouped photo sequences • Create slide shows • View photos on the camera's color LCD or a television PC • View photos on a computer monitor when the camera is connected to a computer • Share, print, and download photos HP PhotoSmart C500 Digital Camera User's Guide 17 - HP Photosmart c500 | HP PhotoSmart C500 Digital Camera User’s Guide - C - Page 16
) • Camera initializing from Sleep mode Orange (solid) • Auto Focus failed or photo underexposure will occur (flash off and insufficient light) • Slow shutter (not enough light or tripod needed) Green (flashing) • Sending a photo via JetSend HP PhotoSmart C500 Digital Camera User's Guide 18 - HP Photosmart c500 | HP PhotoSmart C500 Digital Camera User’s Guide - C - Page 17
sunlight, you can make the color LCD brighter (see below). The display on the color LCD varies with each camera mode. The following table indicates whether the color LCD is on or off in each mode, and the default display. Camera Basics Color LCD HP PhotoSmart C500 Digital Camera User's Guide 19 - HP Photosmart c500 | HP PhotoSmart C500 Digital Camera User’s Guide - C - Page 18
turn the camera mode dial to Rec. Menu button 2. Press the Menu button. 3. Use the 4-way arrow button to scroll to the Preferences menu. LCD Brightness is highlighted. 4. Press the Edit button (left soft key). 4-way arrow button Soft keys HP PhotoSmart C500 Digital Camera User's Guide 20 - HP Photosmart c500 | HP PhotoSmart C500 Digital Camera User’s Guide - C - Page 19
more power it uses. You may want to lower the brightness level if you use the color information they provide varies with each camera mode. In Rev (Review) mode, the lower overlay bar is guide. Overlay button Overlay bars Color LCD on/off button HP PhotoSmart C500 Digital Camera User's Guide 21 - HP Photosmart c500 | HP PhotoSmart C500 Digital Camera User’s Guide - C - Page 20
on. To turn the overlay bars on or off in Play mode: 1. Turn the camera on and turn the camera mode dial to Play. By default only the lower overlay bar appears. 2. Press the the three options. Lower overlay bar No overlay bars HP PhotoSmart C500 Digital Camera User's Guide Both overlay bars 22 - HP Photosmart c500 | HP PhotoSmart C500 Digital Camera User’s Guide - C - Page 21
the camera menus and select the menu options. Menu options are described in detail throughout this guide. For a list of options, see "Menu Structure" on page 124 in Appendix B. Menu button 4-way arrow button Menus display on the color LCD Soft keys HP PhotoSmart C500 Digital Camera User's Guide - HP Photosmart c500 | HP PhotoSmart C500 Digital Camera User’s Guide - C - Page 22
installed the NiMH batteries and are not using an AC power adapter. • After losing power in both the coin and NiMH batteries at the same time. You can also use the Preferences camera menu in Rec (Record) mode to change the date and time as needed. HP PhotoSmart C500 Digital Camera User's Guide 24 - HP Photosmart c500 | HP PhotoSmart C500 Digital Camera User’s Guide - C - Page 23
example, cameras with the language set to English have a default date format of MM/DD/YY and a default time format of 12 hours. Cameras with the language set to French have a default date format of DD/MM/YY and a default time format of 24 hours. HP PhotoSmart C500 Digital Camera User's Guide 25 - HP Photosmart c500 | HP PhotoSmart C500 Digital Camera User’s Guide - C - Page 24
you want to change the date and time formats from the ones displayed on the color LCD: • Press the Format button (left soft key). • Use the 4-way arrow button to scroll to the format you want. • Press the Select button (left soft key). HP PhotoSmart C500 Digital Camera User's Guide Camera Basics 26 - HP Photosmart c500 | HP PhotoSmart C500 Digital Camera User’s Guide - C - Page 25
on and turn the camera mode dial to Rev. 2. Press the Menu button. 3. Use the 4-way arrow button to scroll to the Preferences menu. 4. Press the Edit button (left soft key). 5. Use the 4-way arrow button to scroll to the language you want to use. HP PhotoSmart C500 Digital Camera User's Guide 27 - HP Photosmart c500 | HP PhotoSmart C500 Digital Camera User’s Guide - C - Page 26
left soft key to toggle between capital letters, lower case letters, numbers, and special characters: A-capital letters, a-lower case letters, 1-numbers, %-special characters. • Use the center soft key to add a space between letters and characters. HP PhotoSmart C500 Digital Camera User's Guide 28 - HP Photosmart c500 | HP PhotoSmart C500 Digital Camera User’s Guide - C - Page 27
adapter connection Note: If you want to use battery power, remove the AC adapter from the power source and the camera. If the AC adapter is connected to the camera, even if it is not connected to a power source, the camera will not use battery power. HP PhotoSmart C500 Digital Camera User's Guide
-
 1
1 -
 2
2 -
 3
3 -
 4
4 -
 5
5 -
 6
6 -
 7
7 -
8
-
9
-
10
-
11
-
12
-
13
-
14
-
15
-
16
-
17
-
18
-
19
-
20
-
21
-
22
-
23
-
24
-
25
-
26
-
27
 |
 |

HP PhotoSmart C500 Digital Camera User’s Guide
3
Chapter 2 - Getting Started
This chapter shows you how to set up your new HP PhotoSmart C500 Digital Camera, including installing the
batteries, using an AC power adapter, installing the memory card, setting the date and time, changing the language,
turning the camera on and off, and using the camera modes, color LCD and menus.
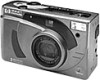
Camera Parts
The following illustrations show the parts of the HP PhotoSmart C500 Digital Camera. To view a glossary of camera
parts and terminology, see “Glossary” on page 136.
Status LCD
Shutter button
Camera mode dial
Flash button
Photo Quality
button
Share button
On/off button
Top
Main battery
compartment door
Tripod mount
Coin battery
compartment cover
Bottom