HP Photosmart c500 HP PhotoSmart C500 Digital Camera User’s Guide - C
HP Photosmart c500 Manual
 |
View all HP Photosmart c500 manuals
Add to My Manuals
Save this manual to your list of manuals |
HP Photosmart c500 manual content summary:
- HP Photosmart c500 | HP PhotoSmart C500 Digital Camera User’s Guide - C - Page 1
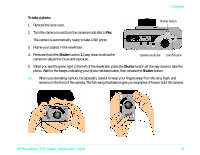
the viewfinder, indicating that you can press the Shutter button all the way down to take the photo. You may want to practice to get used to the timing, before taking important photos. HP PhotoSmart C500 Digital Camera User's Guide 30 - HP Photosmart c500 | HP PhotoSmart C500 Digital Camera User’s Guide - C - Page 2
. Tip: When you are taking a photo, be especially careful to keep your fingers away from the lens, flash, and sensors on the front of the camera. The following illustrations give you examples of how to hold the camera. HP PhotoSmart C500 Digital Camera User's Guide 31 - HP Photosmart c500 | HP PhotoSmart C500 Digital Camera User’s Guide - C - Page 3
Flash Photo quality To view the camera status on the status LCD: • Press the on/off button to turn the camera on. Individual icons are discussed throughout this guide or you can see a list of all the icons in Appendix B "Icons" on page 129. HP PhotoSmart C500 Digital Camera User's Guide 32 - HP Photosmart c500 | HP PhotoSmart C500 Digital Camera User’s Guide - C - Page 4
and status. To change the camera settings, use the camera menus. See the following sections of this chapter for details. One or more icons may also appear on the Status screen, depending on the camera status. Color LCD Soft keys on/off button HP PhotoSmart C500 Digital Camera User's Guide 33 - HP Photosmart c500 | HP PhotoSmart C500 Digital Camera User’s Guide - C - Page 5
setting. White Bal The current white balance setting. Digita The camera firmware version number. Memory card inserted Battery status Color LCD Status 4. When you have finished viewing the camera status, press the Exit button (right soft key). HP PhotoSmart C500 Digital Camera User's Guide 34 - HP Photosmart c500 | HP PhotoSmart C500 Digital Camera User’s Guide - C - Page 6
, then press and hold the Shutter button 1/2 way down to allow the camera to adjust the focus and exposure. If you see an orange light to the left of the viewfinder, you may need to change the flash setting to adjust for the lighting conditions. HP PhotoSmart C500 Digital Camera User's Guide 35 - HP Photosmart c500 | HP PhotoSmart C500 Digital Camera User’s Guide - C - Page 7
not ready until this number appears. 2. Adjust your camera settings as needed. See "Adjusting the Camera Settings" on page 42 for details. 3. Press the color LCD on/off button to turn the color LCD on. Status LCD Camera mode dial On/off button HP PhotoSmart C500 Digital Camera User's Guide 36 - HP Photosmart c500 | HP PhotoSmart C500 Digital Camera User’s Guide - C - Page 8
card. If not, press the Delete button (center soft key) to discard the photos and try again. Pressing Delete discards the entire series of photos, not just the first photo. If you do not press either button, the camera automatically saves the photo. HP PhotoSmart C500 Digital Camera User's Guide - HP Photosmart c500 | HP PhotoSmart C500 Digital Camera User’s Guide - C - Page 9
Timelapse photo sequences. See "Using an AC Power Adapter (recommended)" on page 29 for more information. Tip: By default the camera takes 10 photos with 1 minute intervals between photos. If you want to change the Timelapse settings, see below. HP PhotoSmart C500 Digital Camera User's Guide 38 - HP Photosmart c500 | HP PhotoSmart C500 Digital Camera User’s Guide - C - Page 10
memory." To solve this problem, insert a new memory card, try a lower photo camera to adjust the focus and exposure. If you see an orange light to the left of the viewfinder, there may not be enough light on your subject. You can still take the photo. HP PhotoSmart C500 Digital Camera User's Guide - HP Photosmart c500 | HP PhotoSmart C500 Digital Camera User’s Guide - C - Page 11
settings: 1. Turn the camera on and turn the camera mode dial to Rec. 2. Press the Menu button. The color LCD displays the Media Settings menu. 3. Use the 4-way arrow button to scroll down to Timelapse. 4. Press the Edit button (left soft key). HP PhotoSmart C500 Digital Camera User's Guide 40 - HP Photosmart c500 | HP PhotoSmart C500 Digital Camera User’s Guide - C - Page 12
. This is the number of photos you want the camera to take. 10 Select from 2 to 1000 photos. 6. Use the 4-way arrow button to select the desired setting. 7. Press the Exit button (right soft key) twice to save your settings and exit the menus. HP PhotoSmart C500 Digital Camera User's Guide 41 - HP Photosmart c500 | HP PhotoSmart C500 Digital Camera User’s Guide - C - Page 13
photo type. 4. Press the Edit button (left soft key), then scroll down to Color. 5. Use the 4-way arrow button to choose B&W (black and white) or Full color. 6. Press the Exit button (right soft key) twice to save the settings and exit the menus. HP PhotoSmart C500 Digital Camera User's Guide 42 - HP Photosmart c500 | HP PhotoSmart C500 Digital Camera User’s Guide - C - Page 14
Timelapse photos, and remains until you change it, even if you turn the camera off. Flash button Note: You cannot use the flash for Burst photos; the flash button is inactive. The flash settings is off, you can take another flash photo. HP PhotoSmart C500 Digital Camera User's Guide 43 - HP Photosmart c500 | HP PhotoSmart C500 Digital Camera User’s Guide - C - Page 15
setting. See the table above for information about each of the flash settings. Note: You cannot use the flash for Burst photos. If you choose a flash setting from the menu but you are taking , turn the color LCD off after you choose the setting. HP PhotoSmart C500 Digital Camera User's Guide 44 - HP Photosmart c500 | HP PhotoSmart C500 Digital Camera User’s Guide - C - Page 16
card, camera processes photos with Fine or Super-fine diamond photo quality faster than those with lower photo quality. If you want to take several photos, one after the other, in a short period of time, use the Fine or Superfine photo quality setting. HP PhotoSmart C500 Digital Camera User's Guide - HP Photosmart c500 | HP PhotoSmart C500 Digital Camera User’s Guide - C - Page 17
To adjust the photo quality: 1. Turn the camera on and turn the camera mode dial to Rec. 2. Press the Photo Quality button repeatedly until the desired photo quality setting displays on the status LCD. Photo quality icon Photo quality button HP PhotoSmart C500 Digital Camera User's Guide 46 - HP Photosmart c500 | HP PhotoSmart C500 Digital Camera User’s Guide - C - Page 18
that you plan to print up to 5x7 inch prints. This is the default setting. Super-fine Produces the highest-quality photos and High Low uses the most memory. Use this setting (1600x1200 pixels) for taking photos you plan to enlarge and print. HP PhotoSmart C500 Digital Camera User's Guide 47 - HP Photosmart c500 | HP PhotoSmart C500 Digital Camera User’s Guide - C - Page 19
of photos: Still, Burst and Timelapse. To adjust the photo quality using the menus: 1. Turn the camera on and turn the camera mode dial to Rec. 2. Press the Menu button. 3. Select the compression level to save space on the memory card. Medium HP PhotoSmart C500 Digital Camera User's Guide 48 - HP Photosmart c500 | HP PhotoSmart C500 Digital Camera User’s Guide - C - Page 20
This just means that you are using a custom photo quality setting. Tip: If you aren't sure which settings to select, press the Default button (left soft key). 7. Press the Exit button (right soft key) twice to save your settings and exit the menus. HP PhotoSmart C500 Digital Camera User's Guide 49 - HP Photosmart c500 | HP PhotoSmart C500 Digital Camera User’s Guide - C - Page 21
bird in the tree. more than you can with the optical zoom. If you use the digital zoom, your photos will have lower resolution than they usually would for a particular with digital zoom 640x480 pixels 800x600 pixels 800x600 pixels 800x600 pixels HP PhotoSmart C500 Digital Camera User's Guide - HP Photosmart c500 | HP PhotoSmart C500 Digital Camera User’s Guide - C - Page 22
. 5. Frame your subject on the color LCD rather than through the viewfinder. Use the Zoom control to make further adjustments. Digital zoom icon 6. Take your photo. 7. Press the color LCD on/off button to turn the color LCD and digital zoom off. HP PhotoSmart C500 Digital Camera User's Guide 51 - HP Photosmart c500 | HP PhotoSmart C500 Digital Camera User’s Guide - C - Page 23
The center soft key toggles between the self-timer and macro mode so that you can take photos using just one of the modes, or both at the same time. The icons appear in color if they are in black and white, indicating that macro mode is off. HP PhotoSmart C500 Digital Camera User's Guide 52 - HP Photosmart c500 | HP PhotoSmart C500 Digital Camera User’s Guide - C - Page 24
the camera on and turn the camera mode dial to Rec. 3. Press the color LCD on/off button to turn the color LCD on. 4. Select the Still option: • Press the left soft key repeatedly until the Still icon displays on the lower overlay bar. Still icon HP PhotoSmart C500 Digital Camera User's Guide - HP Photosmart c500 | HP PhotoSmart C500 Digital Camera User’s Guide - C - Page 25
and macro modes so that you can take photos using just one of the modes, or both at the same time camera starts blinking. The light blinks faster for the final 3 seconds, then stops blinking just before the camera takes the photo. Self-timer activated HP PhotoSmart C500 Digital Camera User's Guide - HP Photosmart c500 | HP PhotoSmart C500 Digital Camera User’s Guide - C - Page 26
Use the 4-way arrow button to decrease or increase the number of seconds the camera waits before taking the photo. You can select 3, 5, 10, 20, or 30 seconds. 8. Press the Exit button (right soft key) twice to save the settings and exit the menus. HP PhotoSmart C500 Digital Camera User's Guide 55 - HP Photosmart c500 | HP PhotoSmart C500 Digital Camera User’s Guide - C - Page 27
can also manually adjust the Use the 4-way arrow button to scroll to the Photo Assist menu. The Photo Assist menu displays with Exposure selected. 4. Press the Edit button (left soft key). 5. Use the 4-way arrow button to select an exposure option. HP PhotoSmart C500 Digital Camera User's Guide - HP Photosmart c500 | HP PhotoSmart C500 Digital Camera User’s Guide - C - Page 28
reading the light from one small spot in the center of the photo. Default 0 Matrix 6. Use the 4-way arrow camera at a darker part of the scene, press the Shutter button 1/2 way down, and then move the camera to include a brighter part of the scene. HP PhotoSmart C500 Digital Camera User's Guide - HP Photosmart c500 | HP PhotoSmart C500 Digital Camera User’s Guide - C - Page 29
a true white in different lighting conditions. You can manually adjust this setting to have the camera compensate for specific lighting conditions. The white balance setting remains the same until you change it, even if you turn the camera off. HP PhotoSmart C500 Digital Camera User's Guide 58 - HP Photosmart c500 | HP PhotoSmart C500 Digital Camera User’s Guide - C - Page 30
light from tungsten filament light bulbs in household lamps. You are using the flash to illuminate the subject. 6. Press the Select button (left soft key). 7. Press the Exit button (right soft key) twice to save the settings and exit the menus. HP PhotoSmart C500 Digital Camera User's Guide 59 - HP Photosmart c500 | HP PhotoSmart C500 Digital Camera User’s Guide - C - Page 31
scroll down to Capture. 4. Press the Edit button (left soft key). 5. Scroll to Instant Review. 6. Use the 4-way arrow button to turn Instant Review on or off. 7. Press the Exit button (right soft key) twice to save the settings and exit the menus. HP PhotoSmart C500 Digital Camera User's Guide 60 - HP Photosmart c500 | HP PhotoSmart C500 Digital Camera User’s Guide - C - Page 32
Camera Settings To use Instant Review: 1. Take your photo. After a few seconds, your photo appears briefly on the color LCD. Note: If your photo does not appear on the color LCD, you need to turn Instant Review color LCD, the camera saves the photo. HP PhotoSmart C500 Digital Camera User's Guide 61 - HP Photosmart c500 | HP PhotoSmart C500 Digital Camera User’s Guide - C - Page 33
the Hand Held setting off, the camera allows you take photos with a shutter speed as slow as 2 seconds. It is recommended that you use the camera with a tripod, or place the camera on a firm, stable surface if you need to use a slow shutter speed. HP PhotoSmart C500 Digital Camera User's Guide 62 - HP Photosmart c500 | HP PhotoSmart C500 Digital Camera User’s Guide - C - Page 34
turn Counter Reset off. It is off by default. To set Counter Reset: 1. Turn the camera on and turn the camera mode dial to Rec. 2. Press the Menu button. 3. Use the 4-way arrow button to scroll to the Preferences menu, then scroll down to Capture. HP PhotoSmart C500 Digital Camera User's Guide 63 - HP Photosmart c500 | HP PhotoSmart C500 Digital Camera User’s Guide - C - Page 35
, Rev, Play, PC Sleep 30 seconds 4 minutes Power off 10 minutes 10 minutes 30 minutes • If the camera is in sleep mode, press any button to "wake up" the camera. • If the camera has turned itself off, press the on/off button to turn it back on. HP PhotoSmart C500 Digital Camera User's Guide 64 - HP Photosmart c500 | HP PhotoSmart C500 Digital Camera User’s Guide - C - Page 36
that it has finished capturing the image. Beep is on by default. The camera beeps: • Twice after a photo has been taken. • Once at the beginning of a Burst series, and then twice at the end of the series. • For 3 seconds when the batteries are low. HP PhotoSmart C500 Digital Camera User's Guide 65 - HP Photosmart c500 | HP PhotoSmart C500 Digital Camera User’s Guide - C - Page 37
to scroll to the Preferences menu, then scroll down to General. 4. Press the Edit button (left soft key). 5. Use the 4-way arrow button to turn Beep on or off. 6. Press the Exit button (right soft key) twice to save the settings and exit the menus. HP PhotoSmart C500 Digital Camera User's Guide 66
-
 1
1 -
 2
2 -
 3
3 -
 4
4 -
 5
5 -
 6
6 -
 7
7 -
8
-
9
-
10
-
11
-
12
-
13
-
14
-
15
-
16
-
17
-
18
-
19
-
20
-
21
-
22
-
23
-
24
-
25
-
26
-
27
-
28
-
29
-
30
-
31
-
32
-
33
-
34
-
35
-
36
-
37
 |
 |

HP PhotoSmart C500 Digital Camera User’s Guide
30
Chapter 3 -Taking Photos
This chapter describes the process of taking photos with your HP PhotoSmart C500 Digital Camera, including how
to take Still, Burst, and Timelapse photos, and detailed descriptions of adjusting the camera settings. If you want a
quick overview, see the Basics guide that you received with your camera.
There are three settings you can use to take photos: Still, Burst, and Timelapse.
Tip:
The Burst setting is ideal for taking action photos. Use the Timelapse setting for observing a subject over a
longer period of time.
Overview
Taking a Photo
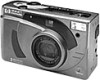
The HP PhotoSmart C500 Digital Camera has a 2-step
Shutter
button. When you press the
Shutter
button 1/2 way
down, the camera adjusts the focus and exposure of the photo. After these settings are adjusted, a green light
appears to the left of the viewfinder, indicating that you can press the
Shutter
button all the way down to take the
photo. You may want to practice to get used to the timing, before taking important photos.
Still
Use this setting for taking a single color or black and white photo.
Burst
Use this setting for taking up to 4 photos in rapid succession.
Timelapse
Use this setting for taking several photos, with a set amount of time (1 minute to 24
hours) between photos.