HP Photosmart s20 HP PhotoSmart S20 Photo Scanner - Basics, User's Guide
HP Photosmart s20 - Photo Scanner Manual
 |
View all HP Photosmart s20 manuals
Add to My Manuals
Save this manual to your list of manuals |
HP Photosmart s20 manual content summary:
- HP Photosmart s20 | HP PhotoSmart S20 Photo Scanner - Basics, User's Guide - Page 1
HP PhotoSmart S20 Photo Scanner Basics - HP Photosmart s20 | HP PhotoSmart S20 Photo Scanner - Basics, User's Guide - Page 2
use of this material. Portions of the software are copyright © LEAD Technologies, Inc. 1991-1998. ALL RIGHTS RESERVED. HP, the HP logo, PhotoSmart, and the PhotoSmart logo are property of Hewlett-Packard Company. Microsoft and Windows are registered trademarks of Microsoft Corporation. Pentium and - HP Photosmart s20 | HP PhotoSmart S20 Photo Scanner - Basics, User's Guide - Page 3
and Scanning Small Prints and Paper Clippings 22 Manually Ejecting Photographs ...24 Learning More About Your Photo Scanner ...25 Chapter 4 - Getting Help for Your Photo Scanner 27 Accessing the HP PhotoSmart Website ...27 Viewing Online Help ...27 Getting Technical Support ...29 http://www - HP Photosmart s20 | HP PhotoSmart S20 Photo Scanner - Basics, User's Guide - Page 4
Appendix A - Cleaning Your Photo Scanner 31 Appendix B - Uninstalling Your Photo Scanner 35 Uninstalling the Software ...35 Disconnecting the Photo Scanner ...35 Glossary ...37 Index ...41 2 HP PhotoSmart S20 Photo Scanner Basics - HP Photosmart s20 | HP PhotoSmart S20 Photo Scanner - Basics, User's Guide - Page 5
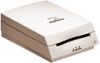
to the HP PhotoSmart S20 Photo Scanner Basics guide. The S20 photo scanner is a compact scanner designed specifically for scanning photographs. It can scan these photographic formats: • Mounted film - 35 mm mounted slides and mounted negatives • Film strips - 35 mm negative strips and slide strips - HP Photosmart s20 | HP PhotoSmart S20 Photo Scanner - Basics, User's Guide - Page 6
contents from the HP PhotoSmart S20 photo scanner box. You should find the following items in the box along with the photo scanner. This Basics guide for the S20 photo scanner and the Quick Reference for the HP PhotoSmart scanning software calibration card * photo sleeve * HP PhotoSmart CD-ROM - HP Photosmart s20 | HP PhotoSmart S20 Photo Scanner - Basics, User's Guide - Page 7
3. Remove the tape from the photo scanner lid. 4. Hold the bottom of the photo scanner with one hand and pull up on the photo scanner lid with your other hand. 5. Open the photo scanner lid carefully and remove the foam insert. http://www.photosmart.com 5 - HP Photosmart s20 | HP PhotoSmart S20 Photo Scanner - Basics, User's Guide - Page 8
view the online Help, and get technical support from Hewlett-Packard Company for your photo scanner. In addition, if you come across a particular term in this guide that you don't understand, please refer to the Glossary of definitions starting on page 37. 6 HP PhotoSmart S20 Photo Scanner Basics - HP Photosmart s20 | HP PhotoSmart S20 Photo Scanner - Basics, User's Guide - Page 9
Setup Chapter 2 - Quick Setup Note: You must install the HP PhotoSmart scanning software on your PC before you connect the S20 photo scanner to your PC. This chapter helps you quickly set up the HP PhotoSmart scanning software and S20 photo scanner with your PC. By following these simple steps, you - HP Photosmart s20 | HP PhotoSmart S20 Photo Scanner - Basics, User's Guide - Page 10
connector looks like this, and should have the distinctive USB symbol printed by it (usually above the connector), as shown here: USB symbol USB connector 8 HP PhotoSmart S20 Photo Scanner Basics - HP Photosmart s20 | HP PhotoSmart S20 Photo Scanner - Basics, User's Guide - Page 11
scanner.) Note: The S20 photo scanner does not have a power switch. Thus, the photo scanner is always on while it is plugged into a power source. The photo scanner does, however, have a "sleep" mode for low power consumption when it is not in use. 6. Click the Connected button in the HP PhotoSmart - HP Photosmart s20 | HP PhotoSmart S20 Photo Scanner - Basics, User's Guide - Page 12
installed, it will take a few seconds to do so. What's Next? You have now successfully set up the HP PhotoSmart scanning software and S20 photo scanner with your PC. Go on to the next chapter, "Scanning Photographs," to learn how to use your photo scanner. 10 HP PhotoSmart S20 Photo Scanner Basics - HP Photosmart s20 | HP PhotoSmart S20 Photo Scanner - Basics, User's Guide - Page 13
explains how to scan your photographs - mounted film, film strips, and prints - with the HP PhotoSmart S20 photo scanner. Scanning photographs consists of these simple steps: • Running the HP PhotoSmart scanning software on your PC • Setting the photo scanner for the format of the photograph you - HP Photosmart s20 | HP PhotoSmart S20 Photo Scanner - Basics, User's Guide - Page 14
your Windows desktop during software installation). OR: • Click the Start button in the Windows taskbar, and then choose Programs > HP PhotoSmart > S20 Photo Scanner > Scanning Software. Note: You can also start the HP PhotoSmart scanning software from inside another software program that supports - HP Photosmart s20 | HP PhotoSmart S20 Photo Scanner - Basics, User's Guide - Page 15
is to set the S20 photo scanner for the format of the photograph you will scan. To do this, you will use the Photo Format button on the photo scanner's front panel. The Photo Format button sets the photo insertion slot so it will accept the photographic format - mounted film, film strip, or print - HP Photosmart s20 | HP PhotoSmart S20 Photo Scanner - Basics, User's Guide - Page 16
Film photo insertion slot set for mounted film Setting the Photo Scanner for a Film Strip indicator light photo insertion slot set for a film strip Setting the Photo Scanner for a Print indicator light photo insertion slot set for a print indicator light 14 HP PhotoSmart S20 Photo Scanner - HP Photosmart s20 | HP PhotoSmart S20 Photo Scanner - Basics, User's Guide - Page 17
Orienting Photographs for Insertion When orienting a photograph for insertion into the S20 photo scanner, you must first determine: • Which is the emulsion side or picture side (face), and which is the back side of the mounted film, film strip, or print • Which edge is the top of a print picture - HP Photosmart s20 | HP PhotoSmart S20 Photo Scanner - Basics, User's Guide - Page 18
slot is set properly for mounted film, as shown in "Setting the Photo Scanner for the Photographic Format" on page 13. 2. Hold the mounted film by its mounting with the emulsion side down. (The emulsion side is dull compared to the shiny base side.) 16 HP PhotoSmart S20 Photo Scanner Basics - HP Photosmart s20 | HP PhotoSmart S20 Photo Scanner - Basics, User's Guide - Page 19
Insert a short side of the mounted film 4. Gently push the mounted film into the slot until the scanner light comes on and the photo scanner pulls in the mounted film. The photo scanner pulls in the mounted film 5. Begin using the HP PhotoSmart scanning software to adjust or store your scanned image - HP Photosmart s20 | HP PhotoSmart S20 Photo Scanner - Basics, User's Guide - Page 20
the photo insertion slot is set properly for film strips, as shown in "Setting the Photo Scanner for the Photographic Format" on page 13. 2. Hold the film strip by its edges with the emulsion side down. (The emulsion side is dull compared to the shiny base side.) 18 HP PhotoSmart S20 Photo Scanner - HP Photosmart s20 | HP PhotoSmart S20 Photo Scanner - Basics, User's Guide - Page 21
the slot until the scanner light comes on and the photo scanner pulls in the film strip. The photo scanner pulls in the film strip 4. Begin using the HP PhotoSmart scanning software to adjust or store your scanned images, as explained in the HP PhotoSmart Scanning Software Quick Reference and the - HP Photosmart s20 | HP PhotoSmart S20 Photo Scanner - Basics, User's Guide - Page 22
print by its edges with the picture side up. • For a landscape print, orient the top edge of the print to the right side of the photo insertion slot, as shown here. Orient a landscape print face up, top pointing right 20 HP PhotoSmart S20 Photo Scanner Basics - HP Photosmart s20 | HP PhotoSmart S20 Photo Scanner - Basics, User's Guide - Page 23
push the print into the slot until the scanner light comes on and the photo scanner pulls in the print. 4. Begin using the HP PhotoSmart scanning software to adjust or store your scanned image, as explained in the HP PhotoSmart Scanning Software Quick Reference and the online Help. http://www - HP Photosmart s20 | HP PhotoSmart S20 Photo Scanner - Basics, User's Guide - Page 24
. 3. Close the clear cover over the print or paper clipping. 4. Press the Photo Format button on the photo scanner until the photo insertion slot is set properly for prints, as shown in "Setting the Photo Scanner for the Photographic Format" on page 13. 22 HP PhotoSmart S20 Photo Scanner Basics - HP Photosmart s20 | HP PhotoSmart S20 Photo Scanner - Basics, User's Guide - Page 25
into the slot, as shown here: Insert the photo sleeve face up, seam pointing in 6. Gently push the photo sleeve into the slot until the scanner light comes on and the photo scanner pulls in the photo sleeve. 7. Begin using the HP PhotoSmart scanning software to adjust or store your scanned image, as - HP Photosmart s20 | HP PhotoSmart S20 Photo Scanner - Basics, User's Guide - Page 26
the photo scanner with one hand and pull up on the photo scanner lid with your other hand. 2. Open the photo scanner lid carefully about 2 inches and then remove your photograph. Be sure you do not touch any of the glass windows inside the photo scanner. 24 HP PhotoSmart S20 Photo Scanner Basics - HP Photosmart s20 | HP PhotoSmart S20 Photo Scanner - Basics, User's Guide - Page 27
scanning software are also included on the HP PhotoSmart CD. Finally, if you ever need help with your S20 photo scanner, see the next chapter. Chapter 4 explains how to access the HP PhotoSmart website and how to get technical support from Hewlett-Packard Company for your S20 photo scanner. http - HP Photosmart s20 | HP PhotoSmart S20 Photo Scanner - Basics, User's Guide - Page 28
26 HP PhotoSmart S20 Photo Scanner Basics - HP Photosmart s20 | HP PhotoSmart S20 Photo Scanner - Basics, User's Guide - Page 29
S20 photo scanner, including: • Accessing the HP PhotoSmart website for project ideas, troubleshooting assistance, and updated software • Viewing the online Help for "how to," reference, and troubleshooting information for your photo scanner • Getting technical support from Hewlett-Packard Company - HP Photosmart s20 | HP PhotoSmart S20 Photo Scanner - Basics, User's Guide - Page 30
Topics dialog box, either: • Click the Help Topics button at the top of any Help window (except "pop-up" Help windows). • From the Windows Start menu, choose Programs > HP PhotoSmart > S20 Photo Scanner > Help Topics. The Help Topics dialog box opens, as shown: tabs Help sections The information - HP Photosmart s20 | HP PhotoSmart S20 Photo Scanner - Basics, User's Guide - Page 31
are or when you need it, Hewlett-Packard Company's technical support is there to help you get the most from your HP products. Whether it's making products easier to use or providing you with innovative new ways to tackle your important projects, HP's technical support helps you be a confident and - HP Photosmart s20 | HP PhotoSmart S20 Photo Scanner - Basics, User's Guide - Page 32
30 HP PhotoSmart S20 Photo Scanner Basics - HP Photosmart s20 | HP PhotoSmart S20 Photo Scanner - Basics, User's Guide - Page 33
your HP PhotoSmart S20 photo scanner. This appendix explains how to clean your photo scanner by removing accumulated dust from the glass windows inside it. Tip: Before performing the cleaning procedure in this appendix, try calibrating the photo scanner to see if that clears up the problem. For - HP Photosmart s20 | HP PhotoSmart S20 Photo Scanner - Basics, User's Guide - Page 34
surface. Caution: Do not touch the glass windows inside the photo scanner with the air bulb. 4. Use the air bulb that came with your photo scanner to blow the dust off the small glass window in the front bottom of the photo scanner between the rollers. 32 HP PhotoSmart S20 Photo Scanner Basics - HP Photosmart s20 | HP PhotoSmart S20 Photo Scanner - Basics, User's Guide - Page 35
5. Use the air bulb to blow the dust off the long glass window in the front top of the photo scanner. 6. Turn the photo scanner back onto its base, and close the photo scanner lid by pressing down firmly until it snaps into place. http://www.photosmart.com 33 - HP Photosmart s20 | HP PhotoSmart S20 Photo Scanner - Basics, User's Guide - Page 36
34 HP PhotoSmart S20 Photo Scanner Basics - HP Photosmart s20 | HP PhotoSmart S20 Photo Scanner - Basics, User's Guide - Page 37
includes uninstalling the HP PhotoSmart scanning software from your PC, as well as disconnecting the S20 photo scanner from the power outlet and from your PC. Uninstalling the Software To uninstall the HP PhotoSmart scanning software from your PC, do the following: 1. From the Windows Start menu - HP Photosmart s20 | HP PhotoSmart S20 Photo Scanner - Basics, User's Guide - Page 38
36 HP PhotoSmart S20 Photo Scanner Basics - HP Photosmart s20 | HP PhotoSmart S20 Photo Scanner - Basics, User's Guide - Page 39
calibration card A card used to calibrate the HP PhotoSmart S20 photo scanner for scanning prints. (The calibration card is packaged in the special pocket inside the back cover of this Basics guide.) The calibration card contains both black and white reference sections so that the photo scanner - HP Photosmart s20 | HP PhotoSmart S20 Photo Scanner - Basics, User's Guide - Page 40
of a particular photograph. The HP PhotoSmart S20 photo scanner can scan photographs of the following photographic formats: mounted film (35 mm mounted slides or mounted negatives), film strips (35 mm negative strips or slide strips), and prints. 38 HP PhotoSmart S20 Photo Scanner Basics - HP Photosmart s20 | HP PhotoSmart S20 Photo Scanner - Basics, User's Guide - Page 41
photo scanner has on the image. The HP PhotoSmart S20 photo scanner is automatically calibrated each time either mounted film or a film strip is scanned, but must be periodically calibrated for prints using the photo scanner's calibration card. See also calibration card. photo sleeve The white card - HP Photosmart s20 | HP PhotoSmart S20 Photo Scanner - Basics, User's Guide - Page 42
the front or back exterior of the PC. USB interface The Universal Serial Bus hardware and its associated software drivers. A USB interface installed in a PC and connected to the HP PhotoSmart S20 photo scanner enables the photo scanner to talk to the PC. 40 HP PhotoSmart S20 Photo Scanner Basics - HP Photosmart s20 | HP PhotoSmart S20 Photo Scanner - Basics, User's Guide - Page 43
S20 photo scanner 10 Calibration card 4, 10 CD-ROM, HP PhotoSmart installing the software from 7 tutorials on 25 Cleaning brush 4 Cleaning the S20 photo scanner 31 Connecting power cable 8 S20 photo scanner to PC 8 S20 photo scanner to USB 9 USB interface cable 9 Connector, USB 8 Customer Support - HP Photosmart s20 | HP PhotoSmart S20 Photo Scanner - Basics, User's Guide - Page 44
27 Photo Format button 13 photographic formats supported 3 registering 10 regulatory notices 28 setting for photographic format 13 sleep mode 9 specifications 28 Stop/Eject button 24 system requirements 3 technical support from HP 29 uninstalling 35 unpacking 4 HP PhotoSmart S20 Photo Scanner Basics - HP Photosmart s20 | HP PhotoSmart S20 Photo Scanner - Basics, User's Guide - Page 45
3 T Technical support from HP 29 Telephone numbers for HP Customer Support 29 Troubleshooting information 27 Tutorials on HP PhotoSmart CD 25 U Uninstalling the S20 photo scanner and scanning software 35 Unpacking the S20 photo scanner 4 USB cable 4 connecting S20 photo scanner to 9 connector - HP Photosmart s20 | HP PhotoSmart S20 Photo Scanner - Basics, User's Guide - Page 46
44 HP PhotoSmart S20 Photo Scanner Basics
-
 1
1 -
 2
2 -
 3
3 -
 4
4 -
 5
5 -
 6
6 -
 7
7 -
8
-
9
-
10
-
11
-
12
-
13
-
14
-
15
-
16
-
17
-
18
-
19
-
20
-
21
-
22
-
23
-
24
-
25
-
26
-
27
-
28
-
29
-
30
-
31
-
32
-
33
-
34
-
35
-
36
-
37
-
38
-
39
-
40
-
41
-
42
-
43
-
44
-
45
-
46
 |
 |

HP PhotoSmart
S20 Photo Scanner
Basics