HP Presario SR1700 Getting Started Guide - Compaq Presario PC - Page 85
Adding slideshows to a video project, Open Project, New Slideshow, Add Files, Capture Pictures
 |
View all HP Presario SR1700 manuals
Add to My Manuals
Save this manual to your list of manuals |
Page 85 highlights
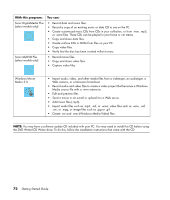
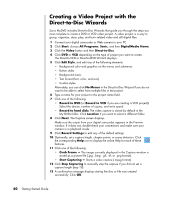
Adding slideshows to a video project You can create a slideshow (a series of still images displayed automatically) by adding existing still photos to your project or by capturing them with a connected digital video source. To add a slideshow to a video project: 1 Click File, Open Project, and then select a video project that you created as described in "Creating a Video Project" on page 75. 2 Click New Slideshow to open the Create Slideshow window. 3 Do one or more of the following: • Click Add Files to add existing picture files to the slideshow. • Click Capture Pictures to capture still images from your camera. 4 Click Options to set the slide duration, or to add a background audio track. Online Help is available for these features by clicking the Help icon in the MyDVD window. 5 Click OK to add the slideshow to the video project. Adding submenus to a video project Each project element (video file, still picture file, and slideshow) that you add to a video project is represented in the main project window. Each menu displays six items before a new menu is automatically created and linked to the previous menu by a Next button. You can manually add submenus to a project and use them to organize topics associated with the theme of your project. For example, if the project is your child's soccer game, the video files of the game could be the main menu elements, and you could insert a submenu that contains interviews with your son and his teammates. To add a submenu to a video project: 1 Click File, Open Project, and then select a video project that you created as described in "Creating a Video Project" on page 75. 2 Click New Sub-Menu. A submenu called Untitled Menu 0 is added to the first menu that has less than six project elements. 3 Click the submenu name (Untitled Menu 0), and type an appropriate name for the menu. 4 Double-click the new submenu, and do one or more of the following: • Add existing video files as described in "Adding files to a video project" on page 75. • Capture video as described in "Capturing video to a video project" on page 76. Creating Video Discs and Movies 77
-
 1
1 -
2
-
3
-
4
-
5
-
6
-
7
-
8
-
9
-
10
-
11
-
12
-
13
-
14
-
15
-
16
-
17
-
18
-
19
-
20
-
21
-
22
-
23
-
24
-
25
-
26
-
27
-
28
-
29
-
30
-
31
-
32
-
33
-
34
-
35
-
36
-
37
-
38
-
39
-
40
-
41
-
42
-
43
-
44
-
45
-
46
-
47
-
48
-
49
-
50
-
51
-
52
-
53
-
54
-
55
-
56
-
57
-
58
-
59
-
60
-
61
-
62
-
63
-
64
-
65
-
66
-
67
-
68
-
69
-
70
-
71
-
72
-
73
-
74
-
75
-
76
-
77
-
78
-
79
-
 80
80 -
 81
81 -
 82
82 -
 83
83 -
 84
84 -
 85
85 -
 86
86 -
 87
87 -
 88
88 -
 89
89 -
 90
90 -
91
-
92
-
93
-
94
-
95
-
96
-
97
-
98
-
99
-
100
-
101
-
102
-
103
-
104
-
105
-
106
-
107
-
108
-
109
-
110
-
111
-
112
 |
 |