HP ProLiant DL140 Intel Processor Installation Instructions ProLiant DL140 Gen - Page 3
Post-installation Procedures
 |
View all HP ProLiant DL140 manuals
Add to My Manuals
Save this manual to your list of manuals |
Page 3 highlights
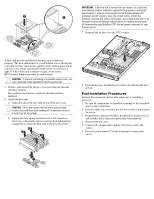
IMPORTANT: If the heat sink is removed for any reason, it is critical that more thermal interface material be applied to the processor's integrated heat spreader in order to ensure proper thermal bonding between the processor and the heat sink. Clean the contact surface of both the processor and heat sink with an alcohol pad, and re-apply a thin layer of an HP approved thermal interface material before re-installing the processor. HP recommends using ShinEtsu G751 thermal grease compound for your ProLiant server. 7. Reinstall the air duct over the CPU sockets. A heat sink must be installed for the processor to function properly. The heat sink model for your ProLiant server already has a thermal interface material pre-applied on the bottom protected by a plastic cover. Make sure that this material has no scratches or gaps. If it does have any scratches or gaps, contact your HP Customer Support provider for replacement. CAUTION: To prevent overheating or a possible system crash, use only a heat sink model specified for this ProLiant model. 5. Remove and discard the plastic cover protecting the thermal interface material. Be careful not to touch or scratch the thermal interface material. 6. Install the heat sink: a. Align then insert the heat sink on top of the processor. CAUTION: Do not over tighten the heat sink's spring-loaded screws to prevent them from breaking off. A maximum torque of 6 in-lb is set for the system. b. Tighten the four spring-loaded screws a few threads in, observing a diagonally opposite pattern, then tighten them completely to secure the heat sink to the processor base. 8. Perform the post- installation procedures described in the next section. Post-installation Procedures Perform the instructions below after removing or installing a processor. 1. Be sure all components are installed according to the described step-by-step instructions. 2. Check to make sure you have not left loose tools or parts inside the server. 3. Reinstall any expansion board(s), peripheral(s), board cover(s), and system cable(s) that have previously been removed. 4. Reinstall the top cover. 5. Connect all external cables and the AC power cord to the system. 6. Press the power button on the front panel to turn on the server.
-
 1
1 -
 2
2 -
 3
3
 |
 |
