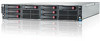
HP ProLiant DL170e HP ProLiant DL170e G6 Server Maintenance and Service Guide - Page 74
To install the heat sink, CAUTION, procedures
 |
View all HP ProLiant DL170e manuals
Add to My Manuals
Save this manual to your list of manuals |
Page 74 highlights
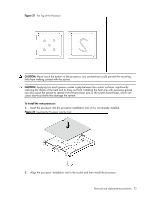
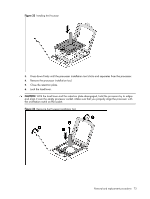
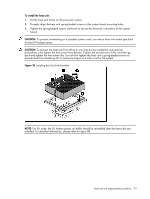
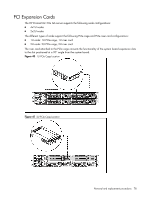
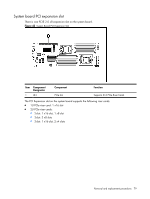
To install the heat sink: 1. Put the heat sink frame on the processor socket. 2. Properly align the heat sink spring-loaded screws to the system board mounting holes. 3. Tighten the spring-loaded screws clockwise to secure the heat sink connection to the system board. CAUTION: To prevent overheating or a possible system crash, use only a heat sink model specified for the HP ProLiant server. CAUTION: To prevent the heat sink from tilting to one side during installation and removal procedures, only tighten the first screw three quarter. Tighten the second screw fully, and then go back and tighten the first screw fully. Do not over tighten the heat sink's spring-loaded screws to prevent them from breaking off. A maximum torque of 4 in-Ib is set for the system. Figure 35 Installing the Heat Sink Assembly NOTE: For 2U node, the 2U bottom plastic air baffle should be reinstalled after the heat sinks are installed. For detailed information, please refer to Figure 88. Removal and replacement procedures 74
-
 1
1 -
2
-
3
-
4
-
5
-
6
-
7
-
8
-
9
-
10
-
11
-
12
-
13
-
14
-
15
-
16
-
17
-
18
-
19
-
20
-
21
-
22
-
23
-
24
-
25
-
26
-
27
-
28
-
29
-
30
-
31
-
32
-
33
-
34
-
35
-
36
-
37
-
38
-
39
-
40
-
41
-
42
-
43
-
44
-
45
-
46
-
47
-
48
-
49
-
50
-
51
-
52
-
53
-
54
-
55
-
56
-
57
-
58
-
59
-
60
-
61
-
62
-
63
-
64
-
65
-
66
-
67
-
68
-
 69
69 -
 70
70 -
 71
71 -
 72
72 -
 73
73 -
 74
74 -
 75
75 -
 76
76 -
 77
77 -
 78
78 -
 79
79 -
80
-
81
-
82
-
83
-
84
-
85
-
86
-
87
-
88
-
89
-
90
-
91
-
92
-
93
-
94
-
95
-
96
-
97
-
98
-
99
-
100
-
101
-
102
-
103
-
104
-
105
-
106
-
107
-
108
-
109
-
110
-
111
-
112
-
113
-
114
-
115
-
116
-
117
-
118
-
119
-
120
-
121
-
122
-
123
-
124
-
125
-
126
-
127
-
128
-
129
-
130
-
131
-
132
-
133
-
134
-
135
-
136
-
137
-
138
-
139
-
140
-
141
-
142
-
143
-
144
-
145
-
146
-
147
-
148
-
149
-
150
-
151
-
152
-
153
-
154
-
155
-
156
-
157
-
158
-
159
-
160
-
161
-
162
-
163
-
164
-
165
-
166
-
167
-
168
-
169
-
170
-
171
-
172
-
173
-
174
-
175
-
176
-
177
-
178
-
179
-
180
 |
 |
