HP ProLiant DL185 HP SATA DVD-ROM Optical Drive Installation Instructions for - Page 1
HP ProLiant DL185 - G5 Server Manual
 |
View all HP ProLiant DL185 manuals
Add to My Manuals
Save this manual to your list of manuals |
Page 1 highlights
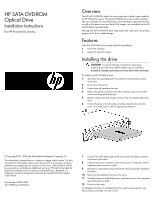
HP SATA DVD-ROM Optical Drive Installation Instructions for HP ProLiant DL servers Overview The HP SATA DVD-ROM optical drive provides optical media read capability for HP ProLiant DL servers. The SATA DVD-ROM drive has a SATA interface and can read both CD and DVD media. More information about this product, as well as the latest drivers and flash ROM images, are available from the HP website (http://www.hp.com). Although the SATA DVD-ROM drive reads audio and video discs, the primary purpose of the drive is data storage. Features The SATA DVD-ROM drive includes the following features: • Has SATA interface • Reads CD and DVD media Installing the drive CAUTION: To prevent damage to electrical components, properly ground the server before beginning any installation procedure. Improper grounding can cause electrostatic discharge. To install the SATA DVD-ROM drive: 1. Shut down the operating system as outlined in the operation system instructions. 2. Power down the server. 3. Power down all peripheral devices. 4. Remove the power cord from the outlet, and then remove it from the server and all peripheral devices. 5. Remove components that prevent access to the removable-media drive bays. 6. Position the drive in the drive bay, and then slide the drive into the server. If needed, secure with the appropriate fasteners. © Copyright 2007, 2008 Hewlett-Packard Development Company, L.P. The information contained herein is subject to change without notice. The only warranties for HP products and services are set forth in the express warranty statements accompanying such products and services. Nothing herein should be construed as constituting an additional warranty. HP shall not be liable for technical or editorial errors or omissions contained herein. Bluetooth is a trademark owned by its proprietor and used by Hewlett-Packard Company under license. Part Number 453281-002 April 2008 (Second Edition) 7. Connect the SATA data cable to the server and to the data connector on the rear of the drive. 8. Connect the power connector to the server power. If required, use the supplied power conversion cable. 9. Reinstall all components removed from the server during the installation procedure. 10. Reconnect all peripheral devices to the server. 11. Connect the power cord to the server, and then connect it to a properly grounded electrical outlet. 12. Power up the server. For detailed instructions on installing the drive, see the server-specific user documentation provided with your server.
-
 1
1
 |
 |