HP Q3714A#ABA HP Color LaserJet 5550 series - User Guide - Page 180
To Load Fonts/data, Insert Or Close
 |
View all HP Q3714A#ABA manuals
Add to My Manuals
Save this manual to your list of manuals |
Page 180 highlights
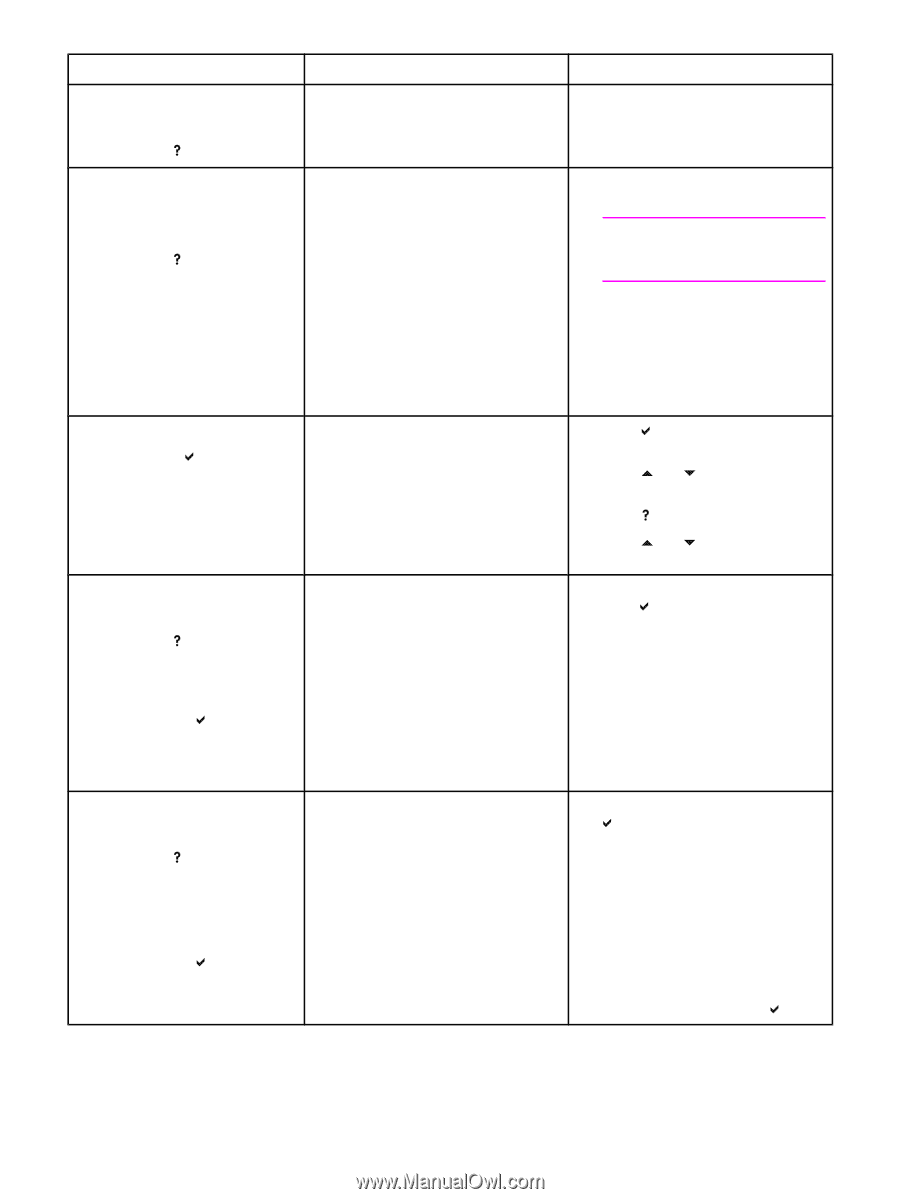
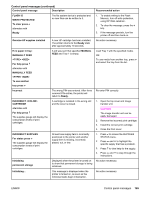
Control panel messages (continued) Control panel message Description Recommended action INSERT OR CLOSE TRAY X For help press Tray XX must be inserted or closed before the current job can be printed. Close the tray indicated. INSTALL CARTRIDGE alternates with For help press The supplies gauge will display the consumption levels of print cartridges. The cartridge is either not installed or not 1. Open the top cover and image correctly installed in the printer. transfer unit. CAUTION The image transfer unit can be easily damaged. 2. Insert the print cartridge and make sure that it is fully seated. 3. Close the front cover. 4. If the error persists, contact HP support at http://www.hp.com/ support/clj5550. INSTALL SUPPLIES For status press The supplies gauge will display the consumption levels of print cartridges. At least one supply item is missing or is not correctly seated in the printer and another supply item is missing, incorrectly placed, out, or low. Insert the supply item or make sure the installed supply item is fully seated. 1. Press to access the SUPPLIES STATUS menu. 2. Press and to highlight the specific supply that has a problem. 3. Press to view help for the supply. 4. Press and to step through the instructions. INSUFFICIENT MEMORY TO LOAD FONTS/DATA For help press alternates with To continue press The device does not have enough memory to load the data, such as fonts or macros from the location specified. can be one of the following: INTERNAL = ROM directly on the formatter board CARD SLOT X = font card in slot X DIMMS EIO X DISK = removable hard disk installed in EIO slot X 1. To use the device without the data, press . 2. To solve the problem, add more memory to the device. DDR SDRAM Memory: 128MB, (Q2630A) or 256MB (Q2631A). LOAD TRAY 1: For help press alternates with LOAD TRAY 1: To continue press Tray 1 is loaded and configured for a type and size other than the one specified in the job. 1. If the correct paper is loaded, press . 2. Otherwise, remove the incorrect paper and load Tray 1 with the specified paper. 3. Confirm that the media guides are in the correct position. 4. Verify that the tray switch is in the correct position. 5. To use another tray, remove paper from Tray 1 and then press . 166 Chapter 8 Problemsolving ENWW
-
 1
1 -
2
-
3
-
4
-
5
-
6
-
7
-
8
-
9
-
10
-
11
-
12
-
13
-
14
-
15
-
16
-
17
-
18
-
19
-
20
-
21
-
22
-
23
-
24
-
25
-
26
-
27
-
28
-
29
-
30
-
31
-
32
-
33
-
34
-
35
-
36
-
37
-
38
-
39
-
40
-
41
-
42
-
43
-
44
-
45
-
46
-
47
-
48
-
49
-
50
-
51
-
52
-
53
-
54
-
55
-
56
-
57
-
58
-
59
-
60
-
61
-
62
-
63
-
64
-
65
-
66
-
67
-
68
-
69
-
70
-
71
-
72
-
73
-
74
-
75
-
76
-
77
-
78
-
79
-
80
-
81
-
82
-
83
-
84
-
85
-
86
-
87
-
88
-
89
-
90
-
91
-
92
-
93
-
94
-
95
-
96
-
97
-
98
-
99
-
100
-
101
-
102
-
103
-
104
-
105
-
106
-
107
-
108
-
109
-
110
-
111
-
112
-
113
-
114
-
115
-
116
-
117
-
118
-
119
-
120
-
121
-
122
-
123
-
124
-
125
-
126
-
127
-
128
-
129
-
130
-
131
-
132
-
133
-
134
-
135
-
136
-
137
-
138
-
139
-
140
-
141
-
142
-
143
-
144
-
145
-
146
-
147
-
148
-
149
-
150
-
151
-
152
-
153
-
154
-
155
-
156
-
157
-
158
-
159
-
160
-
161
-
162
-
163
-
164
-
165
-
166
-
167
-
168
-
169
-
170
-
171
-
172
-
173
-
174
-
 175
175 -
 176
176 -
 177
177 -
 178
178 -
 179
179 -
 180
180 -
 181
181 -
 182
182 -
 183
183 -
 184
184 -
 185
185 -
186
-
187
-
188
-
189
-
190
-
191
-
192
-
193
-
194
-
195
-
196
-
197
-
198
-
199
-
200
-
201
-
202
-
203
-
204
-
205
-
206
-
207
-
208
-
209
-
210
-
211
-
212
-
213
-
214
-
215
-
216
-
217
-
218
-
219
-
220
-
221
-
222
-
223
-
224
-
225
-
226
-
227
-
228
-
229
-
230
-
231
-
232
-
233
-
234
-
235
-
236
-
237
-
238
-
239
-
240
-
241
-
242
-
243
-
244
-
245
-
246
-
247
-
248
-
249
-
250
-
251
-
252
-
253
-
254
-
255
-
256
-
257
-
258
-
259
-
260
-
261
-
262
-
263
-
264
-
265
-
266
-
267
-
268
-
269
-
270
-
271
-
272
-
273
-
274
-
275
-
276
-
277
-
278
-
279
-
280
-
281
-
282
-
283
-
284
-
285
-
286
-
287
-
288
-
289
-
290
-
291
-
292
-
293
-
294
 |
 |