HP Q7311A Setup Guide
HP Q7311A - Officejet 5610 All-in-One Manual
 |
UPC - 829160963952
View all HP Q7311A manuals
Add to My Manuals
Save this manual to your list of manuals |
HP Q7311A manual content summary:
- HP Q7311A | Setup Guide - Page 1
/2700 series all-in-one User Guide User Guide phone cord print cartridges power cord and adapter control panel faceplate (may be attached) bottom paper tray USB cable* top (output) tray *Purchased separately. The contents of your box may differ. HP Officejet 5600 All-in-One series Setup Guide - HP Q7311A | Setup Guide - Page 2
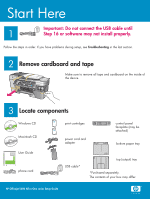
tray into b Slide the paper adjuster over to c Insert plain white paper. the device, and then lower until the the left. tray is flat. d Attach the top (output) tray. Make sure you hook the top edge of the tray into the light gray latches, and then lower. 2 • HP All-in-One e Flip the paper tray - HP Q7311A | Setup Guide - Page 3
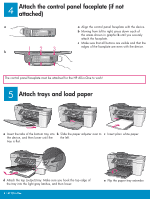
supplied phone cord Connect one end of the supplied phone cord to the phone port on the left (1-LINE) and the other to a wall jack. To connect an answering machine or use your own phone cord, see the User Guide side. If you have a carriage jam, see Troubleshooting on the last page. HP All-in-One • 3 - HP Q7311A | Setup Guide - Page 4
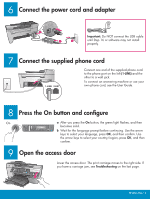
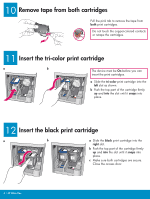
it snaps into place. 12 Insert the black print cartridge a b a Slide the black print cartridge into the right slot. b Push the top part of the cartridge firmly up and into the slot until it snaps into place. c Make sure both cartridges are secure. Close the access door. 4 • HP All-in-One - HP Q7311A | Setup Guide - Page 5
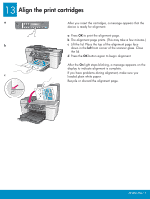
13 Align the print cartridges a After you insert the cartridges, a message appears that the device is ready for alignment. a Press alignment is complete. If you have problems during alignment, make sure you c loaded plain white paper. Recycle or discard the alignment page. HP All-in-One • 5 - HP Q7311A | Setup Guide - Page 6
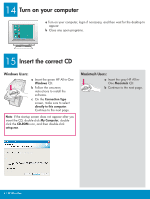
for the desktop to appear. b Close any open programs. 15 Insert the correct CD Windows Users: a Insert the green HP All-in-One Windows CD. b Follow the onscreen instructions to install the software. c On the Connection Type screen, make sure to select directly to this computer. Continue to the - HP Q7311A | Setup Guide - Page 7
Double-click the HP All-in-One Installer icon. c Make sure you complete all screens, including the Setup Assistant. After you complete software installation, you are finished. If you do not see this screen, see Troubleshooting in the last section. b Follow the onscreen instructions. Complete the Fax - HP Q7311A | Setup Guide - Page 8
the copper contacts. Re-insert the cartridges, and then close the access door. Problem: (Windows only) You did not see the screen telling you when to connect the USB cable. Action: Remove, and then re-insert the HP All-in-One Windows CD. Refer to Step 15. Problem: (Windows only) The Microsoft Add
-
 1
1 -
 2
2 -
 3
3 -
 4
4 -
 5
5 -
 6
6 -
 7
7 -
8
 |
 |

2
3
1
HP Photosmart 2600/2700 series all-in-one
User Guide
HP Photosmart 2600/2700 series all-in-one
User Guide
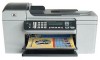
Start Here
Important: Do not connect the USB cable until
Step 16 or software may not install properly.
Remove cardboard and tape
Locate components
Windows CD
Macintosh CD
User Guide
print cartridges
power cord and
adapter
USB cable*
HP Officejet 5600 All-in-One series Setup Guide
*Purchased separately.
The contents of your box may differ.
Follow the steps in order. If you have problems during setup, see
Troubleshooting
in the last section.
phone cord
bottom paper tray
top (output) tray
Make sure to remove all tape and cardboard on the inside of
the device.
control panel
faceplate (may be
attached)