HP RDX1000 Internal Removable Disk Backup System Plus 2RDX1000 HP RDX USB 3.0 - Page 1
HP RDX1000 Internal Removable Disk Backup System Plus 2RDX1000 Manual
 |
View all HP RDX1000 Internal Removable Disk Backup System Plus 2RDX1000 manuals
Add to My Manuals
Save this manual to your list of manuals |
Page 1 highlights
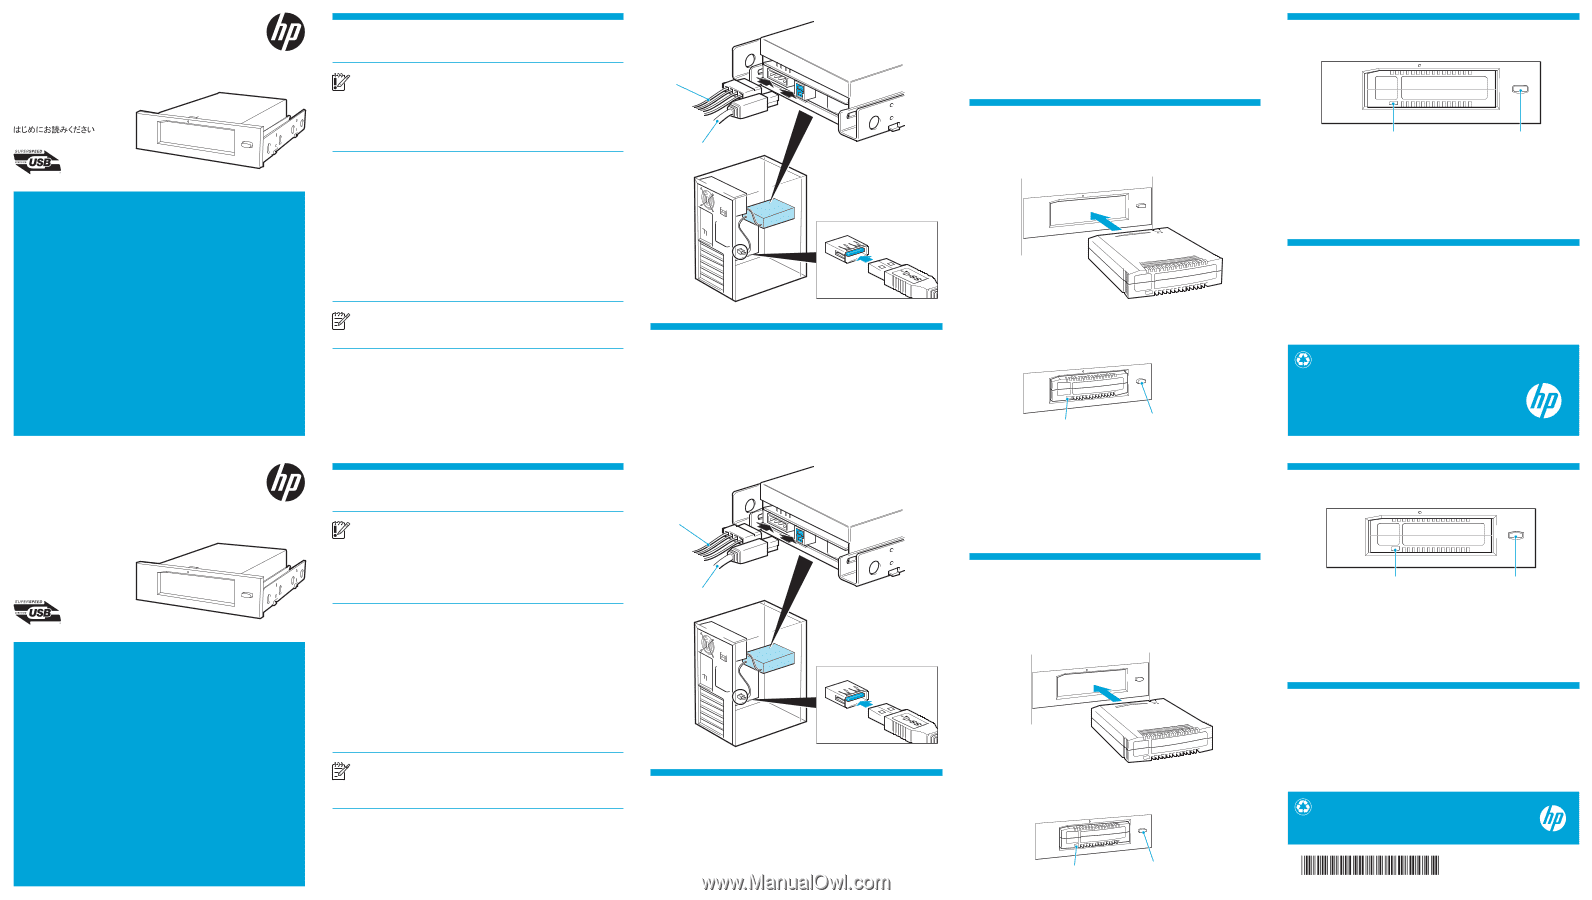
HP RDX USB 3.0 Removable Disk Backup System Internal drive Start Here Commencez ici Hier starten= IMPORTANT INFORMATION ABOUT YOUR NEW DRIVE • Connect to a USB 3.0 port (on a computer running Windows®). USB 2.0 is supported, but performance will be degraded. • For optimum performance use HP-branded RDX Removable Disk cartridges. • Although RDX Removable Disk cartridges are ruggedly built, they must be handled with care to ensure data integrity and long life. • To ensure correct operation of the eject function, install the HP RDX Utility from the CD. This utility also allows you to download and install firmware upgrades from www.hp.com/support/rdx. 1 Installation overview IMPORTANT: Disconnect your computer from the mains power supply before installing the RDX Removable Disk Backup System and observe anti-static precautions. See also the Safety Booklet on the HP RDX Utility CD. Use a spare power cable to connect to the computer's power supply. (The drive is not powered from the USB bus.) For detailed, step-by-step installation instructions refer to the User Guide found on the HP RDX Utility CD supplied with your product. Mounting Screws An accessory kit containing M3 screws is supplied with the HP RDX USB 3.0 Internal Removable Disk Backup System for use with servers that do not have the correct screws available. Check server schematic for internal USB port Connect to a dedicated USB 3.0 port on your computer. The drive is backward compatible with USB 2.0, but performance will be degraded. Do not connect to a USB 1.1 port. Use the schematic on the inside of the door or consult your computer documentation to locate the availability and position of a standard USB 3.0 Type A socket. If a suitable internal port is not available on the system board, HP recommends installing a dedicated host bus adapter. See the RDX QuickSpecs for recommended products. NOTE: It is also possible to connect to a USB 2.0 Intel or HP 4-pin header connector; appropriate cables must be purchased separately. See the RDX QuickSpecs for recommended products and refer to the User Guide for cabling instructions. Attach USB cable to internal USB 3.0 port Use the standard USB 3.0 cable supplied with the RDX Removable Disk Backup System. Power cable USB cable 2 Completing the installation Install the HP RDX Utility supplied on your HP RDX Utility CD. If the software is not installed, the eject button and right-click eject method may not work properly. Install or update backup software: It is important to check www.hp.com/storage/spock for software compatibility and install any recommended updates. Diagnostic tools The HP RDX Removable Disk utility contains basic diagnostics tools, enables proper cartridge ejection and allows you to download and install firmware upgrades from www.hp.com/support/rdx. This utility is on the HP RDX Utility CD supplied with your product. HP Library & Tape Tools, which can be downloaded free of charge from www.hp.com/support/tapetools, can also be used to determine whether your product can operate properly. 3 Using the RDX Removable Disk Backup System To load a cartridge: Push the cartridge gently into the unit until it is locked into place with a clicking sound. To unload a cartridge: Wait until the cartridge Activity LED is solid green and push the Eject button. (Eject only works correctly if HP RDX Removable disk utility is installed.) Activity LED Eject button/Power LED 4 Understanding the LEDs Activity LED Eject button/Power LED Activity LED • Blinking Green: Cartridge is connected to an RDX service (reading, writing, seeking activity). • On Amber: The drive has detected a cartridge fault condition. Eject Button/Power LED • Off: No power. • On Green: The drive is ready for use. • Blinking Green: The drive is ejecting the cartridge. • On Amber: There is a fault with the drive. • Blinking Amber: The drive is waiting for cartridge activity to complete before ejecting. 5 Other sources of information • The detailed User Guide on the HP RDX Utility CD. • www.hp.com/storage/spock (for computer, OS and software compatibility). • www.hp.com/support/ (for latest product details). • For detailed safety instructions, see the Safety Booklet on the HP RDX Utility CD. © 2012 Hewlett-Packard Development Company, L.P. Printed in China www.hp.com HP RDX USB 3.0 Removable Disk Backup System Lecteur interne Commencez ici INFORMATIONS IMPORTANTES SUR LE NOUVEAU LECTEUR • Connectez-vous toujours sur un port USB 3.0 (sur un ordinateur exécutant Windows®) USB 2.0 est également pris en charge, mais les performances risquent d'être dégradées. • Pour des performances optimales, utilisez des cartouches de disque amovibles RDX de marque HP. • Bien que les cartouches de disques amovibles RDX soient de fabrication robuste, elles doivent être manipulées avec soin pour assurer l'intégrité des données et prolonger leur durée de vie. • Pour assurer le bon fonctionnement de la fonction d'éjection, installez l'utilitaire HP RDX Utility inclus dans le CD-ROM. Cet utilitaire permet également de télécharger et d'installer les mises à niveau de microprogrammes depuis www.hp.com/support/rdx. 1 Présentation de l'installation IMPORTANT : débranchez l'ordinateur du secteur avant d'installer le système de sauvegarde sur disque amovible RDX et observez les précautions relatives à la protection antistatique. Consultez également le document Safety Booklet sur le CD HP RDX Utility. Utilisez un câble d'alimentation de rechange pour le raccordement à l'alimentation de l'ordinateur. (Le lecteur n'est pas alimenté à partir du bus USB.) Pour obtenir des instructions d'installation détaillées, consultez le manuel de l'utilisateur du CD-ROM HP RDX fourni avec votre produit. Vis de montage Un kit d'accessoires contenant des vis M3 est fourni avec HP RDX USB 3.0 Internal Removable Disk Backup System à utiliser avec les serveurs qui ne disposent pas des vis appropriées. Recherchez le port USB interne sur le schéma du serveur Connectez-vous à un port USB 3.0 dédié de l'ordinateur. Le lecteur est rétro-compatible avec USB 2.0, mais les performances risquent d'être dégradées. Connexion impossible au port USB 1.1. Utilisez le schéma placé sur la partie intérieure de la porte ou consultez la documentation de votre ordinateur pour localiser la disponibilité et la position d'une prise de type A standard USB 3.0. Si un port interne approprié n'est pas disponible sur la carte système, HP conseille d'installer une carte bus hôte dédiée. Pour obtenir les produits recommandés, consultez le document RDX QuickSpecs. REMARQUE : il est également possible de se connecter à une embase USB 2.0 Intel ou 4 broches HP ; les câbles doivent être achetés séparément. Consultez le document RDX QuickSpecs pour obtenir les produits recommandés et reportez-vous au manuel de l'utilisateur pour les instructions de câblage. Connectez le cordon USB à un port USB 3.0 interne Utilisez le câble USB 3.0 standard fourni avec le système de sauvegarde sur disque amovible RDX. Cordon d'alimentation Câble USB 2 Dernières étapes de l'installation Installez l'utilitaire HP RDX Utility fourni sur votre CD HP RDX Utility. Si le logiciel n'est pas installé, le bouton Éjecter et la méthode d'éjection via le bouton droit de la souris ne fonctionneront peut-être pas correctement. Installation ou mise à jour du logiciel de sauvegarde : Il est important de consulter www.hp.com/storage/spock pour connaître la compatibilité logicielle et installer les éventuelles mises à jour recommandées. Outils de diagnostic L'utilitaire HP RDX Removable Disk contient les outils de diagnostic de base, et permet une éjection appropriée des cartouches. Il permet également de télécharger et d'installer les mises à niveau de microprogrammes depuis www.hp.com/support/rdx. Cet utilitaire figure sur le CD HP RDX Utility fourni avec votre produit. HP Library & Tape Tools, que vous pouvez télécharger gratuitement sur www.hp.com/support/tapetools, permet également de déterminer si votre produit peut fonctionner correctement ou non. 3 Utilisation du système de sauvegarde sur disque amovible RDX Pour charger une cartouche : Insérez doucement la cartouche dans l'unité jusqu'à ce qu'elle s'enclenche en position et que vous entendiez un clic. Pour décharger une cartouche : Attendez que le voyant d'activité de la cartouche soit vert continu et appuyez sur le bouton Éjecter. (L'éjection ne fonctionne que si l'utilitaire HP RDX Removable Disk est installé.) Voyant d'activité Voyant d'alimentation/ du bouton Éjecter 4 Signification des voyants Voyant d'activité Voyant d'alimentation/du bouton Éjecter Voyant d'activité Voyant d'alimentation/du bouton Éjecter • Vert clignotant : la cartouche est connectée à un service RDX (activité de lecture, d'écriture, de recherche). • Orange continu : le lecteur a détecté une condition de panne de cartouche. • Éteint : pas d'alimentation. • Vert continu : le lecteur est prêt à l'utilisation. • Vert clignotant : Le lecteur éjecte la cartouche. • Orange continu : défaillance du lecteur. • Orange clignotant : le lecteur attend la fin de l'activité de la cartouche avant de procéder à l'éjection. 5 Autres sources d'information • Le manuel de l'utilisateur détaillé sur le CD HP RDX Utility • www.hp.com/storage/spock (pour vérifier la compatibilité des ordinateurs, des systèmes d'exploitation et des logiciels) • www.hp.com/support/ (pour obtenir les dernières informations sur les produits) • Pour obtenir des informations de sécurité détaillées, reportez-vous au document Safety Booklet sur le CD HP RDX Utility © 2012 Hewlett-Packard Development Company, L.P. Imprimé en Chine www.hp.com 484931-002
-
 1
1 -
 2
2
 |
 |