HP SG3-200 Upgrading and Servicing Guide - Page 25
slot cover into the open card slot.
 |
View all HP SG3-200 manuals
Add to My Manuals
Save this manual to your list of manuals |
Page 25 highlights
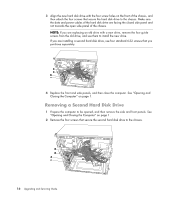
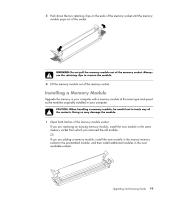
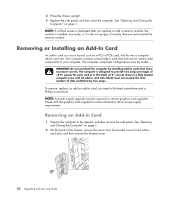
3 Gently lay the chassis on its side. 4 Inside the computer, locate the add-in card slots on the motherboard. WARNING: Beware of the sharp edges on the add-in card slot cover. 5 Move any cabling out of the way, if this is necessary to reach the add-in cards. 6 Hold the card at each end, carefully rock it back and forth until the connectors pull free from the socket, and then lift the card from the chassis. NOTE: Be sure not to scrape the add-in card against the other components. Store the old add-in card in the antistatic packaging that contained the new card. 7 If you are not replacing the old add-in card with a new add-in card, insert the metal slot cover into the open card slot. Upgrading and Servicing Guide 21
-
 1
1 -
2
-
3
-
4
-
5
-
6
-
7
-
8
-
9
-
10
-
11
-
12
-
13
-
14
-
15
-
16
-
17
-
18
-
19
-
 20
20 -
 21
21 -
 22
22 -
 23
23 -
 24
24 -
 25
25 -
 26
26 -
 27
27 -
 28
28
 |
 |

Upgrading and Servicing Guide
21
3
Gently lay the chassis on its side.
4
Inside the computer, locate the add-in card slots on the motherboard.
5
Move any cabling out of the way, if this is necessary to reach the add-in cards.
6
Hold the card at each end, carefully rock it back and forth until the connectors pull
free from the socket, and then lift the card from the chassis.
7
If you are not replacing the old add-in card with a new add-in card, insert the metal
slot cover into the open card slot.
WARNING: Beware of the sharp edges on the add-in card slot cover.
NOTE:
Be sure not to scrape the add-in card against the other components.
Store the old add-in card in the antistatic packaging that contained the
new card.