HP StorageWorks 4000s HP StorageWorks Online Volume Growth Application Note (M - Page 7
Special considerations when using OVG, LUN creation, Expanding a LUN, Deleting a LUN - storageworks nas
 |
View all HP StorageWorks 4000s manuals
Add to My Manuals
Save this manual to your list of manuals |
Page 7 highlights
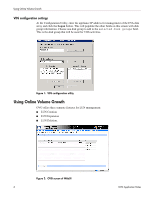
Using Online Volume Growth Special considerations when using OVG ■ Large EVA configurations may take large amounts of time to load on the HP StorageWorks NAS screen. During this time, there will be no system activity. ■ When creating a LUN using OVG, there is a minimum of 1 GB required for the LUN size. ■ Ensure that the disk group contains enough free space before using OVG to extend a LUN LUN creation To create a LUN: 1. Click the Create LUN from the Tasks Column. 2. Select the RAID protection level. 3. Enter the desired LUN size (GB). 4. Click OK. Expanding a LUN To expand a LUN: 1. Select the LUN to be expanded. 2. Click the Extend LUN button. 3. Enter the additional size in GB. 4. Click OK. Deleting a LUN Note: Deleting a LUN can take a few minutes. While the LUN is being deleted no system activity will be provided on screen. To Delete a LUN: 1. Select the LUN to be deleted. 2. Click the Delete LUN button. Caution: Deleting a LUN will delete all data on that LUN permanently. 3. Confirm the deletion of the LUN by clicking the OK button. OVG Application Notes 7
-
 1
1 -
 2
2 -
 3
3 -
 4
4 -
 5
5 -
 6
6 -
 7
7
 |
 |
