HP SureStore 7400 Disk System/Configuration Specific Instructions - Page 2
Step 3, Step 4, Step 5, Step 6, Step 7, Step 8, Step 9, Step 10
 |
View all HP SureStore 7400 manuals
Add to My Manuals
Save this manual to your list of manuals |
Page 2 highlights
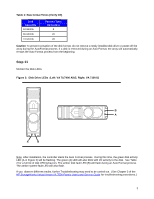
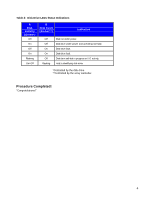
Step 3 Push down release tab (B in Figure 1), pull up the lever (A) on disk to be replaced. Step 4 Caution Wait 15 seconds for the disk to spin down. There is a danger of damage to the disk if it is dropped due to gyroscopic effects. Wait for a spinning disk to stop spinning prior to removing it from the product. Step 5 Pull the disk to be replaced from the slot. Step 6 Caution DO NOT leave the disk slot empty for more than 5 minutes, as proper cooling/airflow depends on all slots being full. Step 7 Verify that the disk module extraction handle (A in Figure 1) is open . Place your thumb behind the extraction handle and with your finger, push the latch tab (B) toward your thumb. Note It is important that the new disk is of the same capacity (in GB) or larger than the disk being replaced. Step 8 Push the replacement disk module, capacity label up, into the empty slot. Step 9 Push down the lever (A in Figure 1) on the disk. It will click into place. Step 10 The drive will now begin an automatic formatting process. Depending on your system configuration, the time to complete will vary. Note An exchange disk drive comes formatted with 512-byte sectors. After installation, the controller starts the Auto Format process to automatically format the disk drive with 520-byte sectors. Table 1 indicates the times required for formatting the different capacity disks. Note Depending on the total amount of memory in your array and your specific configuration, a complete format and rebuild process may take between 4 and 24 hours. As per Step 11 (below) monitor your array for correct LED behavior. 2
-
 1
1 -
 2
2 -
 3
3 -
 4
4
 |
 |
