HP SureStore 7400 Disk Hardware Component Replacement Instructions - Page 2
Caution
 |
View all HP SureStore 7400 manuals
Add to My Manuals
Save this manual to your list of manuals |
Page 2 highlights
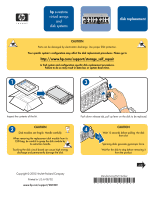
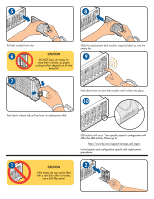
5 8 Pull disk module from slot. 6 CAUTION DO NOT leave slot empty for more that 5 minutes, as proper cooling/airflow depends on all slots being full. Slide the replacement disk module, capacity label up, into the empty slot. 9 7 Push down lever on new disk module until it clicks into place. 10 Push down release tab, pull up lever on replacement disk. LED activity will occur. Your specific system's configuration will affect the LED activity. Please go to: http://www.hp.com/support/storage_self_repair to find system and configuration specific disk replacement procedures. 1 CAUTION 2 If the empty slot can not be filled with a new disk within 5 minutes, use a disk filler panel.
-
 1
1 -
 2
2
 |
 |

7
9
CAUTION
DO NOT leave slot empty for
more that 5 minutes, as proper
cooling/airflow depends on all slots
being full.
Push down release tab, pull up lever on replacement disk.
Push down lever on new disk module until it clicks into place.
LED activity will occur. Y
our specific system's configuration will
affect the LED activity. Please go to:
to find system and configuration specific disk replacement
procedures.
CAUTION
If the empty slot can not be filled
with a new disk within 5 minutes,
use a disk filler panel.
Pull disk module from slot.
5
6
8
Slide the replacement disk module, capacity label up, into the
empty slot.
10
1
2