HP V6110US Compaq Presario V6000 Notebook PC Maintenance and Service Guide - Page 144
Power Button Board, Power Button Board Spare Part Number Information
 |
UPC - 882780849006
View all HP V6110US manuals
Add to My Manuals
Save this manual to your list of manuals |
Page 144 highlights
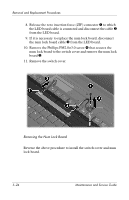
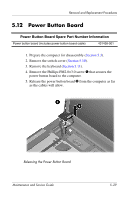
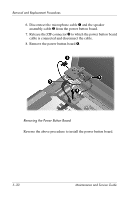
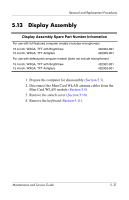
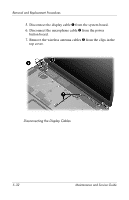
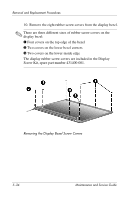
Removal and Replacement Procedures 5.12 Power Button Board Power Button Board Spare Part Number Information Power button board (includes power button board cable) 431438-001 1. Prepare the computer for disassembly (Section 5.3). 2. Remove the switch cover (Section 5.10). 3. Remove the keyboard (Section 5.11). 4. Remove the Phillips PM2.0×3.0 screw 1 that secures the power button board to the computer. 5. Release the power button board 2 from the computer as far as the cables will allow. Releasing the Power Button Board Maintenance and Service Guide 5-29
-
 1
1 -
2
-
3
-
4
-
5
-
6
-
7
-
8
-
9
-
10
-
11
-
12
-
13
-
14
-
15
-
16
-
17
-
18
-
19
-
20
-
21
-
22
-
23
-
24
-
25
-
26
-
27
-
28
-
29
-
30
-
31
-
32
-
33
-
34
-
35
-
36
-
37
-
38
-
39
-
40
-
41
-
42
-
43
-
44
-
45
-
46
-
47
-
48
-
49
-
50
-
51
-
52
-
53
-
54
-
55
-
56
-
57
-
58
-
59
-
60
-
61
-
62
-
63
-
64
-
65
-
66
-
67
-
68
-
69
-
70
-
71
-
72
-
73
-
74
-
75
-
76
-
77
-
78
-
79
-
80
-
81
-
82
-
83
-
84
-
85
-
86
-
87
-
88
-
89
-
90
-
91
-
92
-
93
-
94
-
95
-
96
-
97
-
98
-
99
-
100
-
101
-
102
-
103
-
104
-
105
-
106
-
107
-
108
-
109
-
110
-
111
-
112
-
113
-
114
-
115
-
116
-
117
-
118
-
119
-
120
-
121
-
122
-
123
-
124
-
125
-
126
-
127
-
128
-
129
-
130
-
131
-
132
-
133
-
134
-
135
-
136
-
137
-
138
-
 139
139 -
 140
140 -
 141
141 -
 142
142 -
 143
143 -
 144
144 -
 145
145 -
 146
146 -
 147
147 -
 148
148 -
 149
149 -
150
-
151
-
152
-
153
-
154
-
155
-
156
-
157
-
158
-
159
-
160
-
161
-
162
-
163
-
164
-
165
-
166
-
167
-
168
-
169
-
170
-
171
-
172
-
173
-
174
-
175
-
176
-
177
-
178
-
179
-
180
-
181
-
182
-
183
-
184
-
185
-
186
-
187
-
188
-
189
-
190
-
191
-
192
-
193
-
194
-
195
-
196
-
197
-
198
-
199
-
200
-
201
-
202
-
203
-
204
-
205
-
206
-
207
-
208
-
209
-
210
-
211
-
212
-
213
-
214
-
215
-
216
-
217
-
218
-
219
-
220
-
221
-
222
-
223
-
224
-
225
-
226
-
227
-
228
-
229
-
230
-
231
-
232
-
233
-
234
-
235
-
236
-
237
-
238
-
239
-
240
-
241
-
242
-
243
-
244
-
245
-
246
-
247
-
248
-
249
-
250
-
251
-
252
-
253
-
254
-
255
-
256
-
257
-
258
-
259
-
260
-
261
-
262
-
263
-
264
-
265
-
266
-
267
-
268
-
269
-
270
-
271
-
272
-
273
-
274
-
275
-
276
-
277
-
278
 |
 |

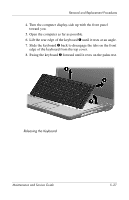
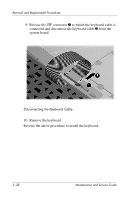
Removal and Replacement Procedures
Maintenance and Service Guide
5–29
5.12
Power Button Board
1. Prepare the computer for disassembly (
Section 5.3
).
2. Remove the switch cover (
Section 5.10
).
3. Remove the keyboard (
Section 5.11
).
4. Remove the Phillips PM2.0×3.0 screw
1
that secures the
power button board to the computer.
5. Release the power button board
2
from the computer as far
as the cables will allow.
Releasing the Power Button Board
Power Button Board Spare Part Number Information
Power button board (includes power button board cable)
431438-001