HP Vectra XM 5/xxx HP Vectra XM 5/xxx Series 3 - User Guide
HP Vectra XM 5/xxx - 3 Manual
 |
View all HP Vectra XM 5/xxx manuals
Add to My Manuals
Save this manual to your list of manuals |
HP Vectra XM 5/xxx manual content summary:
- HP Vectra XM 5/xxx | HP Vectra XM 5/xxx Series 3 - User Guide - Page 1
User's Guide HP Vectra XM 5/xx Series 3 - HP Vectra XM 5/xxx | HP Vectra XM 5/xxx Series 3 - User Guide - Page 2
Notice The information contained in this document is subject to change without notice. Hewlett-Packard makes no warranty of any kind with regard to this material, including, but not limited to, the implied warranties of merchantability and fitness for a particular purpose. Hewlett-Packard shall not - HP Vectra XM 5/xxx | HP Vectra XM 5/xxx Series 3 - User Guide - Page 3
User's Guide - HP Vectra XM 5/xxx | HP Vectra XM 5/xxx Series 3 - User Guide - Page 4
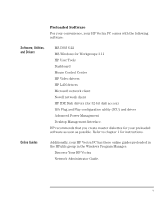
purchase of your new Hewlett-Packard Personal Computer. Your high-performance HP Vectra PC provides: • a PentiumTM processor in a Zero Insertion serial ports • preloaded HP utilities to ease system configuration tasks • BIOS stored in Flash ROM (for easy upgradeability) • BIOS support for ISA "Plug - HP Vectra XM 5/xxx | HP Vectra XM 5/xxx Series 3 - User Guide - Page 5
Advanced Power Management Ì Desktop Management Interface. HP recommends that you create master diskettes for your preloaded software as soon as possible. Refer to chapter 1 for instructions. Online Guides Additionally, your HP Vectra PC has these online guides preloaded in the HPutils group in the - HP Vectra XM 5/xxx | HP Vectra XM 5/xxx Series 3 - User Guide - Page 6
vi Francais - HP Vectra XM 5/xxx | HP Vectra XM 5/xxx Series 3 - User Guide - Page 7
Diskettes 10 2 Using Your PC Starting and Stopping Your PC 12 Configuring Password Security 13 Setting a Password 14 Introducing the HP Utilities 16 Using the HP User Tools 16 Some Buttons You May Need To Use 17 Understanding Power Management 18 Personalizing Your Mouse 19 English vii - HP Vectra XM 5/xxx | HP Vectra XM 5/xxx Series 3 - User Guide - Page 8
Understanding the Desktop Management Interface 19 Tips for Using Your PC 20 3 How to Install Accessories Inside Your PC Supported HP Accessories 22 Removing and Replacing the Cover 24 Replacing the Cover after Installing Accessories 25 Removing and Replacing the Power Supply 26 Replacing the - HP Vectra XM 5/xxx | HP Vectra XM 5/xxx Series 3 - User Guide - Page 9
4 Troubleshooting Your PC and Using the SETUP Program Solving Problems 58 If You Cannot Solve the Problem 59 Message Appears 61 If Your PC Has a Hardware Problem 66 If Your Display Does Not Work 66 If Not Work 72 If Your PC Has a Software Problem 73 If You Have Forgotten Your Password 73 If - HP Vectra XM 5/xxx | HP Vectra XM 5/xxx Series 3 - User Guide - Page 10
, Jumpers, and Switches 90 Processor Voltage Selection Jumper (J27 90 System Board Switches 91 6 Getting Support Getting Support from your HP Reseller 94 HP SupportPack 94 Hewlett-Packard Information Services 95 HP BBS Library 95 HP FAXback on Demand-HP FIRST 95 HP Audio Tips (USA only - HP Vectra XM 5/xxx | HP Vectra XM 5/xxx Series 3 - User Guide - Page 11
Internet-FTP Library Service/World-Wide Web 96 HP Forum on CompuServe 96 Hewlett-Packard Telephone Support 97 If You Need to Contact Hewlett-Packard 98 Glossary 99 Index 101 English xi - HP Vectra XM 5/xxx | HP Vectra XM 5/xxx Series 3 - User Guide - Page 12
xii English - HP Vectra XM 5/xxx | HP Vectra XM 5/xxx Series 3 - User Guide - Page 13
1 Setting Up Your PC This chapter leads you through the first time installation of your HP Vectra PC. - HP Vectra XM 5/xxx | HP Vectra XM 5/xxx Series 3 - User Guide - Page 14
cord • the display and its cables • the keyboard and mouse • the manuals. Computer Typical Display Computer Power Cord Mouse Keyboard Display Power Cord Manuals NOTE The operating system software, drivers, and HP utilities are preloaded on the hard disk. No diskettes are supplied. 2 English - HP Vectra XM 5/xxx | HP Vectra XM 5/xxx Series 3 - User Guide - Page 15
. If you are in any doubt that you can lift the display safely, do not try to move it without help. Refer to the display's manual for information. English 3 - HP Vectra XM 5/xxx | HP Vectra XM 5/xxx Series 3 - User Guide - Page 16
1 Setting Up Your PC Connecting the Mouse, Keyboard, and Display Connecting the Mouse, Keyboard, and Display 1 Connect the mouse, keyboard, and display to the back of the computer. The connectors are shaped to go in one way only. 2 Tighten the display cable attachment screws. Mouse Keyboard - HP Vectra XM 5/xxx | HP Vectra XM 5/xxx Series 3 - User Guide - Page 17
can install an optional BNC Coax adapter accessory board (order D2746A). Refer to chapter 3, How to Install Accessories Inside Your PC, for accessory board installation instructions. English 5 - HP Vectra XM 5/xxx | HP Vectra XM 5/xxx Series 3 - User Guide - Page 18
1 Setting Up Your PC Connecting a Printer Connecting a Printer If you have a printer, connect its cable to the back of the computer and tighten the attachment screws. Use the connector labeled: • Parallel (25-pin parallel connector) for a parallel device • Serial A (9-pin serial connector) for a - HP Vectra XM 5/xxx | HP Vectra XM 5/xxx Series 3 - User Guide - Page 19
1 Setting Up Your PC Connecting the Power Cords Connecting the Power Cords 1 If fitted, remove the label covering the computer's power connector. 2 Connect the power cords to the display and the computer. 3 Connect the display's power cord and the computer's power cord to a grounded outlet. (The - HP Vectra XM 5/xxx | HP Vectra XM 5/xxx Series 3 - User Guide - Page 20
-on self-test and displays a test screen. If an error is detected during the power-on self-test, press to view an explanation of the problem. You may be prompted to press to start the SETUP program. Follow the screen messages to correct the error. Do NOT switch OFF the PC - HP Vectra XM 5/xxx | HP Vectra XM 5/xxx Series 3 - User Guide - Page 21
company name. (If necessary, the name of the user can be modified later.) • The current date and time. • The type of printer (for example, HP LaserJet the name you wish to give this computer. • The model number of your display. The display's model number is shown on the cover of the manual supplied - HP Vectra XM 5/xxx | HP Vectra XM 5/xxx Series 3 - User Guide - Page 22
, adjust it using the controls on the display. Refer to the display's manual for details. • Set the keyboard to a comfortable position. Adjust brightness ( used to restore the preloaded software to your PC in an emergency. HP recommends that you use new diskettes to create the master diskettes. 1 - HP Vectra XM 5/xxx | HP Vectra XM 5/xxx Series 3 - User Guide - Page 23
2 Using Your PC This chapter explains how to use the HP Vectra features and tools designed to increase your productivity. - HP Vectra XM 5/xxx | HP Vectra XM 5/xxx Series 3 - User Guide - Page 24
password again. To stop your PC, first make sure that you have exited all programs then press the power button . Refer to your operating system manual for details if you are not sure how to exit your operating system. 12 English - HP Vectra XM 5/xxx | HP Vectra XM 5/xxx Series 3 - User Guide - Page 25
2 Using Your PC Configuring Password Security User Password Configuring Password Security You can set two passwords, which can be used to provide two levels of protection for your PC. The User Password provides these security features: • a power-on password prompt to prevent your PC being started - HP Vectra XM 5/xxx | HP Vectra XM 5/xxx Series 3 - User Guide - Page 26
2 Using Your PC Configuring Password Security Setting a Password 1 Turn on the PC and the display. If the PC is already turned on, exit all applications and then press and Delete to restart the PC. 2 When appears at the bottom of the screen press . HINT You can press to run - HP Vectra XM 5/xxx | HP Vectra XM 5/xxx Series 3 - User Guide - Page 27
to save Setting the Keyboard Lock Timer 7 Press the key until the Keyboard Lock Timer line is highlighted. 8 Press or to select a value between 1 and 75 minutes. If you wish to save this setting and leave SETUP, press the key now. Setting Screen Blanking 9 Press the key until the Screen Blanking - HP Vectra XM 5/xxx | HP Vectra XM 5/xxx Series 3 - User Guide - Page 28
Windows program manager. These utilities include: Ì Discover Your HP Vectra an online introduction to the main features of your PC Ì Network Administrator Guide a guide to configuring your PC for different network operating systems (this guide exists in English only) Ì Network Setup a setup program - HP Vectra XM 5/xxx | HP Vectra XM 5/xxx Series 3 - User Guide - Page 29
HP Utilities Some Buttons You May Need To Use The Working in Comfort button provides important ergonomic advice for using your computer. Click on this button if you want to change the name of the user of the PC. If a user name (Refer to your printer's manual for configuration information.) Click on - HP Vectra XM 5/xxx | HP Vectra XM 5/xxx Series 3 - User Guide - Page 30
can use power management to reduce the power used by your PC when you aren't using it. Two power management modes are supported: • Standby mode reduces power consumption significantly • Sleep mode reduces power consumption to a minimum. Configuring Power Management in Windows NOTE 1 Double-click - HP Vectra XM 5/xxx | HP Vectra XM 5/xxx Series 3 - User Guide - Page 31
Center. 3 Click on the Help button for more information about the Mouse Control Center. Understanding the Desktop Management Interface Your PC supports the Desktop Management Interface (DMI). The DMI lets an application request information about your computer. For example, an application can use - HP Vectra XM 5/xxx | HP Vectra XM 5/xxx Series 3 - User Guide - Page 32
and set up and use Read the manuals supplied with the application an application. software. up a printer. Use the Printers icon in the HP User Tools. 9 Make more disk space available. Display more colors. Use the Video Mode icon in the HP User Tools. Install more video memory. Refer to chapter - HP Vectra XM 5/xxx | HP Vectra XM 5/xxx Series 3 - User Guide - Page 33
3 How to Install Accessories Inside Your PC This chapter explains how to install accessories, such as extra memory, accessory boards, and additional disk drives, in your PC. - HP Vectra XM 5/xxx | HP Vectra XM 5/xxx Series 3 - User Guide - Page 34
3 How to Install Accessories Inside Your PC Supported HP Accessories Supported HP Accessories This chapter describes how to install memory, mass storage devices, and accessory boards in your PC. Contact your dealer for an up-to-date list of supported devices. One internal mass storage device Up - HP Vectra XM 5/xxx | HP Vectra XM 5/xxx Series 3 - User Guide - Page 35
Video Memory Module: 1 MB to upgrade to 2 MB, order D3404A 3 How to Install Accessories Inside Your PC Supported HP Accessories Up to four accessory boards, such as: BNC Coax Adapter D2746A WARNING Main Memory Modules (70 ns): 4 MB, order D2690A 8 MB, order D2691A 16 - HP Vectra XM 5/xxx | HP Vectra XM 5/xxx Series 3 - User Guide - Page 36
3 How to Install Accessories Inside Your PC Removing and Replacing the Cover Removing and Replacing the Cover 1 Switch off the display and computer. 2 Disconnect the power cords from the power outlets, computer, and display. Then remove the display. 3 If necessary, unlock the cover using the key - HP Vectra XM 5/xxx | HP Vectra XM 5/xxx Series 3 - User Guide - Page 37
3 How to Install Accessories Inside Your PC Removing and Replacing the Cover Replacing the Cover after Installing Accessories 1 Check that you have installed all your accessories. 2 Make sure that all internal cables are properly connected and safely routed. 3 Ensure the cover lock is unlocked and - HP Vectra XM 5/xxx | HP Vectra XM 5/xxx Series 3 - User Guide - Page 38
3 How to Install Accessories Inside Your PC Removing and Replacing the Power Supply Removing and Replacing the Power Supply You must remove the power supply to access the sockets for the main memory, video memory, processor, or accessory board slots. 1 Disconnect the computer's power supply cord. 2 - HP Vectra XM 5/xxx | HP Vectra XM 5/xxx Series 3 - User Guide - Page 39
3 How to Install Accessories Inside Your PC Removing and Replacing the Power Supply Replacing the Power Supply after Installing Accessories 1 Ensure that you have installed all of your accessories in the PC. 2 Position the power supply over the left-hand side of the PC, and ensure that the cables - HP Vectra XM 5/xxx | HP Vectra XM 5/xxx Series 3 - User Guide - Page 40
WARNING 3 How to Install Accessories Inside Your PC Installing Memory Installing Memory Main Memory Modules Your PC is supplied with main memory. If you need more main memory to run your application software, you can install up to a total of 192 MB. Main memory is available in modules of 4 MB, 8 MB - HP Vectra XM 5/xxx | HP Vectra XM 5/xxx Series 3 - User Guide - Page 41
3 How to Install Accessories Inside Your PC Installing Memory 4 Pivot the memory module to the vertical position. 5 Repeat this procedure for each memory module you are installing. If you need to remove a main memory module: Release the retaining clip and pull the module forward and out of the - HP Vectra XM 5/xxx | HP Vectra XM 5/xxx Series 3 - User Guide - Page 42
To Install a Video Memory Module 3 How to Install Accessories Inside Your PC Installing Memory Installing a Video Memory Module Your PC is supplied with 1 MB of video memory. If you need to have more video memory to display more colors, higher resolutions, or for increased speed, you can install - HP Vectra XM 5/xxx | HP Vectra XM 5/xxx Series 3 - User Guide - Page 43
Size field. 3 When Windows is loaded, click on the Hputils group icon to display the Hewlett-Packard utilities. 4 Click on the HP User Tools icon utility. to display the HP User Tools 5 Click on the Video Mode icon and follow the screen messages to change the video resolution and the number of - HP Vectra XM 5/xxx | HP Vectra XM 5/xxx Series 3 - User Guide - Page 44
used by the system-based components. Configuring Plug and Play with the SETUP program You can use the SETUP program to select the level of support provided by the BIOS for Plug and Play-compatible accessory boards: 1 Turn on the PC and press when appears. 2 Highlight the Plug and - HP Vectra XM 5/xxx | HP Vectra XM 5/xxx Series 3 - User Guide - Page 45
support for your PC. 3 Double-click on the ICU User Guide icon information about using the ICU. for detailed 4 Double-click on the ICU icon to launch your accessory board, you will need to enter the configuration details manually when prompted by the ICU. Refer to the documentation supplied with - HP Vectra XM 5/xxx | HP Vectra XM 5/xxx Series 3 - User Guide - Page 46
computer's cover and power supply (see pages 24 and 26). 4 Find a free slot. Some boards may have preferred locations and special installation instructions detailed in their manuals. 5 Unscrew and remove the slot cover. Store it in a safe place. If the slot cover is tight, loosen the screws on the - HP Vectra XM 5/xxx | HP Vectra XM 5/xxx Series 3 - User Guide - Page 47
3 How to Install Accessories Inside Your PC Installing Accessory Boards 6 Hold the board horizontally by its "top" edge. Slide it into the board guide of the chosen slot. Do not bend the board. 7 Align the board's connector with the slot's socket. Firmly press the board into the socket. Ensure - HP Vectra XM 5/xxx | HP Vectra XM 5/xxx Series 3 - User Guide - Page 48
3 How to Install Accessories Inside Your PC Installing Accessory Boards 9 If you install a BNC Coax adapter accessory board (D2746A), connect its cable to the AUI (Attachment Unit Interface) connector on the system board. AUI connector for BNC Coax adapter VESA pass-through connector for video - HP Vectra XM 5/xxx | HP Vectra XM 5/xxx Series 3 - User Guide - Page 49
access device. Your PC has the following connectors on the system board which may be used by mass storage devices: • a flexible disk drive connector (supporting up to two flexible disk drives) • an IDE CD-ROM drive connector (this connector - colored red - cannot be used for IDE hard disk drives - HP Vectra XM 5/xxx | HP Vectra XM 5/xxx Series 3 - User Guide - Page 50
3 How to Install Accessories Inside Your PC Installing Mass Storage Devices Installing a Flexible Disk Drive or a CD-ROM Drive in the Middle Shelf 1 Disconnect the computer's power supply cord. 2 Remove the computer's cover (see page 24). 3 Remove the RFI bezel from the middle shelf and put it in a - HP Vectra XM 5/xxx | HP Vectra XM 5/xxx Series 3 - User Guide - Page 51
3 How to Install Accessories Inside Your PC Installing Mass Storage Devices 5 Connect the data and power cables to the rear of the device installed in the middle shelf. If you are installing an IDE CD-ROM drive, connect the drive to the data cable with the red connector on the system board. The - HP Vectra XM 5/xxx | HP Vectra XM 5/xxx Series 3 - User Guide - Page 52
Devices Installing an IDE Hard Disk Drive in the Rear Shelf The PC has an integrated Enhanced IDE controller which supports two Fast IDE hard disk drives. Refer to the drive's manuals to see if you must set jumpers or if there is a special installation procedure to follow. 1 Disconnect the computer - HP Vectra XM 5/xxx | HP Vectra XM 5/xxx Series 3 - User Guide - Page 53
3 How to Install Accessories Inside Your PC Installing Mass Storage Devices 5 Connect the power cable and the data cable to the rear of the drive. (The connectors are shaped to go in one way only.) Data cable Power cable 6 Install any other accessories before replacing the cover (see page 25). - HP Vectra XM 5/xxx | HP Vectra XM 5/xxx Series 3 - User Guide - Page 54
Installing an IDE Hard Disk Drive in the Bottom Shelf The PC has an integrated Enhanced IDE controller which supports two Fast IDE hard disk drives. Refer to the drive's manuals to see if you must set jumpers or if there is a special installation procedure to follow. 1 Disconnect the computer - HP Vectra XM 5/xxx | HP Vectra XM 5/xxx Series 3 - User Guide - Page 55
3 How to Install Accessories Inside Your PC Installing Mass Storage Devices 6 Support the power supply with your hand (to prevent it falling out) and carefully turn the PC onto it's side. 7 Slide the hard disk into the bottom shelf, supporting the disk with your hand. English 43 - HP Vectra XM 5/xxx | HP Vectra XM 5/xxx Series 3 - User Guide - Page 56
Your PC Installing Mass Storage Devices 8 Align the drive with the holes in the bottom of the PC. Support the drive with your hand while securing the drive with the four screws provided. 9 Support the power supply with your hand and very carefully return the PC to the upright position. 10 Connect - HP Vectra XM 5/xxx | HP Vectra XM 5/xxx Series 3 - User Guide - Page 57
are supplied with mounting rails. If you order your drive from another supplier, you will need to order drive mounting rails from HP. You should order product number D2880A (5.25-inch disk drive rails). 1 Disconnect the computer's power supply cord. 2 Remove the computer's cover (see page 24). 3 If - HP Vectra XM 5/xxx | HP Vectra XM 5/xxx Series 3 - User Guide - Page 58
3 How to Install Accessories Inside Your PC Installing Mass Storage Devices 5 Remove the two RFI bezels from the bottom shelf. 6 Remove the side bracket from the bottom shelf and store it in a safe place. 46 English - HP Vectra XM 5/xxx | HP Vectra XM 5/xxx Series 3 - User Guide - Page 59
3 How to Install Accessories Inside Your PC Installing Mass Storage Devices 7 Slide the drive mid-way into the bottom shelf. 8 Connect the data and power cables to the rear of the drive. The connectors are shaped to fit one way only. Data cable Power cable English 47 - HP Vectra XM 5/xxx | HP Vectra XM 5/xxx Series 3 - User Guide - Page 60
3 How to Install Accessories Inside Your PC Installing Mass Storage Devices 9 Slide the drive completely into the bottom shelf and secure it with the screws provided with the device. 10 If a device was removed from the middle shelf, replace it. 11 If no device was removed from the middle shelf, - HP Vectra XM 5/xxx | HP Vectra XM 5/xxx Series 3 - User Guide - Page 61
are supplied with mounting rails. If you order your drive from another supplier, you will need to order drive mounting rails from HP. You should order product number D3566A (3.5-inch disk drive rails). 1 Disconnect the computer's power supply cord. 2 Remove the computer's cover (see page 24). 3 If - HP Vectra XM 5/xxx | HP Vectra XM 5/xxx Series 3 - User Guide - Page 62
3 How to Install Accessories Inside Your PC Installing Mass Storage Devices 5 Remove the two RFI bezels from the bottom shelf. 6 Slide the drive completely into the bottom shelf and secure it with the screws provided with the device. 50 English - HP Vectra XM 5/xxx | HP Vectra XM 5/xxx Series 3 - User Guide - Page 63
7 Replace the side bezel. 3 How to Install Accessories Inside Your PC Installing Mass Storage Devices 8 Connect the data and power cables to the rear of the drive. The connectors are shaped to fit one way only. Data cable Power cable 9 Slide the drive completely into the bottom shelf and secure - HP Vectra XM 5/xxx | HP Vectra XM 5/xxx Series 3 - User Guide - Page 64
3 How to Install Accessories Inside Your PC Installing Mass Storage Devices Completing the Installation of an IDE Drive After installing an IDE drive you will need to run the SETUP program to confirm that the drive has been detected by the PC. When an Additional IDE 1 Switch on the PC. Drive is - HP Vectra XM 5/xxx | HP Vectra XM 5/xxx Series 3 - User Guide - Page 65
Program If you have installed an IDE hard disk drive and SETUP has not detected it, you must enter the details in the SETUP program manually. This information is supplied by the manufacturer of the hard disk. 1 Switch on the PC. 2 When appears, press to run the SETUP program - HP Vectra XM 5/xxx | HP Vectra XM 5/xxx Series 3 - User Guide - Page 66
3 How to Install Accessories Inside Your PC Installing an Upgrade Processor Installing an Upgrade Processor When future upgrade processors become available, you can replace your main processor with a more powerful processor. 1 Disconnect the computer's power supply cord. 2 Remove the computer's - HP Vectra XM 5/xxx | HP Vectra XM 5/xxx Series 3 - User Guide - Page 67
3 How to Install Accessories Inside Your PC Installing an Upgrade Processor 6 Change the processor voltage selection jumper (J27) to correspond with the new processor, as shown in the figure below. Refer to the documentation supplied with the upgrade processor for more details about the processor - HP Vectra XM 5/xxx | HP Vectra XM 5/xxx Series 3 - User Guide - Page 68
3 How to Install Accessories Inside Your PC Installing the Security Bracket Installing the Security Bracket The security bracket supplied with the computer can be used to fasten the computer to your desk. 1 Remove the computer's cover (see page 24). 2 Remove the security bracket from the storage - HP Vectra XM 5/xxx | HP Vectra XM 5/xxx Series 3 - User Guide - Page 69
4 Troubleshooting Your PC and Using the SETUP Program This chapter can help you solve problems that you may encounter when using your PC and describes how to use the HP SETUP program. - HP Vectra XM 5/xxx | HP Vectra XM 5/xxx Series 3 - User Guide - Page 70
4 Troubleshooting Your PC and Using the SETUP Program Solving Problems Solving Problems If you have a problem with your PC, search the list below for the problem description which most closely matches it. Then turn to the page indicated for guidance. If Your PC Does Not Start Ì If nothing appears - HP Vectra XM 5/xxx | HP Vectra XM 5/xxx Series 3 - User Guide - Page 71
. If You Cannot Solve the Problem If you are unable to solve your problem after following the troubleshooting advice in this chapter, refer to chapter 6 Getting Support for information on getting help from your HP Reseller or from your nearest HP Customer Support Center. WARNING There is a danger - HP Vectra XM 5/xxx | HP Vectra XM 5/xxx Series 3 - User Guide - Page 72
Troubleshooting the accessory boards are properly set (refer to the manuals that came with each board). h Check that the jumpers and switches on the system board are properly set (refer to page 90). i Replace the cover (refer to page 25). j Connect all cables problem. 60 English - HP Vectra XM 5/xxx | HP Vectra XM 5/xxx Series 3 - User Guide - Page 73
Troubleshooting specify the model number of your HP Vectra PC when ordering the HPInit utility HP Information Services described in chapter 6 Getting Support. To update the system BIOS: 1 Insert the HPInit utility diskette in drive A. 2 Switch the computer OFF and then ON, and follow the instructions - HP Vectra XM 5/xxx | HP Vectra XM 5/xxx Series 3 - User Guide - Page 74
NOTE 4 Troubleshooting Your PC and Using the SETUP Program If Your PC Does Not Start If a Power-On-Self-Test Error Appears Hewlett-Packard System Hardware HP VECTRA PC System BIOS (Version xx.xx.xx) Video (Integrated VGA, Memory Size: 1 MB) System Board (Pentium(TM) xxMHz) Cache Memory Keyboard/ - HP Vectra XM 5/xxx | HP Vectra XM 5/xxx Series 3 - User Guide - Page 75
4 Troubleshooting Your PC and Using the SETUP Program If Your PC Does "If You Can't Start the SETUP Program" in this chapter on page 75). 3 If the problem persists, the system board may need to be replaced. Contact your service representative. What you should do: 1 Disable all shadowing in SETUP. - HP Vectra XM 5/xxx | HP Vectra XM 5/xxx Series 3 - User Guide - Page 76
4 Troubleshooting Your PC and Using the SETUP Program If Your PC Does Not Start 910B of diskette is invalid, cannot start from this diskette. Cannot start from hard disk. Explanation: There is a problem with the disk drive, or the disk drive is not properly formatted. What you should do: Insert a - HP Vectra XM 5/xxx | HP Vectra XM 5/xxx Series 3 - User Guide - Page 77
4 Troubleshooting Your PC and Using the SETUP Program If Your PC Does Not accept or transmit data. This could occur if: • The diskette has not been inserted correctly. If this is the problem, reinsert the diskette and type ''R'' (for Retry). • The printer is not working-ensure it is on and ready - HP Vectra XM 5/xxx | HP Vectra XM 5/xxx Series 3 - User Guide - Page 78
for instructions. If the screens generated by the applications do not appear correct, check the application's manual to find out which video standard is required. Also check your display manual to find out which refresh rate is required. Use SETUP or the HP User Tools to select the correct refresh - HP Vectra XM 5/xxx | HP Vectra XM 5/xxx Series 3 - User Guide - Page 79
4 Troubleshooting Your PC and Using the SETUP Program If Your PC Has a Hardware Problem If the display works correctly by the POST, follow the instructions below to correct the problem. If Your Display is Blurred or Unreadable If you select the wrong display in the HP User Tools menu, the display - HP Vectra XM 5/xxx | HP Vectra XM 5/xxx Series 3 - User Guide - Page 80
4 Troubleshooting Your PC and Using the SETUP Program If Your PC Has a Hardware Problem If You Cannot Use Any Video Resolution Higher Than 640 ! 480 If you cannot select a video resolution higher than 640 ! 480, you should clear the - HP Vectra XM 5/xxx | HP Vectra XM 5/xxx Series 3 - User Guide - Page 81
4 Troubleshooting Your PC and Using the SETUP Program If Your PC Has a Hardware Problem If Your Keyboard or Mouse Does Not Work 1 Ensure that the keyboard or mouse is correctly connected. 2 Ensure that the mouse driver supplied with the - HP Vectra XM 5/xxx | HP Vectra XM 5/xxx Series 3 - User Guide - Page 82
NOTE 4 Troubleshooting Your PC and Using the SETUP Program If Your PC Has a Hardware Problem If Your Printer Does Not Work 1 application program's "print" menu has been correctly set up. (Refer to the manual supplied with the application software.) 7 Check that the PC's port is working properly - HP Vectra XM 5/xxx | HP Vectra XM 5/xxx Series 3 - User Guide - Page 83
4 Troubleshooting Your PC and Using the SETUP Program If Your PC Has a Hardware Problem If the Flexible Disk Drive Does Not Work 1 Ensure you are using a formatted diskette and it is inserted correctly. 2 Check you are using a diskette that - HP Vectra XM 5/xxx | HP Vectra XM 5/xxx Series 3 - User Guide - Page 84
4 Troubleshooting Your PC and Using the SETUP Program If Your PC Has a Hardware Problem If the Hard Disk Activity using memory, I/O addresses, an IRQ, or DMA also used by the PC. Refer to the board's manual for details. For information on the current usage of IRQs by the PC, at the MS-DOS prompt - HP Vectra XM 5/xxx | HP Vectra XM 5/xxx Series 3 - User Guide - Page 85
4 Troubleshooting Your PC and Using the SETUP Program If Your PC Has a Software Problem If Your PC Has a Software Problem If You Have Forgotten Your Password Ì If you forget the User Password and the System Administrator Password is set and known: 1 Restart the PC. If - HP Vectra XM 5/xxx | HP Vectra XM 5/xxx Series 3 - User Guide - Page 86
4 Troubleshooting Your PC and Using the SETUP Program If Your PC Has a Software Problem If You Can't Start the SETUP Program This may happen if the with the correct settings. Refer to the operating system and application software manuals. 2 If Windows does not run properly, refer to the Windows - HP Vectra XM 5/xxx | HP Vectra XM 5/xxx Series 3 - User Guide - Page 87
Troubleshooting Your PC and Using the SETUP Program If Your PC Has a Software Problem field to MS-DOS with APM. Follow the instructions displayed by the Setup program to return to the HP User Tools program. Refer to chapter 2 for more information about the HP User Tools. If you do not have the HP - HP Vectra XM 5/xxx | HP Vectra XM 5/xxx Series 3 - User Guide - Page 88
4 Troubleshooting Your PC and Using the SETUP Program Using the HP SETUP Program Using the HP SETUP Program SETUP is an integrated (ROM-based) program that displays the PC's configuration. Configuration information for associated PC features is grouped together to make - HP Vectra XM 5/xxx | HP Vectra XM 5/xxx Series 3 - User Guide - Page 89
4 Troubleshooting Your PC and Using the SETUP Program Using the HP SETUP Program 3 The PC's User Password Set • To change a setting, move the highlight to the desired line and follow the instructions on the bottom of the screen. • Use the or another. keys to move the highlight from one - HP Vectra XM 5/xxx | HP Vectra XM 5/xxx Series 3 - User Guide - Page 90
4 Troubleshooting Your PC and Using the SETUP Program Using the HP SETUP Program Understanding the SETUP Program The built-in not automatically detected, set to None for SCSI or Custom to manually configure a drive) Define if the hard disk controller is integrated on an accessory board 78 English - HP Vectra XM 5/xxx | HP Vectra XM 5/xxx Series 3 - User Guide - Page 91
Troubleshooting Your PC and Using the SETUP Program Using the HP SETUP Program SETUP Item: What you can do: SCSI Accessory Boards View the SCSI BIOS ROM address for an HP Disallow writing to Flexible Disks • Select the level of support for Plug and Play Accessories Disable/Enable the Parallel - HP Vectra XM 5/xxx | HP Vectra XM 5/xxx Series 3 - User Guide - Page 92
4 Troubleshooting Your PC and Using the SETUP Program Using the HP SETUP Program 80 English - HP Vectra XM 5/xxx | HP Vectra XM 5/xxx Series 3 - User Guide - Page 93
5 Technical Information This chapter provides technical information about your PC. - HP Vectra XM 5/xxx | HP Vectra XM 5/xxx Series 3 - User Guide - Page 94
connector 9-pin serial connectors Disk drive shelves Description: PENTIUMTM 75 MHz, 90 MHz, or 120 MHz 8 KB code, 8 KB write-back data B: 2F8h (IRQ 3), 2E8h (IRQ 3), or Off Four internal mass storage shelves supporting: • three front-access devices (a third-height 3.5-inch drive, a half-height 5. - HP Vectra XM 5/xxx | HP Vectra XM 5/xxx Series 3 - User Guide - Page 95
(supporting one HP mouse with mini-DIN connector. Characteristics: Weight (excluding keyboard and display) Dimensions Footprint Storage temperature Storage humidity Operating temperature Operating humidity Maximum thermal dissipation Acoustic noise emission Power supply Description: 9 kilograms (20 - HP Vectra XM 5/xxx | HP Vectra XM 5/xxx Series 3 - User Guide - Page 96
Technical Information Specifications Power Consumption Information Full Power mode Standby mode Sleep mode Off 44 W 24 W 21 W < 5 W1 1 The power supply in your Vectra PC continues to supply power to the CMOS memory, even when switched off. When the PC is turned off with the power button on the - HP Vectra XM 5/xxx | HP Vectra XM 5/xxx Series 3 - User Guide - Page 97
5 Technical Information Specifications IRQs, DMAs, and I/O Addresses Used by Your PC IRQs used by PC 1 1 The IRQ, DMA, and I/O address mappings shown here are for a PC with a basic configuration. The resources used by your PC may vary, depending upon which accessory boards are bundled with the PC. - HP Vectra XM 5/xxx | HP Vectra XM 5/xxx Series 3 - User Guide - Page 98
colors 256 colors 64 K colors hi-color 16.7 M colors true-color 640 x 480 1 MB 60/72/75 Hz 1 MB 60 Hz 2 MB 60/72/75 Hz 800 x 600 1 MB 56/60/72/75 Hz 1 MB 56/60 Hz 2 MB 2 MB 56/60/72/75 Hz 56/60 Hz 1024 x 768 1 MB 87i/60/70 - HP Vectra XM 5/xxx | HP Vectra XM 5/xxx Series 3 - User Guide - Page 99
your old PC back for recycling when it reaches the end of its useful life. In fact, HP has a product take back program in several countries. The collected equipment is sent to one of HP's recycling facilities in Europe or the USA. As many parts as possible are reused. The remainder is - HP Vectra XM 5/xxx | HP Vectra XM 5/xxx Series 3 - User Guide - Page 100
5 Technical Information The PC's Memory Map The PC's Memory Map Memory Area Memory Range Hexadecimal Address Range Extended Memory: 1 MB to 4 MB Extended memory 1024 KB upward 01000 to 0F0000 Conventional Memory: 0 KB to 1024 KB (1 MB) 384 KB Reserved Memory Area 960 KB to 1024 KB 0F0000 to - HP Vectra XM 5/xxx | HP Vectra XM 5/xxx Series 3 - User Guide - Page 101
5 Technical Information The PC's Rear Connectors The PC's Rear Connectors Serial Connector Keyboard/Mouse Connectors Parallel Connector RJ-45 LAN Connector Red - 1 VGA Video Connector English 89 - HP Vectra XM 5/xxx | HP Vectra XM 5/xxx Series 3 - User Guide - Page 102
which requires Vcc voltage - (Default for PCs with Pentium 75 MHz installed) Select the VR jumper position when you install 90 MHz installed) Select the VRE jumper position when you install an upgrade processor which requires Vre voltage - (Default for PCs with Pentium 120 MHz installed) 90 - HP Vectra XM 5/xxx | HP Vectra XM 5/xxx Series 3 - User Guide - Page 103
5 Technical Information System Board Connectors, Jumpers, and Switches System Board Switches Switch 1 - FLASH 2 - RESERVED 3 - CONFG 4 - PSWRD 5 - PARIT 6 - RESERVED 7 - RESERVED 8 - RESERVED Use Switch Block to: Enable or prevent system ROM updates using the HPInit utility: • OFF to enable - HP Vectra XM 5/xxx | HP Vectra XM 5/xxx Series 3 - User Guide - Page 104
5 Technical Information System Board Connectors, Jumpers, and Switches 92 English - HP Vectra XM 5/xxx | HP Vectra XM 5/xxx Series 3 - User Guide - Page 105
6 Getting Support - HP Vectra XM 5/xxx | HP Vectra XM 5/xxx Series 3 - User Guide - Page 106
not commonly used with, your HP Vectra contact your Authorized HP Reseller. For questions regarding product development or custom installations, we suggest that you contact your Authorized HP Reseller, third party support services, or the HP Customer Support organization in your country. They will - HP Vectra XM 5/xxx | HP Vectra XM 5/xxx Series 3 - User Guide - Page 107
States Worldwide Number 1 (800) 333-1917 +1 (208) 344-4809 A complete description of Hewlett-Packard electronic services is provided in document #9020. HP Audio Tips (USA only) Automated audio (voice) problem-solving tips for your most frequently asked questions. The number is: 1 (800) 333-1917 - HP Vectra XM 5/xxx | HP Vectra XM 5/xxx Series 3 - User Guide - Page 108
Internet IP Address Alias Name Password World-Wide Web URL 192.6.71.2 ftp-boi.external.hp.com anonymous Enter your E-mail address http://www.hp.com/home.html HP Forum on CompuServe The HP Systems Forum on CompuServe is an online service accessible via modem. This service provides information about - HP Vectra XM 5/xxx | HP Vectra XM 5/xxx Series 3 - User Guide - Page 109
Hewlett-Packard Telephone Support Technical Phone Support for Customers HP Phone Support for your Vectra PC is available at no charge during the first year of your hardware warranty. This service will provide technical assistance with basic configuration and setup of your Vectra PC. To ensure - HP Vectra XM 5/xxx | HP Vectra XM 5/xxx Series 3 - User Guide - Page 110
6 Getting Support If You Need to Contact Hewlett-Packard Worldwide HP Marketing Headquarters If You Need to Contact Hewlett-Packard Should you need to contact Hewlett-Packard, check your local telephone directory for the HP Sales and Service Office near you. If you cannot find an HP office, - HP Vectra XM 5/xxx | HP Vectra XM 5/xxx Series 3 - User Guide - Page 111
Disc Read Only Memory. A mass storage device that uses compact disc technology. CDs can store data, but most cannot be written to. HP Utilities Software provided by Hewlett-Packard to perform certain tasks, for example, changing the date and time. IDE Integrated Device Electronics. An interface - HP Vectra XM 5/xxx | HP Vectra XM 5/xxx Series 3 - User Guide - Page 112
smallest addressable spot on the screen. POST Power-On-Self-Test. A series of tests your computer performs when you switch the computer on. RAM parts of the computer's operating system permanently. ROM chips can contain instructions and data. SCSI Small Computer System Interface. A high-speed data - HP Vectra XM 5/xxx | HP Vectra XM 5/xxx Series 3 - User Guide - Page 113
, 19 Discover Your HP Vectra, 16 display connecting, problems, 71 G getting support, 93 glossary, 99 H hard disk problems, 71 Hewlett-Packard contacting, 98 information services, 95 marketing headquarters, 98 product take back program, 87 HP SETUP program starting, 76 understanding options, 78 HP - HP Vectra XM 5/xxx | HP Vectra XM 5/xxx Series 3 - User Guide - Page 114
, 12 support getting, 93 switch location, 90 system board, 90 jumper location, 90 switch location, 90 T tape drive installing, 49 technical specifications, 81 time setting, 16 tools required for installation, 3 troubleshooting, 57 U unpacking the PC, 2 user name setting, 16 using PC, 11-20 tips, 20 - HP Vectra XM 5/xxx | HP Vectra XM 5/xxx Series 3 - User Guide - Page 115
Regulatory Information and Warranty - HP Vectra XM 5/xxx | HP Vectra XM 5/xxx Series 3 - User Guide - Page 116
OF CONFORMITY according to ISO/IEC Guide 22 and EN 45014 Manufacturer's Name and Address: HEWLETT-PACKARD Boulevard Steve Biko 38090 Villefontaine FRANCE Declares that the product: Product Name: Personal Computer Model Number: HP Vectra XM 5/xx series 3 Conforms to the following Product - HP Vectra XM 5/xxx | HP Vectra XM 5/xxx Series 3 - User Guide - Page 117
installed and used in accordance with the instructions, may cause harmful interference to radio communications tests were conducted with HP-supported peripheral devices and HP shielded cables, such as CSA. Notice for the United Kingdom The HP Vectra PC is approved under approval number NS/G/1234 - HP Vectra XM 5/xxx | HP Vectra XM 5/xxx Series 3 - User Guide - Page 118
not apply to you. Obtaining On-Site Warranty Service To obtain on-site warranty service, the customer must contact an HP Sales and Service Office (in the US, call the HP Customer Support Center at (303) 635-1000) or a participating Authorized HP Personal Computer Dealer Repair Center and arrange for - HP Vectra XM 5/xxx | HP Vectra XM 5/xxx Series 3 - User Guide - Page 119
and negotiated beyond Zone 6. Worldwide Customer Support Travel information is available from any HP Sales and Service Office. Travel restrictions and response time for dealer or distributor service are defined by the participating dealer or distributor. Service contracts which provide after-hour or - HP Vectra XM 5/xxx | HP Vectra XM 5/xxx Series 3 - User Guide - Page 120
HP Software may have been developed by a third party software supplier named in the copyright notices included with the software, who shall updates and upgrades which may be available from Hewlett-Packard under a separate support agreement. 8 EXPORT CLAUSE. Customer agrees not to export or re- - HP Vectra XM 5/xxx | HP Vectra XM 5/xxx Series 3 - User Guide - Page 121
so the above limitation or exclusion may not apply to you. Obtaining Warranty Service Warranty service may be obtained from the nearest HP sales office or other location indicated in the owner's manual or service booklet. Consumer transactions in Australia and the United Kingdom: The disclaimers and - HP Vectra XM 5/xxx | HP Vectra XM 5/xxx Series 3 - User Guide - Page 122
11f0ranfçraainsçais
-
 1
1 -
 2
2 -
 3
3 -
 4
4 -
 5
5 -
 6
6 -
 7
7 -
8
-
9
-
10
-
11
-
12
-
13
-
14
-
15
-
16
-
17
-
18
-
19
-
20
-
21
-
22
-
23
-
24
-
25
-
26
-
27
-
28
-
29
-
30
-
31
-
32
-
33
-
34
-
35
-
36
-
37
-
38
-
39
-
40
-
41
-
42
-
43
-
44
-
45
-
46
-
47
-
48
-
49
-
50
-
51
-
52
-
53
-
54
-
55
-
56
-
57
-
58
-
59
-
60
-
61
-
62
-
63
-
64
-
65
-
66
-
67
-
68
-
69
-
70
-
71
-
72
-
73
-
74
-
75
-
76
-
77
-
78
-
79
-
80
-
81
-
82
-
83
-
84
-
85
-
86
-
87
-
88
-
89
-
90
-
91
-
92
-
93
-
94
-
95
-
96
-
97
-
98
-
99
-
100
-
101
-
102
-
103
-
104
-
105
-
106
-
107
-
108
-
109
-
110
-
111
-
112
-
113
-
114
-
115
-
116
-
117
-
118
-
119
-
120
-
121
-
122
 |
 |

User’s Guide
HP Vectra XM
5/xx Series 3