HP Visualize b1000 hp Visualize b1000 and c3000 workstations owner's guide (a5 - Page 126
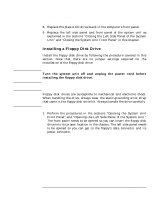
Installing a Floppy Disk Drive
 |
View all HP Visualize b1000 manuals
Add to My Manuals
Save this manual to your list of manuals |
Page 126 highlights
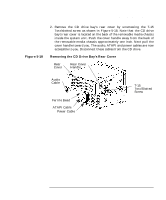
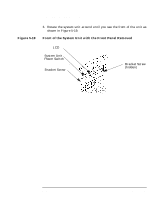
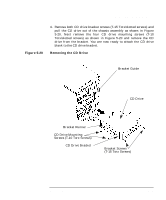
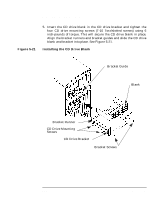
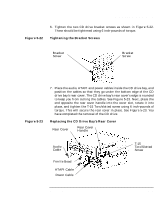
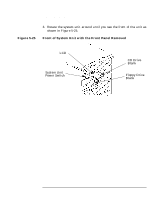
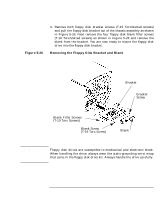
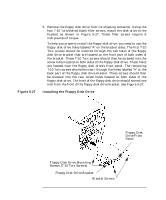
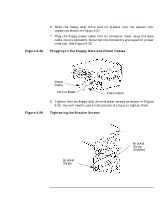
WARNING CAUTION Changing Your Computer Hardware Configuration Removable Media Devices 8. Replace the plastic CD drive blank in the computer's front panel. 9. Replace the left side panel and front panel of the system unit as explained in the sections "Closing the Left Side Panel of the System Unit" and "Closing the System Unit Front Panel" in this chapter. Installing a Floppy Disk Drive Install the floppy disk drive by following the procedure covered in this section. Note that there are no jumper settings required for the installation of the floppy disk drive. Turn the system unit off and unplug the power cord before installing the floppy disk drive. Floppy disk drives are susceptible to mechanical and electronic shock. When handling the drive, always wear the static-grounding wrist strap that came in the floppy disk drive kit. Always handle the drive carefully. 1. Perform the procedures in the sections "Opening the System Unit Front Panel" and "Opening the Left Side Panel of the System Unit." The front panel needs to be opened so you can insert the floppy disk drive into its proper location in the chassis. The left side panel needs to be opened so you can get to the floppy's data connector and its power connector. 126 Chapter 5
-
 1
1 -
2
-
3
-
4
-
5
-
6
-
7
-
8
-
9
-
10
-
11
-
12
-
13
-
14
-
15
-
16
-
17
-
18
-
19
-
20
-
21
-
22
-
23
-
24
-
25
-
26
-
27
-
28
-
29
-
30
-
31
-
32
-
33
-
34
-
35
-
36
-
37
-
38
-
39
-
40
-
41
-
42
-
43
-
44
-
45
-
46
-
47
-
48
-
49
-
50
-
51
-
52
-
53
-
54
-
55
-
56
-
57
-
58
-
59
-
60
-
61
-
62
-
63
-
64
-
65
-
66
-
67
-
68
-
69
-
70
-
71
-
72
-
73
-
74
-
75
-
76
-
77
-
78
-
79
-
80
-
81
-
82
-
83
-
84
-
85
-
86
-
87
-
88
-
89
-
90
-
91
-
92
-
93
-
94
-
95
-
96
-
97
-
98
-
99
-
100
-
101
-
102
-
103
-
104
-
105
-
106
-
107
-
108
-
109
-
110
-
111
-
112
-
113
-
114
-
115
-
116
-
117
-
118
-
119
-
120
-
 121
121 -
 122
122 -
 123
123 -
 124
124 -
 125
125 -
 126
126 -
 127
127 -
 128
128 -
 129
129 -
 130
130 -
 131
131 -
132
-
133
-
134
-
135
-
136
-
137
-
138
-
139
-
140
-
141
-
142
-
143
-
144
-
145
-
146
-
147
-
148
-
149
-
150
-
151
-
152
-
153
-
154
-
155
-
156
-
157
-
158
-
159
-
160
-
161
-
162
-
163
-
164
-
165
-
166
-
167
-
168
-
169
-
170
-
171
-
172
-
173
-
174
-
175
-
176
-
177
-
178
-
179
-
180
-
181
-
182
-
183
-
184
-
185
-
186
-
187
-
188
-
189
-
190
-
191
-
192
-
193
-
194
-
195
-
196
-
197
-
198
-
199
-
200
-
201
-
202
-
203
-
204
-
205
-
206
-
207
-
208
-
209
-
210
-
211
-
212
-
213
-
214
-
215
-
216
-
217
-
218
-
219
-
220
-
221
-
222
-
223
-
224
-
225
-
226
-
227
-
228
-
229
-
230
-
231
-
232
-
233
-
234
-
235
-
236
-
237
-
238
-
239
-
240
-
241
-
242
-
243
-
244
-
245
-
246
 |
 |