HP Workstation xw4100 Getting Started Guide HP Workstations xw4100, xw4200, xw - Page 14
xw4200 Rear Panel Components
 |
View all HP Workstation xw4100 manuals
Add to My Manuals
Save this manual to your list of manuals |
Page 14 highlights
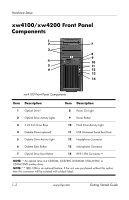
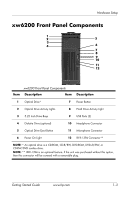
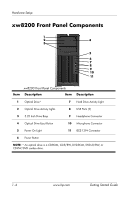
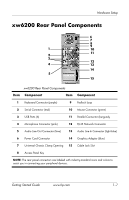
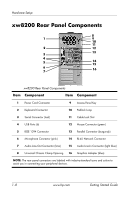
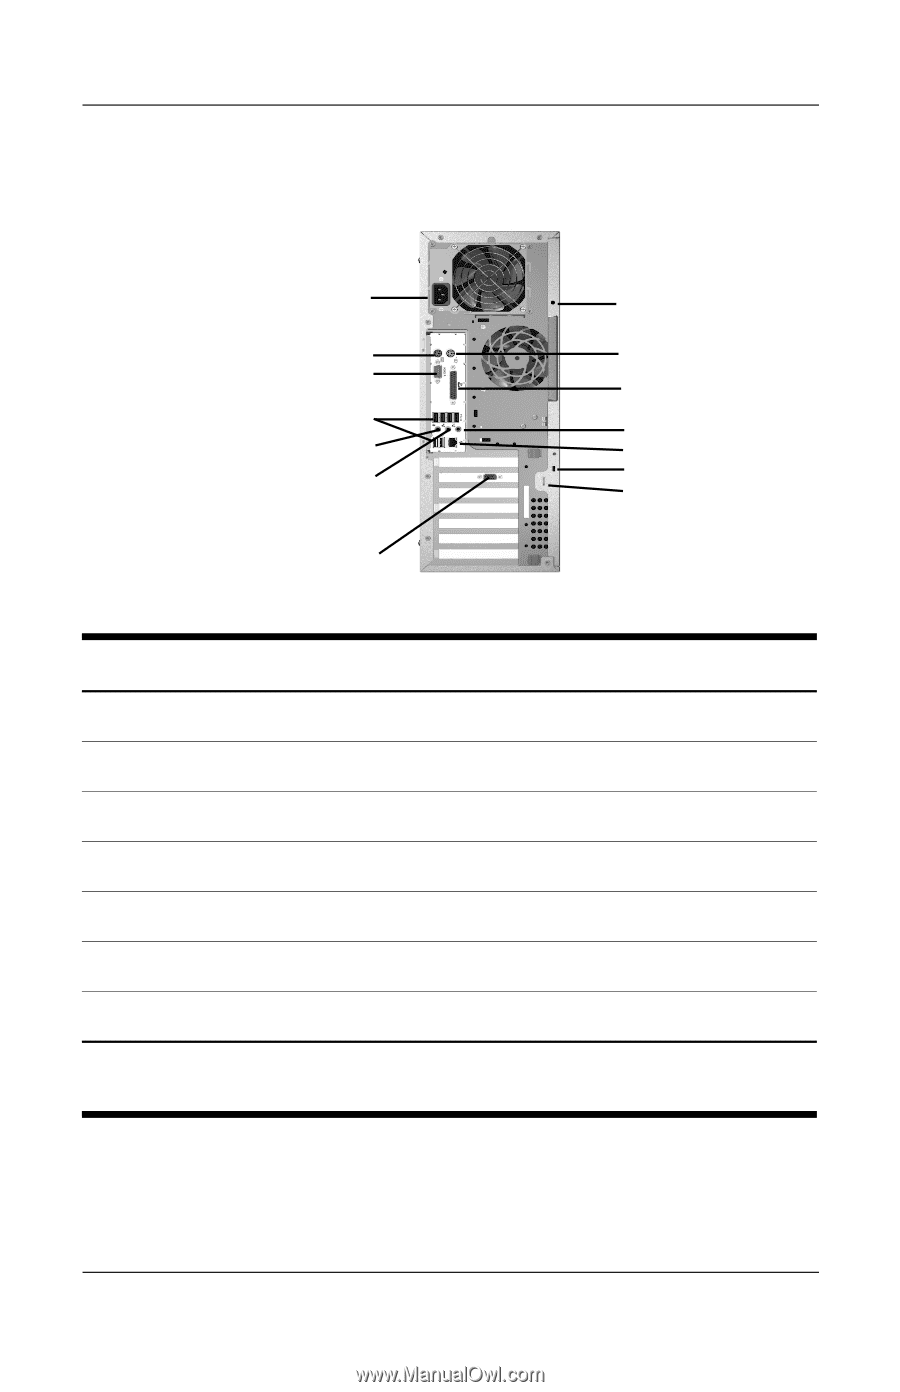
Hardware Setup xw4200 Rear Panel Components 1 8 2 9 3 10 4 5 11 12 6 13 14 7 xw4200 Rear Panel Components Item Component Item Component 1 Power Cord Connector 8 Universal Chassis Clamp Opening 2 Keyboard Connector (purple) 9 Mouse Connector (green) 3 Serial Connector (teal) 10 Parallel Connector (burgundy) 4 USB Ports (6) 11 Audio Line-In Connector (light blue) 5 Microphone Connector (pink) 12 RJ-45 Network Connector 6 Audio Line-Out Connector (lime) 13 Cable Lock Slot 7 Graphics Adapter (blue) 14 Padlock Loop NOTE: The rear panel connectors are labeled with industry-standard icons and colors to assist you in connecting your peripheral devices. 1-6 www.hp.com Getting Started Guide
-
 1
1 -
2
-
3
-
4
-
5
-
6
-
7
-
8
-
 9
9 -
 10
10 -
 11
11 -
 12
12 -
 13
13 -
 14
14 -
 15
15 -
 16
16 -
 17
17 -
 18
18 -
 19
19 -
20
-
21
-
22
-
23
-
24
-
25
-
26
-
27
-
28
-
29
-
30
-
31
-
32
-
33
-
34
-
35
-
36
-
37
-
38
-
39
-
40
-
41
-
42
-
43
-
44
-
45
-
46
-
47
-
48
-
49
-
50
-
51
-
52
-
53
-
54
-
55
-
56
-
57
-
58
-
59
-
60
-
61
-
62
 |
 |
1–6
www.hp.com
Getting Started Guide
Hardware Setup
xw4200 Rear Panel Components
xw4200 Rear Panel Components
1
2
3
4
5
6
7
8
9
10
11
12
13
14
Item
Component
Item
Component
1
Power Cord Connector
8
Universal Chassis Clamp Opening
2
Keyboard Connector (purple)
9
Mouse Connector (green)
3
Serial Connector (teal)
10
Parallel Connector (burgundy)
4
USB Ports (6)
11
Audio Line-In Connector (light blue)
5
Microphone Connector (pink)
12
RJ-45 Network Connector
6
Audio Line-Out Connector (lime)
13
Cable Lock Slot
7
Graphics Adapter (blue)
14
Padlock Loop
NOTE:
The rear panel connectors are labeled with industry-standard icons and colors to
assist you in connecting your peripheral devices.