HP dx2480 Hardware Reference Guide: HP Compaq dx2480 Business Desktop MIcrotow
HP dx2480 - Microtower PC Manual
 |
View all HP dx2480 manuals
Add to My Manuals
Save this manual to your list of manuals |
HP dx2480 manual content summary:
- HP dx2480 | Hardware Reference Guide: HP Compaq dx2480 Business Desktop MIcrotow - Page 1
Hardware Reference Manual HP Compaq Business Desktop dx2480 Microtower Model March 2008 This guide provides basic information for upgrading this computer model. Document Number : 468080-D61 - HP dx2480 | Hardware Reference Guide: HP Compaq dx2480 Business Desktop MIcrotow - Page 2
Hardware Reference Guide HP Compaq Business Desktop dx2480 Microtower Model March 2008 This guide provides basic information for upgrading this computer model. - HP dx2480 | Hardware Reference Guide: HP Compaq dx2480 Business Desktop MIcrotow - Page 3
change without notice. Microsoft, MS-DOS, Windows and Windows Vista are trademarks of Microsoft Corporation in the U.S. and other countries. The only warranties for HP products and services equipment or loss of information. Hardware Reference Guide HP Compaq Business Desktop dx2480 Microtower Model - HP dx2480 | Hardware Reference Guide: HP Compaq dx2480 Business Desktop MIcrotow - Page 4
Features Standard Configuration Features 1-1 Front Panel Components 1-2 Rear Panel Components 1-3 Keyboard ...1-4 Windows Logo Key 1-5 Special Mouse Functions 1-5 Serial Number Location 1-6 2 Hardware Upgrades Serviceability Features Computer 2-25 Hardware Reference Guide www.hp.com/in iii - HP dx2480 | Hardware Reference Guide: HP Compaq dx2480 Business Desktop MIcrotow - Page 5
Preparation 6-3 7 Computer Setup (F10) Utility Computer Setup (F10) Utility 7-1 Using Computer Setup (F10) Utilities 7-2 Recovering the Configuration Settings 7-4 8 Troubleshooting Guide Computer Diagnostic Features 8-1 Troubleshooting ...8- 8 Hardware Reference Guide www.hp.com/in iv - HP dx2480 | Hardware Reference Guide: HP Compaq dx2480 Business Desktop MIcrotow - Page 6
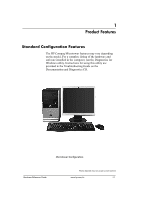
Standard Configuration Features The HP Compaq Microtower features may vary depending on the model. For a complete listing of the hardware and software installed in the computer, run the Diagnostics for Windows utility. Instructions for using this utility are provided in the Troubleshooting Guide on - HP dx2480 | Hardware Reference Guide: HP Compaq dx2480 Business Desktop MIcrotow - Page 7
Product Features Front Panel Components Drive configuration may vary by model. 1 8 2 9 10 3 4 11 5 12 6 7 Front Panel Components 1 Optical Drives 2 Optical (Universal Serial Bus) Ports 12 Hard Drive Activity Light Hardware Reference Guide Photos depicted may vary as per actual machine www - HP dx2480 | Hardware Reference Guide: HP Compaq dx2480 Business Desktop MIcrotow - Page 8
. 8 Parallel Port Connector 9 Monitor Connector 10 Headphone/Line-Out Connector 11 Audio/Line-In Connector 12 Microphone Connector Arrangement and number of connectors may vary by model. ! Hardware Reference Guide Photos depicted may vary as per actual machine www.hp.com/in 1-3 - HP dx2480 | Hardware Reference Guide: HP Compaq dx2480 Business Desktop MIcrotow - Page 9
Product Features Keyboard Keyboard Components 1 Function Keys 2 Editing Keys 3 Status Lights 4 Numeric Keys 5 Arrow Keys 6 Ctrl Keys 7 Application Key* 8 Windows Logo Keys* 9 Alt Keys Perform special functions depending on the software application being used. Includes the following: Insert, Home, - HP dx2480 | Hardware Reference Guide: HP Compaq dx2480 Business Desktop MIcrotow - Page 10
Windows Logo Key + u Windows Logo Key + Tab Displays or hides the Start menu. Displays the Desktop. Minimizes all open applications. Undoes Minimize All. Launches My Computer. Launches Find Document. Launches Find Computer. Launches Windows Help. Locks the computer if you are connected to a network - HP dx2480 | Hardware Reference Guide: HP Compaq dx2480 Business Desktop MIcrotow - Page 11
Features Serial Number Location Each computer has a unique serial number and a product ID number that are located on the top cover of the computer. Keep these numbers available for use when contacting customer service for assistance. Serial Number and Product ID Location Hardware Reference Guide - HP dx2480 | Hardware Reference Guide: HP Compaq dx2480 Business Desktop MIcrotow - Page 12
features that make it easy to upgrade and service. A Torx T-15 screwdriver is needed for many of the installation procedures described in this chapter. Warnings and Cautions Before performing upgrades be sure to carefully read all of the applicable instructions, cautions, and warnings in this guide - HP dx2480 | Hardware Reference Guide: HP Compaq dx2480 Business Desktop MIcrotow - Page 13
unit. To replace the access panel, reverse the removal steps. ! Removing the Computer Access Panel Photos depicted may vary as per actual machine Hardware Reference Guide www.hp.com/in 2-2 - HP dx2480 | Hardware Reference Guide: HP Compaq dx2480 Business Desktop MIcrotow - Page 14
down on all four tabs at the bottom of the bezel and then rotate the bezel off the chassis 1 . 2 1 Removing the Front Bezel Hardware Reference Guide Photos depicted may vary as per actual machine www - HP dx2480 | Hardware Reference Guide: HP Compaq dx2480 Business Desktop MIcrotow - Page 15
800 MHz-compliant DDR2 800 MHz DIMM 256Mbit, 512Mbit, and 1Gbit non-ECC memory technologies single-sided and double-sided DIMMS The system will not start if you install unsupported DIMMs. *8GB Memory is supported only with Windows Vista 64 bit or Freedos operating systems !! Hardware Reference - HP dx2480 | Hardware Reference Guide: HP Compaq dx2480 Business Desktop MIcrotow - Page 16
channel. DIMM Socket Item 1 2 3 4 Description DIMM socket, Channel A DIMM socket, Channel A DIMM socket, Channel B DIMM socket, Channel B Socket Color Yellow Red Yellow Red 1 2 3 4 Hardware Reference Guide www.hp.com/in 2-5 - HP dx2480 | Hardware Reference Guide: HP Compaq dx2480 Business Desktop MIcrotow - Page 17
upgrading the memory, it is important to use memory modules with Chapter 5, "Electrostatic Discharge." CAUTION: When handling a memory module, be careful not to touch any of the . 3. Remove the computer access panel. 4. Locate the memory module sockets on the system board. WARNING: To reduce - HP dx2480 | Hardware Reference Guide: HP Compaq dx2480 Business Desktop MIcrotow - Page 18
in the closed position 3 . 7. Repeat steps 5 and 6 to install any additional modules. 8. Replace the access panel. The computer should automatically recognize the additional memory the next time you turn on the computer. Hardware Reference Guide Photos depicted may vary as per actual machine www - HP dx2480 | Hardware Reference Guide: HP Compaq dx2480 Business Desktop MIcrotow - Page 19
side of the front bezel then snap the right side of the blank into place. Photos depicted may vary as per actual machine Hardware Reference Guide www.hp.com/in 2-8 - HP dx2480 | Hardware Reference Guide: HP Compaq dx2480 Business Desktop MIcrotow - Page 20
supports up to six drives that may be installed in various configurations. This section describes the procedure for replacing or upgrading the storage drives. A Torx screwdriver is needed to remove and install the guide the HP factory-installed files. Hardware Reference Guide www.hp.com/in 2-9 - HP dx2480 | Hardware Reference Guide: HP Compaq dx2480 Business Desktop MIcrotow - Page 21
Hardware Upgrades Locating Drive Positions 2 3 Hardware Reference Guide Drive Positions Photos depicted may vary as per actual machine www.hp.com/in 2-10 - HP dx2480 | Hardware Reference Guide: HP Compaq dx2480 Business Desktop MIcrotow - Page 22
illustrations. 4. Remove all the screws that secures the drives in the drive bay. Slide the drive disk forward and out of the bay. Hardware Reference Guide Removing the Drives Photos depicted may vary as per actual machine www - HP dx2480 | Hardware Reference Guide: HP Compaq dx2480 Business Desktop MIcrotow - Page 23
out of the bay. WARNING: There may be sharp edges on the insides of the bay ! opening after the shield has been removed. Hardware Reference Guide Photos depicted may vary as per actual machine www - HP dx2480 | Hardware Reference Guide: HP Compaq dx2480 Business Desktop MIcrotow - Page 24
up the data on the old hard drive before removing it so that you can install the data onto the new hard drive. ! Hardware Reference Guide www.hp.com/in 2-13 - HP dx2480 | Hardware Reference Guide: HP Compaq dx2480 Business Desktop MIcrotow - Page 25
1. Slide the floppy drive into the drive bay, making sure to align the guide screws with the guide slots, until the drive snaps into place. 2 Sliding the Drives into the Drive Secure the Drive by tighten all two screws. Hardware Reference Guide Photos depicted may vary as per actual machine www - HP dx2480 | Hardware Reference Guide: HP Compaq dx2480 Business Desktop MIcrotow - Page 26
drive bays holes. Secure the Drive by tighten all the screws at each bottom side 3 Sliding the Hard Drive into the Drive Cage Hardware Reference Guide Photos depicted may vary as per actual machine www - HP dx2480 | Hardware Reference Guide: HP Compaq dx2480 Business Desktop MIcrotow - Page 27
hard drive in hard drive bay located in (as indicated by arrow 1 ). 2. Secure the second hard drive by tightening the 2 screws at bottom. Hardware Reference Guide Photos depicted may vary as per actual machine www - HP dx2480 | Hardware Reference Guide: HP Compaq dx2480 Business Desktop MIcrotow - Page 28
Hardware Upgrades 3. Connect one end of the data cables to the second hard drive as shown above. 4. The other end connect to the system board. Hardware Reference Guide Photos depicted may vary as per actual machine www.hp.com/in 2-17 - HP dx2480 | Hardware Reference Guide: HP Compaq dx2480 Business Desktop MIcrotow - Page 29
hard drive, insert the Restore Plus! DVD to restore the operating system, software drivers, and/or any software applications that were preinstalled on the computer from HP. Follow the instructions in the guide included with the restore DVD. When the restore process has completed, reinstall any - HP dx2480 | Hardware Reference Guide: HP Compaq dx2480 Business Desktop MIcrotow - Page 30
expansion slots, one PCI-Express x 1 & one PCI-Express x 16 slots PCI -E x16 Slot PCI -E x1 Slot PCI Slot PCI Slot Expansion Slot Locations Hardware Reference Guide Photos depicted may vary as per actual machine www - HP dx2480 | Hardware Reference Guide: HP Compaq dx2480 Business Desktop MIcrotow - Page 31
secures the slot cover lock in place and slide the slot cover lock away from the slots to remove it from the computer . Hardware Reference Guide Releasing the Slot Cover Lock Photos depicted may vary as per actual machine www - HP dx2480 | Hardware Reference Guide: HP Compaq dx2480 Business Desktop MIcrotow - Page 32
chassis. Pull the slot cover straight up from the socket then away from the inside of the chassis. Removing an Expansion Slot Cover Hardware Reference Guide Photos depicted may vary as per actual machine www - HP dx2480 | Hardware Reference Guide: HP Compaq dx2480 Business Desktop MIcrotow - Page 33
hold the card at each end, and carefully rock it back and forth until the connectors pull free from the socket. Pull the expansion card straight up from the socket 1 then away from the . Removing an Expansion Card Hardware Reference Guide Photos depicted may vary as per actual machine www - HP dx2480 | Hardware Reference Guide: HP Compaq dx2480 Business Desktop MIcrotow - Page 34
cable. When installing an expansion card, press firmly on the card so that the whole connector seats properly in the expansion card slot. Hardware Reference Guide Photos depicted may vary as per actual machine www - HP dx2480 | Hardware Reference Guide: HP Compaq dx2480 Business Desktop MIcrotow - Page 35
cover lock. Securing the Expansion Cards and Slot Covers 11. Complete the procedure described in the "Reassembling the Computer" section of this chapter. Hardware Reference Guide Photos depicted may vary as per actual machine www - HP dx2480 | Hardware Reference Guide: HP Compaq dx2480 Business Desktop MIcrotow - Page 36
the two hooks on the top of the bezel into the rectangular holes on the chassis then rotate the bezel into the place 2 . Hardware Reference Guide Replacing the Front Bezel Photos depicted may vary as per actual machine www - HP dx2480 | Hardware Reference Guide: HP Compaq dx2480 Business Desktop MIcrotow - Page 37
: To reduce the risk of electrical shock, fire, or damage to the ! equipment, do not plug telecommunications or telephone connectors into the network interface controller (NIC) ports. 5. Turn on the computer by pressing the power button. Photos depicted may vary as per actual machine Hardware - HP dx2480 | Hardware Reference Guide: HP Compaq dx2480 Business Desktop MIcrotow - Page 38
the battery only with the HP spare designated for this product. CAUTION: Before replacing the battery, it is important to back up the computer CMOS settings. When the battery is removed or replaced, the CMOS settings will be cleared. Refer to the Troubleshooting Guide on the Documentation and - HP dx2480 | Hardware Reference Guide: HP Compaq dx2480 Business Desktop MIcrotow - Page 39
system board. 4. Depending on the type of battery holder on the system board, complete the following instructions to replace the battery. a.To release the battery from its holder, squeeze the metal clamp that snaps over the other edge of the battery 2 . Hardware Reference Guide www.hp.com/in 3-2 - HP dx2480 | Hardware Reference Guide: HP Compaq dx2480 Business Desktop MIcrotow - Page 40
any special system setups, using Computer Setup. Refer to the Computer Setup (F10) Utility Guide on the Documentation and Diagnostics CD. Power Supply Notice ! WARNING: The power supply contains AND OTHER BODY PARTS AWAY Hardware Reference Guide Photos depicted may vary as per actual machine www - HP dx2480 | Hardware Reference Guide: HP Compaq dx2480 Business Desktop MIcrotow - Page 41
software screen displays a boot, the screen displays Guide. Setting the Chassis Intrusion Switch To set the CI Protection, complete the following steps: 1. Fix the CI Switch on the Back panel of Chassis as directed in the diagram. 2. Connect the CI Switch cable to the CI Pins on the system motherboard - HP dx2480 | Hardware Reference Guide: HP Compaq dx2480 Business Desktop MIcrotow - Page 42
safe containers. n Keep electrostatic-sensitive parts in their containers until they arrive at static-free workstations. n Place parts on a grounded surface before removing them from their containers. proper ground, wear the strap snug against the skin. Hardware Reference Guide www.hp.com/in 5-1 - HP dx2480 | Hardware Reference Guide: HP Compaq dx2480 Business Desktop MIcrotow - Page 43
mat. If you do not have any of the suggested equipment for proper grounding, contact an HP authorized dealer, reseller, or service provider. For more information on static electricity, contact an HP authorized dealer, reseller, or service provider. ! Hardware Reference Guide www.hp.com/in 5-2 - HP dx2480 | Hardware Reference Guide: HP Compaq dx2480 Business Desktop MIcrotow - Page 44
with the keyboard feet down, directly against the front of the desktop unit as this also restricts airflow. n Keep the computer away or enable power management functions of the operating system or other software, including sleep states. n Turn off the computer before you Guide www.hp.com/in 6-1 - HP dx2480 | Hardware Reference Guide: HP Compaq dx2480 Business Desktop MIcrotow - Page 45
during reading. n Avoid exposing the drive to sudden changes in temperature, as condensation may form inside the unit. If the temperature suddenly changes while the drive is on, wait at least one and have it checked by an authorized HP service provider. Hardware Reference Guide www.hp.com/in 6-2 - HP dx2480 | Hardware Reference Guide: HP Compaq dx2480 Business Desktop MIcrotow - Page 46
computer. 7. Pack the system components and external devices in their original packing boxes or similar packaging with sufficient packing material to protect them. ! Hardware Reference Guide www.hp.com/in 6-3 - HP dx2480 | Hardware Reference Guide: HP Compaq dx2480 Business Desktop MIcrotow - Page 47
Computer Setup (F10) Utility Guide HP Compaq Business Desktop dx2480 Microtower Model March 2008 This guide provides instructions on how to use Computer Setup. This tool is used to reconfigure and modify computer default settings when new hardware is installed and for maintenance purposes. - HP dx2480 | Hardware Reference Guide: HP Compaq dx2480 Business Desktop MIcrotow - Page 48
change without notice. Microsoft, MS-DOS, Windows and Windows Vista are trademarks of Microsoft Corporation in the U.S. and other countries. The only warranties for HP products and services or loss of information. Computer Setup (F10) Utility Guide HP Compaq Business Desktop dx2480 Microtower Model - HP dx2480 | Hardware Reference Guide: HP Compaq dx2480 Business Desktop MIcrotow - Page 49
PORT 2 7-4 SATA PORT 3 7-4 IDE Channel 0 &1Master 7-5 Access Mode 7-5 Halt On 7-5 SATA Controller 7-5 LEGACY Mode Support 7-5 Advanced BIOS Features 7-5 Quick Power On Self Test 7-6 Hard Disk Boot Priority 7-6 CDROM Boot Priority 7-6 Computer Setup (F10) Utility Guide www.hp.com/in iii - HP dx2480 | Hardware Reference Guide: HP Compaq dx2480 Business Desktop MIcrotow - Page 50
Features 7-6 PEG/Onchip VGA Controller 7-6 On-Chip Frame Buffer Size 7-6 DVMT Mode 7-6 IGD DVMT/Fixed Memory 7-7 Integrated Peripherals 7-7 USB Controller 7-7 USB Legacy Support 7-7 Azalia Codec 7-7 Onboard LAN 7-7 Onboard LAN Boot 7-9 Computer Setup (F10) Utility Guide www.hp.com/in iv - HP dx2480 | Hardware Reference Guide: HP Compaq dx2480 Business Desktop MIcrotow - Page 51
factory default settings. n Set the system date and time. n Set,view,change,or verify the system configuration,including settings for processor, graphics, memory, audio, storage, communications,and input devices. n Modify the boot order of bootable devices such as hard drives, optical drives,orUSB - HP dx2480 | Hardware Reference Guide: HP Compaq dx2480 Business Desktop MIcrotow - Page 52
Turn on or restart the computer. If you are in Microsoft Windows, click Start > Shut Down > Restart. 2. As soon as Features n Advanced BIOS Features n Advanced Chipset Features n Integrated Peripherals n Power Management Setup n Hardware Monitor Setup ! Computer Setup (F10) Utility Guide www.hp - HP dx2480 | Hardware Reference Guide: HP Compaq dx2480 Business Desktop MIcrotow - Page 53
the previous screen, press Esc. 4. To apply and save changes, press F10 or select Save & Exit Setup on the Computer Setup Utility screen and press NOT turn the computer power OFF while the ROM is saving the F10 Computer Setup changes because the CMOS could become corrupted. It is safe to turn off the computer only - HP dx2480 | Hardware Reference Guide: HP Compaq dx2480 Business Desktop MIcrotow - Page 54
BIOS Version (view only) BIOS Features Floppy Drive A View 1.44MB,3.5" or None SATA Port 0 SATA Port 1 SATA Port 2 SATA Port 3 HDD Auto Detection ! Support for specific Computer Setup options may vary depending on the hardware configuration Computer Setup (F10) Utility Guide www.hp - HP dx2480 | Hardware Reference Guide: HP Compaq dx2480 Business Desktop MIcrotow - Page 55
IDE deviceto: • None • Auto(default) • Manual Access Mode This allows you to set the access support This allows you to set for: • Enabled (default) • Disabled ! Support for specific Computer Setup options may vary depending on the hardware configuration Computer Setup (F10) Utility Guide www.hp - HP dx2480 | Hardware Reference Guide: HP Compaq dx2480 Business Desktop MIcrotow - Page 56
Buffer Size Allow you to ser On-Chip Frame Buffer size to • 1MB • 8MB DVMT Mode Allows you to set DVMT Mode to: • Fixed • DVMT ! Support for specific Computer Setup options may vary depending on the hardware configuration Computer Setup (F10) Utility Guide www.hp.com/in 7-6 - HP dx2480 | Hardware Reference Guide: HP Compaq dx2480 Business Desktop MIcrotow - Page 57
) Heading Option Description Advanced IGD DVMT/Fixed Chipset Features Memory This allows you to set memory size to: • 128MB • 256MB • MAX Integrated Peripherals USB Controller USB Legacy Support Azalia Audio Onboard LAN Onboard LAN Boot Serial Port Parallel port Parallel Port Mode ECP Mode - HP dx2480 | Hardware Reference Guide: HP Compaq dx2480 Business Desktop MIcrotow - Page 58
Setup ACPI Function Enables/disables ACPI functions. Changing this item can make the existing OS bit Mode is for 32 bit OS • 64-bit Mode is for 64 bit OS ! Support for specific Computer Setup options may vary depending on the hardware configuration. Computer Setup (F10) Utility Guide www.hp - HP dx2480 | Hardware Reference Guide: HP Compaq dx2480 Business Desktop MIcrotow - Page 59
Exit Allows you to save current settings and exit Computer Setup Exit without Saving Allows you to exit Computer setup without saving changes ! Support for specific Computer Setup options may vary depending on the hardware configuration. Computer Setup (F10) Utility Guide www.hp.com/in 7-9 - HP dx2480 | Hardware Reference Guide: HP Compaq dx2480 Business Desktop MIcrotow - Page 60
Troubleshooting Guide HP Business Desktop dx2480 March 2008 This guide provides helpful hints and solutions for troubleshooting the above products as well as scenarios for possible hardware and software problems. - HP dx2480 | Hardware Reference Guide: HP Compaq dx2480 Business Desktop MIcrotow - Page 61
change without notice. Microsoft, MS-DOS, Windows and Windows Vista are trademarks of Microsoft Corporation in the U.S. and other countries. The only warranties for HP products and services . Troubleshooting Guide HP Compaq Business Desktop dx2480 Microtower Model First Edition (March 2008) - HP dx2480 | Hardware Reference Guide: HP Compaq dx2480 Business Desktop MIcrotow - Page 62
device. You should run tests, save the test results, and print them so that you have printed reports available before placing a call to the Customer Support Center. Third party devices may not be detected by HP Insight Diagnostics. ! Troubleshooting Guide www.hp.com/in 8-1 - HP dx2480 | Hardware Reference Guide: HP Compaq dx2480 Business Desktop MIcrotow - Page 63
the assigned default keyboard for your language unless you want to test your specific keyboard. 6. In the End User License Agreement page, click Agree if you agree with the terms. The HP Insight Diagnostics utility launches with the Survey tab displayed. Troubleshooting Guide www.hp.com/in 8-2 - HP dx2480 | Hardware Reference Guide: HP Compaq dx2480 Business Desktop MIcrotow - Page 64
Features Survey Tab The Survey tab displays important system configuration information. In the View section on the left side of the screen, you can select the Summary view to see limited configuration and BIOS, plus internal speaker and PCI bus information. Troubleshooting Guide www.hp.com/in 8-3 - HP dx2480 | Hardware Reference Guide: HP Compaq dx2480 Business Desktop MIcrotow - Page 65
software will prompt you for input during tests that require your interaction.You may also determine whether the test passed or failed. n Unattended Mode-Does not display The Custom Test mode allows you to specifically select which devices, tests, and test Troubleshooting Guide www.hp.com/in 8-4 - HP dx2480 | Hardware Reference Guide: HP Compaq dx2480 Business Desktop MIcrotow - Page 66
Computer Diagnostic Features 5. Choose how The Status tab, which allows you to monitor the progress of the test, is automatically displayed during the testing process. When the test is complete, the Status tab shows whether The condition status of each test Troubleshooting Guide www.hp.com/in 8-5 - HP dx2480 | Hardware Reference Guide: HP Compaq dx2480 Business Desktop MIcrotow - Page 67
not supported. 2. Click Save in the upper right corner of the tab. 3. Select Save to the floppy or Save to USB key. 4. Enter a file name in the File Name box and click the Save button. An html file will be saved to the inserted diskette or USB HP Drive Key. Troubleshooting Guide www.hp.com - HP dx2480 | Hardware Reference Guide: HP Compaq dx2480 Business Desktop MIcrotow - Page 68
) in the text box and press the Enter key. 5. Select your specific computer model 6. Select your OS. 7. Click the Diagnostic link. 8. Locate HP Insight Diagnostics and click Download. The download includes instructions on how to create the bootable CD. ! Troubleshooting Guide www.hp.com/in 8-7 - HP dx2480 | Hardware Reference Guide: HP Compaq dx2480 Business Desktop MIcrotow - Page 69
isolate the exact problem before calling for technical support. n Run the diagnostics utility. Refer to Chapter 1, "Computer Diagnostic Features" for more available. Or, change out the monitor with a monitor that you know is functioning properly. Troubleshooting Guide www.hp.com/in 8-8 - HP dx2480 | Hardware Reference Guide: HP Compaq dx2480 Business Desktop MIcrotow - Page 70
HP support, use HP Instant Support Professional Edition's online chat feature. Access HP Instant Support Professional Edition at: www.hp.com/go/ispe. Access the Business Support Center (BSC) at www.hp.com/go/bizsupport for the latest online support information, software and drivers, proactive - HP dx2480 | Hardware Reference Guide: HP Compaq dx2480 Business Desktop MIcrotow - Page 71
and warranty upgrades (HP Care Pack Services), call your local authorized service provider or dealer. Helpful Hints If you encounter problems with the computer, monitor, or software, see the following restart, press the power button to start the computer. Troubleshooting Guide www.hp.com/in 8-10 - HP dx2480 | Hardware Reference Guide: HP Compaq dx2480 Business Desktop MIcrotow - Page 72
Troubleshooting n Reconfigure the computer after installing a nonplug and play expansion board or other option. See "Solving Hardware Installation Problems" for instructions. n Be sure that all the needed device drivers have been installed. For example, if you are using a printer, you need a driver - HP dx2480 | Hardware Reference Guide: HP Compaq dx2480 Business Desktop MIcrotow - Page 73
Troubleshooting Solving General Problems You may be able to easily resolve the minor problems described in this section. If a problem persists and you are unable to resolve it yourself or if you feel uncomfortable about performing the operation, contact your HP authorized reseller or service - HP dx2480 | Hardware Reference Guide: HP Compaq dx2480 Business Desktop MIcrotow - Page 74
in the Control Panel (Computer Setup can also be used to update the RTC date and time). If the problem persists, replace the RTC battery. See the Hardware Reference Guide on the Documentation and Diagnostics CD for instructions on installing a new battery. Cursor will not move using the Tohne - HP dx2480 | Hardware Reference Guide: HP Compaq dx2480 Business Desktop MIcrotow - Page 75
to free up memory. 2. Add more memory. Some software applications, 1. Lower the display especially games, are resolution for the current stressful on the graphics application or from the monitor to the computer and to the electrical outlet. Troubleshooting Guide www.hp.com/in 8-14 - HP dx2480 | Hardware Reference Guide: HP Compaq dx2480 Business Desktop MIcrotow - Page 76
Troubleshooting Problem Blank screen (no video) (continued). Cause Solution You may have a screen blanking utility installed or energy saver features are enabled. Press any key or click the Lights and Audible Codes" to interpret the error code. Troubleshooting Guide www.hp.com/in 8-15 - HP dx2480 | Hardware Reference Guide: HP Compaq dx2480 Business Desktop MIcrotow - Page 77
device and configure the computer. If you install a nonplug and play device, you must reconfigure the computer after completing installation of the new hardware. In Windows XP Home/Professional/Vista, use the Add Hardware Wizard and follow the instructions that appear on the screen. Problem A new - HP dx2480 | Hardware Reference Guide: HP Compaq dx2480 Business Desktop MIcrotow - Page 78
Troubleshooting Problem Computer will not start. Cause Wrong memory modules were used in the upgrade or memory modules were installed in the wrong location. Solution 1. Review the documentation that came with the system to determine if you are using the correct memory modules and to verify the - HP dx2480 | Hardware Reference Guide: HP Compaq dx2480 Business Desktop MIcrotow - Page 79
or contact an authorized reseller or service provider Pre-video memory error. 1. Reseat DIMMs. Power on the system. 2. Replace DIMMs one at a time to isolate the faulty module. 3. Replace third-party memory with HP memory. 4. Replace the system board. Troubleshooting Guide www.hp.com/in 8-18 - HP dx2480 | Hardware Reference Guide: HP Compaq dx2480 Business Desktop MIcrotow - Page 80
side cover is closed if not fix it as directed in the assembling guide. 2. Ensure that any system access was authorized, check all the hardware ensuring that no hardware has been changed or removed. Then enter the BIOS setup by pressing F10 then select Hardware Monitor setup and enable the Reset - HP dx2480 | Hardware Reference Guide: HP Compaq dx2480 Business Desktop MIcrotow - Page 81
! Troubleshooting Restoring the Software The Windows operating system and software can be restored to the original state that they were when you purchased the computer by using the Restore Plus! DVD. See the documentation included with the Restore Plus! DVD for complete instructions on using this
-
 1
1 -
 2
2 -
 3
3 -
 4
4 -
 5
5 -
 6
6 -
 7
7 -
8
-
9
-
10
-
11
-
12
-
13
-
14
-
15
-
16
-
17
-
18
-
19
-
20
-
21
-
22
-
23
-
24
-
25
-
26
-
27
-
28
-
29
-
30
-
31
-
32
-
33
-
34
-
35
-
36
-
37
-
38
-
39
-
40
-
41
-
42
-
43
-
44
-
45
-
46
-
47
-
48
-
49
-
50
-
51
-
52
-
53
-
54
-
55
-
56
-
57
-
58
-
59
-
60
-
61
-
62
-
63
-
64
-
65
-
66
-
67
-
68
-
69
-
70
-
71
-
72
-
73
-
74
-
75
-
76
-
77
-
78
-
79
-
80
-
81
 |
 |
