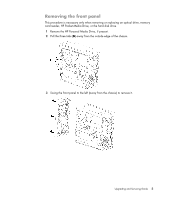
HP m9510f Upgrading and Servicing Guide - Page 8
Replacing the side panel, See After closing the computer
 |
UPC - 884420537359
View all HP m9510f manuals
Add to My Manuals
Save this manual to your list of manuals |
Page 8 highlights
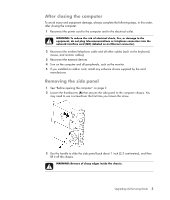
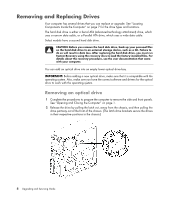
Replacing the side panel 1 Align the tabs at the bottom of the side panel with the ridge on the bottom of the chassis. Place the side panel in the proper position on the chassis, and then slide it toward the front of the chassis. NOTE: There is a 3mm gap between the top of the side panel and the top of the chassis when the side panel is attached properly. 2 Ensure that the hole for the thumbscrew is aligned with the hole in the chassis, and then replace the thumbscrew (A). 3 See "After closing the computer" on page 3. 4 Upgrading and Servicing Guide
-
 1
1 -
2
-
 3
3 -
 4
4 -
 5
5 -
 6
6 -
 7
7 -
 8
8 -
 9
9 -
 10
10 -
 11
11 -
 12
12 -
 13
13 -
14
-
15
-
16
-
17
-
18
-
19
-
20
-
21
-
22
-
23
-
24
-
25
-
26
-
27
-
28
-
29
-
30
-
31
-
32
-
33
-
34
-
35
-
36
 |
 |

4
Upgrading and Servicing Guide
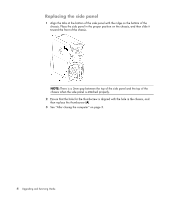
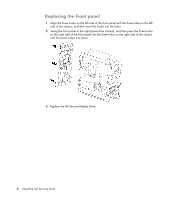
Replacing the side panel
1
Align the tabs at the bottom of the side panel with the ridge on the bottom of the
chassis. Place the side panel in the proper position on the chassis, and then slide it
toward the front of the chassis.
2
Ensure that the hole for the thumbscrew is aligned with the hole in the chassis, and
then replace the thumbscrew (
A
).
3
See “After closing the computer” on page 3.
NOTE:
There is a 3mm gap between the top of the side panel and the top of the
chassis when the side panel is attached properly.