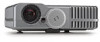
HP mp3322 User Guide - Page 57
Picture problems, Select input > Auto-scan sources.
 |
View all HP mp3322 manuals
Add to My Manuals
Save this manual to your list of manuals |
Page 57 highlights
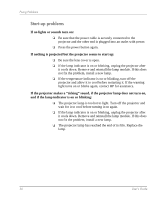
Fixing Problems Picture problems If the image is not displayed on the screen, but the HP startup screen is displayed: ❏ Press the source button on the projector or remote control. ❏ Turn off or disable the notebook or desktop computer screen saver function. ❏ For a computer connection, ensure your notebook computer's external video port is turned on. See the video port card shipped with the projector. On some notebooks, for example, press the Fn + F4 function keys to turn on the external video port. ❏ Verify that the right input source is connected. Open the on-screen menu and go to Select input. Then set the correct input port where the equipment is connected. ❏ Verify that auto search is enabled. Open the on-screen menu and go to Select input > Auto-scan sources. If the wrong input source is displayed: ❏ Press the source button on the projector or the remote control to select another active input source. ❏ Verify that the right input source is connected. Open the on-screen menu and go to Select input. Then set the correct input source. ❏ Verify that the projector is enabled for auto-searching. Open the on-screen menu and go to Select input > Auto-scan sources. ❏ If the input source might turn off and on, open the on-screen menu and go to Select input. Set Auto-scan sources to Off and select the correct input source. User's Guide 57
-
 1
1 -
2
-
3
-
4
-
5
-
6
-
7
-
8
-
9
-
10
-
11
-
12
-
13
-
14
-
15
-
16
-
17
-
18
-
19
-
20
-
21
-
22
-
23
-
24
-
25
-
26
-
27
-
28
-
29
-
30
-
31
-
32
-
33
-
34
-
35
-
36
-
37
-
38
-
39
-
40
-
41
-
42
-
43
-
44
-
45
-
46
-
47
-
48
-
49
-
50
-
51
-
 52
52 -
 53
53 -
 54
54 -
 55
55 -
 56
56 -
 57
57 -
 58
58 -
 59
59 -
 60
60 -
 61
61 -
 62
62 -
63
-
64
-
65
-
66
-
67
-
68
-
69
-
70
-
71
-
72
-
73
-
74
-
75
-
76
-
77
-
78
-
79
-
80
 |
 |