HP rp2405 rp24xx A180 User Manual - Page 89
Cache Memory Removal, Cache Memory Replacement, A-Class Server Cache Memory Removal and Replacement
 |
View all HP rp2405 manuals
Add to My Manuals
Save this manual to your list of manuals |
Page 89 highlights
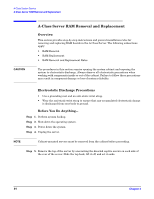
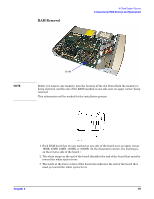
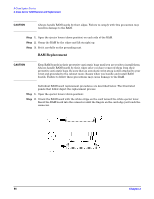
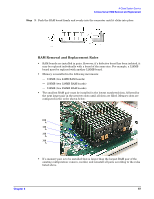
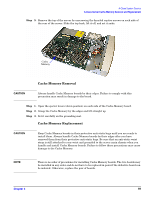
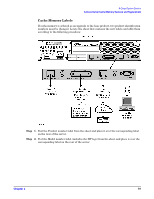
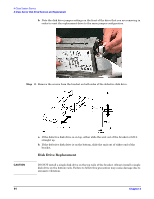
A-Class System Service A-Class Server Cache Memory Removal and Replacement Step 5. Remove the top of the server by unscrewing the knurled captive screws on each side of the rear of the server. Slide the top back, lift it off, and set it aside. Cache Memory Cache Memory Removal CAUTION Always handle Cache Memory boards by their edges. Failure to comply with this precaution may result in damage to the board. Step 1. Open the ejector levers (down position) on each side of the Cache Memory board. Step 2. Grasp the Cache Memory by the edges and lift straight up Step 3. Set it carefully on the grounding mat. Cache Memory Replacement CAUTION Keep Cache Memory boards in their protective anti-static bags until you are ready to install them. Always handle Cache Memory boards by their edges after you have removed them from their protective anti-static bags. Be sure that an anti-static wrist strap is still attached to your wrist and grounded to the server main chassis when you handle and install Cache Memory boards. Failure to follow these precautions may cause damage to the Cache Memory. NOTE There is no order of precedence for installing Cache Memory boards. The two boards may be installed in any order and do not have to be replaced in pairs if the defective board can be isolated. Otherwise, replace the pair of boards. Chapter 3 89
-
 1
1 -
2
-
3
-
4
-
5
-
6
-
7
-
8
-
9
-
10
-
11
-
12
-
13
-
14
-
15
-
16
-
17
-
18
-
19
-
20
-
21
-
22
-
23
-
24
-
25
-
26
-
27
-
28
-
29
-
30
-
31
-
32
-
33
-
34
-
35
-
36
-
37
-
38
-
39
-
40
-
41
-
42
-
43
-
44
-
45
-
46
-
47
-
48
-
49
-
50
-
51
-
52
-
53
-
54
-
55
-
56
-
57
-
58
-
59
-
60
-
61
-
62
-
63
-
64
-
65
-
66
-
67
-
68
-
69
-
70
-
71
-
72
-
73
-
74
-
75
-
76
-
77
-
78
-
79
-
80
-
81
-
82
-
83
-
 84
84 -
 85
85 -
 86
86 -
 87
87 -
 88
88 -
 89
89 -
 90
90 -
 91
91 -
 92
92 -
 93
93 -
 94
94 -
95
-
96
-
97
-
98
-
99
-
100
-
101
-
102
-
103
-
104
-
105
-
106
 |
 |
