HP s300 HP s300 Digital Camera - Quick Start Guide
HP s300 Manual
 |
View all HP s300 manuals
Add to My Manuals
Save this manual to your list of manuals |
HP s300 manual content summary:
- HP s300 | HP s300 Digital Camera - Quick Start Guide - Page 1
s300 Digital Camera Quick Start Guide - HP s300 | HP s300 Digital Camera - Quick Start Guide - Page 2
For more details about the camera operation and troubleshooting, please read the User Manual located on the CDROM disc included with your camera or visit http://www.hp.com/support and download it for the camera support page. - HP s300 | HP s300 Digital Camera - Quick Start Guide - Page 3
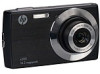
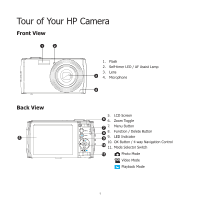
Tour of Your HP Camera Front View 1 2 1. Flash 2. Self-timer LED / AF Assist Lamp 3. Lens 3 4. Microphone 4 Back View 5 5. LCD Screen 6 6. Zoom Toggle 7 7. Menu Button 8 8. Function / Delete Button 9 9. LED Indicator 10. - HP s300 | HP s300 Digital Camera - Quick Start Guide - Page 4
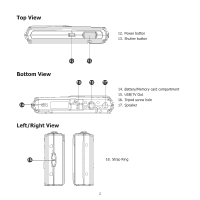
Top View 12. Power button 13. Shutter button Bottom View 14 12 13 15 16 17 14. Battery/Memory card compartment 15. USB/TV Out 16. Tripod screw hole 17. Speaker Left/Right View 18 18. Strap Ring 2 - HP s300 | HP s300 Digital Camera - Quick Start Guide - Page 5
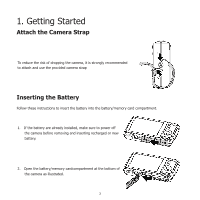
Strap To reduce the risk of dropping the camera, it is strongly recommended to attach and use the provided camera strap Inserting the Battery Follow these instructions to insert the battery into the battery/memory card compartment. 1. If the battery are already installed, make sure to power off - HP s300 | HP s300 Digital Camera - Quick Start Guide - Page 6
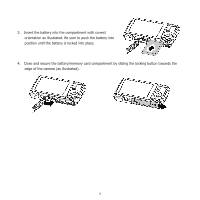
3. Insert the battery into the compartment with correct orientation as illustrated. Be sure to push the battery into position until the battery is locked into place. 4. Close and secure the battery/memory card compartment by sliding the locking button towards the edge of the camera (as illustrated). - HP s300 | HP s300 Digital Camera - Quick Start Guide - Page 7
that comes alone with your package is not fully charged. You need to charge the battery before using the camera. 1. Connect the camera with the USB cable as shown. 2. Connect the other end with the USB adapter and plug it into a power outlet or with the USB port - HP s300 | HP s300 Digital Camera - Quick Start Guide - Page 8
consumer store and online locations. 1. Make sure to power off the camera before proceeding. Inserting the memory card while powered on may damage the card and camera. 2. Open the battery/memory card compartment at the bottom of the camera. 3. Insert the SD/SDHC card into the memory card slot with - HP s300 | HP s300 Digital Camera - Quick Start Guide - Page 9
- To remove the SD/SDHC card 1. Make sure to power off the camera before proceeding. Removing the memory card while powered on may damage the card and camera. 2. Open the battery/memory cardcompartment. 3. Gently push the card until it clicks and pushes our of position. 4. Carefully pull out the - HP s300 | HP s300 Digital Camera - Quick Start Guide - Page 10
2. Initial Settings When the camera is powered up for the first time, please set the display language and date & time settings. 3. If necessary, press Menu button to close the menu. At this point, the camera settings are set to the default automatic mode and is ready to take photos and videos. 8 - HP s300 | HP s300 Digital Camera - Quick Start Guide - Page 11
Modes This camera has a three mode selector switch. The different modes are: Photo Mode • Slide the mode switch to [ modes. Video Mode ] take photos and record audio clips - HP s300 | HP s300 Digital Camera - Quick Start Guide - Page 12
release the shutter and repeat this step until the bracket turns green. In some situations, lighting and contrast may be insufficient for the camera to successfully complete the auto focus and exposure level routine. If this occurs, try better lighting. 5. Pressing the Shutter button down fully - HP s300 | HP s300 Digital Camera - Quick Start Guide - Page 13
AWB, Metering, and Color mode. • Press the FUNC button of your camera to launch the Function Menu. • Press the FUNC button again to close the menu. • The Menu bar displays the current status of the camera settings. Only the available functions for the settings are shown as icon on - HP s300 | HP s300 Digital Camera - Quick Start Guide - Page 14
the steps below. 1. Slide the Mode switch to Playback mode . 2. The camera's LCD screen with display an image. To understand the icons and other information the screen, please see "Photo Mode Screen Layout " in the electronic User Manual on the software CD-ROM. Still Image 3. Use the or keys to view - HP s300 | HP s300 Digital Camera - Quick Start Guide - Page 15
6. Using the Setup Menu You can access the Setup menu whether you are in Record or Playback mode. The Setup menu allows to configure general camera settings. - To enter the Setup Menu: 1. Press Menu button Menu. to launch the Record/Playback 2. Use the or keys to switch the menu tab to - HP s300 | HP s300 Digital Camera - Quick Start Guide - Page 16
you have a technical support question or your HP Digital Camera require service within the warranty period, please contact the original point of purchase or an authorized HP reseller in your country. If service is not available at those locations, please contact an HP Branded Product warranty agent - HP s300 | HP s300 Digital Camera - Quick Start Guide - Page 17
Contact/phone Support: Country Language Europe Region (EMEA) België Nederlandsk/ Deutsch Deutschland Deutsch España Español France Français Ireland English Italia Italiano Nederland Nederlandsk Schweiz Deutsch/ Franç - HP s300 | HP s300 Digital Camera - Quick Start Guide - Page 18
- HP s300 | HP s300 Digital Camera - Quick Start Guide - Page 19
P/N: 7525C00265A
-
 1
1 -
 2
2 -
 3
3 -
 4
4 -
 5
5 -
 6
6 -
 7
7 -
8
-
9
-
10
-
11
-
12
-
13
-
14
-
15
-
16
-
17
-
18
-
19
 |
 |

s300
Digital Camera
Quick Start Guide