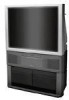
Hitachi 43GX01B Owners Guide
Hitachi 43GX01B Manual
 |
View all Hitachi 43GX01B manuals
Add to My Manuals
Save this manual to your list of manuals |
Hitachi 43GX01B manual content summary:
- Hitachi 43GX01B | Owners Guide - Page 1
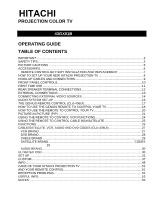
PROJECTION COLOR TV 43GX01B OPERATING GUIDE TABLE OF CONTENTS IMPORTANT ...2 SAFETY TIPS...3 PICTURE CAUTIONS ...6 ACCESSORIES...6 REMOTE CONTROL BATTERY INSTALLATION AND REPLACEMENT 7 HOW TO SET UP YOUR NEW HITACHI PROJECTION TV 8 HOOK-UP CABLES AND CONNECTORS 9 FRONT PANEL CONTROLS...10 FIRST - Hitachi 43GX01B | Owners Guide - Page 2
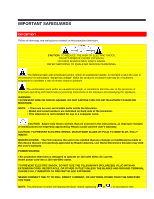
operating and maintenance (servicing) instructions in the literature accompanying the appliance. WARNING: TO PREVENT FIRE OR SHOCK HAZARD, DO NOT EXPOSE THIS COLOR TELEVISION TO RAIN OR MOISTURE. NOTE: • There are no user serviceable parts inside the television. • Model and serial numbers are - Hitachi 43GX01B | Owners Guide - Page 3
very high voltages and other hazards. If the television does not operate properly, unplug the television and call your authorized dealer or service shop. SAFETY TIPS IMPORTANT SAFEGUARDS SAFETY POINTS YOU SHOULD KNOW ABOUT YOUR HITACHI PROJECTION TELEVISION CAUTION: • Read all of these instructions - Hitachi 43GX01B | Owners Guide - Page 4
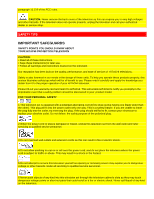
damage to the appliance. Use only with a cart or stand recommended by the manufacturer, or sold with the television. Wall or shelf mounting should follow the Wall/Shelf mounting manufacturer's instructions, and should use a mounting kit approved by the manufacturer. 11-2 An appliance and cart - Hitachi 43GX01B | Owners Guide - Page 5
televisions designed to operate from battery power, refer to the operating instructions. 20 If the television does not operate normally by following the operating instructions, unplug the television from the wall outlet and refer servicing to qualified service personnel. Adjust only those controls - Hitachi 43GX01B | Owners Guide - Page 6
operating instructions, do not attempt any further adjustment. Unplug the television and call your dealer or service projection television receivers. Such "PATTERN BURNS" constitute misuse and are NOT COVERED by your HITACHI Factory Warranty. • When using Picture-in-Picture function, the sub-picture - Hitachi 43GX01B | Owners Guide - Page 7
adjustable shelf. Available in shark grey. CAUTION: Television stand model SP-43G is designed for use with 43GX01B only. Use of a smaller stand, a non Hitachi recommended stand or a generic stand may result in instability, causing possible injury. 1. Remote Control Unit CLU-436UI (Part No. HL00728 - Hitachi 43GX01B | Owners Guide - Page 8
NEW HITACHI PROJECTION TV ANTENNA Unless your TV is connected to a cable TV system or to a centralized antenna system, a good outdoor color TV antenna where sunlight or bright indoor illumination will not fall directly on the picture screen. Also, be sure that the location selected allows a free - Hitachi 43GX01B | Owners Guide - Page 9
Connector For connecting RF signals (antenna or cable TV) to the antenna jack on the television. a high-quality picture. ANTENNA CONNECTIONS TO REAR JACK PANEL VHF (75-Ohm) antenna/CATV (Cable TV) When TV. When both VHF and UHF antennas are connected Attach an optional antenna cable mixer to the TV - Hitachi 43GX01B | Owners Guide - Page 10
to set TV features to your preference without using the remote. INPUT/ POWER Button Press this button to turn the TV on or off. NOTES: Your HITACHI Projection TV will appear to be turned OFF if there is no video input when VIDEO: 1 or 2 is selected. Check the POWER Light to make sure the TV is turned - Hitachi 43GX01B | Owners Guide - Page 11
POWER light You will see a red light when the TV is turned on. AI (Artificial Intelligence) sensor The artificial Intelligence sensor will make automatic picture adjustments depending on the amount of light in the room to give the best picture. (See page 48.) REMOTE CONTROL Sensor Point your remote - Hitachi 43GX01B | Owners Guide - Page 12
TV's CB input and the components R-Y output to the TV's CR input. It may be necessary to adjust TINT or turn AUTO COLOR-ON to obtain optimum picture CONNECT AFTER TURNING THE POWER TO THE TV OFF. Press Projection TV and an external amplifier. This could damage both the TV and the speakers. Your TV - Hitachi 43GX01B | Owners Guide - Page 13
for high performance laserdisc players, VCRs etc., that have this feature. Use these connections in place of the standard video connection if your device has this feature. If your device has only one audio output (mono sound), connect it to the left audio jack on the TV. Refer to the operating guide - Hitachi 43GX01B | Owners Guide - Page 14
adjust the sound using the remote control fo the TV set. CONNECTING EXTERNAL VIDEO SOURCES The exact arrangement you use to connect the VCR, camcorder, laserdisc player, DVD player to your TV set is dependent on the model and features of each component. Check the owner's manual of each component for - Hitachi 43GX01B | Owners Guide - Page 15
the cable from the AUDIO OUT of the VCR or the laserdisc player to the INPUT (VIDEO) jack on the TV set below. 2. Connect the cable from the AUDIO OUT R of the VCR or the laserdisc player to the insert the connection cord plugs when connecting to rear panel jacks. The picture that is played back - Hitachi 43GX01B | Owners Guide - Page 16
in example on page 11) Refer to your VCR operating guide for more information on line inputoutput connections. 1. Connect the to the INPUT 2 (Y) jack as shown on the TV set below. 2. Connect the cable from the CB OUT when connecting to rear panel jacks. The picture that is played back will be abnormal - Hitachi 43GX01B | Owners Guide - Page 17
mono and stereo sound. Receive Movie Theater-like sound. This feature turns off the TV's internal speakers. THE GENIUS REMOTE CONTROL (CLU-436UI) In addition to controlling all the functions on your HITACHI Projection TV, the new remote is designed to operate different types of VCRs, CATV (Cable - Hitachi 43GX01B | Owners Guide - Page 18
point the remote control at the remote sensor of the TV and press the TV button. The remote will now control your television. To operate your VCR, point the remote at the remote sensor of the VCR and press the VCR button. The remote will now control your VCR. (See page 25 for instructions on how to - Hitachi 43GX01B | Owners Guide - Page 19
(1) POWER Button Press this button to turn the TV set on or off when the remote is in TV mode. If a SPECIAL EVENT REMINDER is set, it will be displayed when the TV is first turned on. (See page 52). (2) PICTURE-IN-PICTURE buttons See separate section on pages 22 for a description. (3) PIP CH Button - Hitachi 43GX01B | Owners Guide - Page 20
telephone, etc., press the MUTE button. Press the MUTE button again to turn the sound off completely (MUTE). To restore the sound, press the REMOTE TO CONTROL YOUR TV (8) EXIT/RECALL button Press this button when no menu is displayed, when you want to check the channel being received, the picture - Hitachi 43GX01B | Owners Guide - Page 21
ANT A antenna source (ANT B cannot be displayed as a PIP sub-picture and COMPONENT VIDEO: Y-CB-CR INPUT 2 source will be displayed as a blank PIP Sub picture.) PICTURE-IN-PICTURE (PIP) Your HITACHI Projection TV incorporates Dual Tuner technology designed for improved viewing enjoyment. This Dual - Hitachi 43GX01B | Owners Guide - Page 22
same for one antenna input (ANT A only) and two antenna inputs (ANT A and ANT B) The Picture-in-Picture feature is convenient when you want to watch more than one program at the same time. You can watch a TV program while viewing other programs from the ANT A source or any of the video inputs - Hitachi 43GX01B | Owners Guide - Page 23
pressed when in SURF mode, auto-scanning will continuously scan. 2. If a channel is tuned during this SURF scanning, sub-pictures will be removed from the screen. 3. If PARENTAL CONTROL MOVIE/TV RATINGS setting is ON, PIP Surf Mode is deactivated. 4. You must be in ANT A mode for SURF PIP to operate - Hitachi 43GX01B | Owners Guide - Page 24
to switch to the VCR pre-coded mode. 4. Hold down the VCR button on the remote, enter the two digit preset code that matches your VCR as shown on page 27. The remote will turn off your VCR when the correct two digit preset code is entered. When this occurs, the remote control is programmed for your - Hitachi 43GX01B | Owners Guide - Page 25
chosen precoded VCR codes. For some VCRs, you must press the RECORD button twice to record a program. (3) EXCLUSIVE TV Buttons These buttons are for operating the TV. NOTE: Refer to instruction manual of the VCR for operation of the buttons exclusively for the VCR. USING THE REMOTE TO CONTROL CABLE - Hitachi 43GX01B | Owners Guide - Page 26
after performing the above procedures, please consult your cable box operating guide. 3. The remote control will remember the codes you have programmed in until the batteries are removed from the remote control. After replacing the batteries repeat the entire programming procedure stated above - Hitachi 43GX01B | Owners Guide - Page 27
CODES (CLU-436UI) VCR BRAND ADVENTURA AIWA AMERICAN HIGH AUDIOVOX BELL & HOWELL CALIX CAPEHART CCE COLT CYBERNEX DAYTRON ELECTROHOME EMEREX FISHER FUNAI GERRARD GOLDSTAR GRUNDIG HARMON/KARDON HEADQUARTER HITACHI PENTAX PHILIPS PIONEER 66 13,19,21,26,39 51 51 40,43,48,54,56 07 36 09,66 09,17,33,51, - Hitachi 43GX01B | Owners Guide - Page 28
16,17,18,27, 29,38,51 11 15,20,21,51 13,31,52 14,16,40,43,47,48,49 RICOH SALORA SANKY SANYO SEARS 18,27 20,51 04,05,06,07,65 65 07,17,18,24,27,33, 49,51,61,64 07 10 DVD BRAND HITACHI 77 MAGNAVOX 72 PANASONIC 76 PIONEER 73 RCA 75 TOSHIBA 69 JVC 74 MITSUBISHI 71 PHILLIPS 72 PROSCAN - Hitachi 43GX01B | Owners Guide - Page 29
Realistic Regal Rembrandt Samsung Seam SL Marx Starcom Sylvania Teleview TFC Toshiba TV 86 United Artists Universal Zenith 25, 43 42 43 23 15, 17 12 01 31 25,42 05,33,52 ,24,25,42,43 09,47,50 SATELLITE BRAND General Instrument Jerrold RCA 30 30 37,56,57 CODES Hitachi Primestar Sony 54,55 30 40 - Hitachi 43GX01B | Owners Guide - Page 30
remote control to display the different features on your HITACHI Projection TV. 2. Press the CURSOR to highlight a different feature. 3. Press EXIT on the remote CLOCK SET DIGITAL ARRAY Choose English, French, or Spanish text. Optimum hook up for your system. Select Antenna or Cable TV. First time - Hitachi 43GX01B | Owners Guide - Page 31
channels. Block channel picture and sound. Turn TV on and off once, daily, or weekly. Automatically turn TV on with any VIDEO input. Feature to display dialogue/text. Select from three types of backgrounds. Introduces you to basic TV functions. CONTRAST BRIGHTNESS COLOR - Hitachi 43GX01B | Owners Guide - Page 32
, press and hold the POWER button on the TV set for approximately five seconds. Press the POWER button on the TV again to end the autodemonstration to previous menu. PLUG & PLAY This graphic guide function will help you to properly set up your TV or Home Theater System. Simply answer two questions - Hitachi 43GX01B | Owners Guide - Page 33
answers to all three questions. Press CURSOR to display the graphic guide. Press EXIT to quit menu or CURSOR to begin AUTO CHANNEL if you are using an indoor or outdoor antenna. Select CATV if you have cable TV. Press CURSOR or to highlight and select the correct SIGNAL SOURCE mode. Press EXIT to - Hitachi 43GX01B | Owners Guide - Page 34
or TV guide for channel identification standards. If certain CATV channels are poor or not possible in CATV1 mode, set SIGNAL SOURCE to CATV2. AUTO CHANNEL SET This feature will automatically store active TV channels SET to add or erase additional channels to the remote control CHANNEL or buttons. - Hitachi 43GX01B | Owners Guide - Page 35
buttons to change the channel. Press EXIT to quit menu or CURSOR to return to previous menu. CHANNEL LIST Use this function allows you to review which channels are labeled in CHANNEL ID (ID.), which have been added to CHANNEL MEMORY (SCAN), and which are protected by PARENTAL CONTROL (LOCK). Add - Hitachi 43GX01B | Owners Guide - Page 36
CURSOR is in the first position. DIGITAL ARRAY Your HITACHI Projection TV has three color projection tubes: one for red, one for TV. If you move your TV, or if, after a time, you notice color rings or halos around objects in the picture, you may want to converge (align) the colors. Properly converged - Hitachi 43GX01B | Owners Guide - Page 37
into memory, press the front panel DIGITAL ARRAY button or the remote control MOVE Button. If you do NOT wish to save your adjustment data into memory, turn the TV OFF or press the remote control PIP button. When the TV is turned ON again, your old convergence data will be stored. When adjusting - Hitachi 43GX01B | Owners Guide - Page 38
page 32), the CHANNEL ID for both antenna inputs will be the same. CHANNEL ID will be displayed only when channel is displayed as main picture. VIDEO ID. Use this feature to give a name to any of the two video inputs. - Hitachi 43GX01B | Owners Guide - Page 39
a blank space. Select RESET to set VIDEO ID to original condition. NOTE: VIDEO ID will be displayed only when VIDEO input is displayed as main picture. FAMILY FAVORITES (MENU) This function allows you to group your favorite channels into six personalized categories that you can rename. A total of 42 - Hitachi 43GX01B | Owners Guide - Page 40
message "PLEASE SWITCH TO ANT A" will appear. FAMILY FAVORITES (OPERATION) Use this function to display FAMILY FAVORITES selections as sub-pictures or to tune the main picture to a desired favorite channel. Select a category using CURSOR or buttons. Press MENU and the category will be displayed as - Hitachi 43GX01B | Owners Guide - Page 41
RATINGS are explained in detail in the Parental Control Movie/TV Ratings Reference Guide. To change the secret code number, select CHANGE SECRET CODE. Enter a new four digit key number you prefer. If you forget your secret code, use the factory code 7777 to erase your key number. This will reset the - Hitachi 43GX01B | Owners Guide - Page 42
to change position. Press CURSOR or to highlight then CURSOR to select MODE: ONCE (TV will turn on/off one time only) or MODE: DAILY (TV will turn on/off at the same time every day), or MODE: WEEKLY (TV will turn on/off at same time every week) and MODE: OFF (to disable this function - Hitachi 43GX01B | Owners Guide - Page 43
To do this, turn your VCR, laserdisc or DVD player OFF. This feature is now reset and will turn on your TV as described above. 2. When using REMOTE mode, any remote control button will or home video which are displayed on the TV screen. Your local TV program guide denotes these programs as or . - Hitachi 43GX01B | Owners Guide - Page 44
turn the display on or off. MODE: C.C. (Closed Caption) is for the program you are viewing. TEXT is for additional information such as news reports or a TV program guide. This information covers the entire screen and viewing the TV gray background is visible (no picture can be seen behind menu - Hitachi 43GX01B | Owners Guide - Page 45
to quit MENU or CURSOR to return to previous menu. NOTE: 1. When TV set is turned on, the FIRST TIME TOUR will always appear if it is set to Use this function to adjust overall picture brightness. COLOR Use this function to adjust the level of color in the picture. TINT Use this function to adjust - Hitachi 43GX01B | Owners Guide - Page 46
HITACHI Projection TV has an Ultra AI (Artificial Intelligence) function which will automatically adjust picture settings to produce the highest quality picture possible. When AI is highlighted, use CURSOR to turn background colors. (This function will automatically set to on and cannot be turned off - Hitachi 43GX01B | Owners Guide - Page 47
Turn on SUPER CONTRAST to improve picture detail in areas of high brightness. COLOR TEMPERATURE Set this to WARM for hotter colors with more red, or set to COOL for less intense colors with more blue. Select AUDIO SETTINGS to adjust the TV to your preference and to improve the sound quality. Use - Hitachi 43GX01B | Owners Guide - Page 48
weather report, etc. The sources received will be displayed at the top center edge of the TV. The source you select will be displayed above the sources received. See example below for each improve the quality of both low and high frequency sounds when listening at low volume levels. PERFECT VOLUME - Hitachi 43GX01B | Owners Guide - Page 49
from automatic picture and audio settings to optimize your TV's performance. Use CURSOR or to change THEATER MODES settings. When TV mode is , the following are automatically set: CONTRAST almost center, SUPER CONTRAST -OFF, COLOR TEMP. - WARM, LOUDNESS-OFF, PERFECT VOLUME -OFF. When SPORTS mode - Hitachi 43GX01B | Owners Guide - Page 50
menu. to select. If the clock is not set, you can not use this function and the next screen will appear. NOTE: 1. When the TV is turned on, the SPECIAL EVENT REMINDER message will automatically appear at the selected time. 2. Each special event message can be a maximum of 20 characters. 3. When - Hitachi 43GX01B | Owners Guide - Page 51
(see page 52) 2. A special icon appears next to "CALENDAR" when a Special Event Reminder is set. USEFUL INFORMATION INDEX CARE OF YOUR HITACHI PROJECTION TV AND YOUR REMOTE CONTROL DO Dust the screen and cabinet with a soft cloth. Clean the screen with a soft cloth moistened with warm water and dry - Hitachi 43GX01B | Owners Guide - Page 52
, remote control operation will become erratic or possibly stop altogether. Replace the old batteries with two new "AA" size batteries. Exposure of the viewing screen to prolonged direct sunlight or heat may cause the screen to permanently warp, resulting in a distorted picture. RECEPTION PROBLEMS - Hitachi 43GX01B | Owners Guide - Page 53
Decoder • High Resolution Picture-In-Picture with Freeze • Tuned Port Bass Reflex Speakers • Dual Antenna Inputs • Auto Link • Digital Convergence (Digital Array) Inputs: • Power Input AC 120V, 60Hz • Power Consumption (operating) 43GX01B 151W • Power Consumption (maximum) 43GX01B 181W - Hitachi 43GX01B | Owners Guide - Page 54
470mVrms, 1k Ohm Dimensions: 43GX01B • Height (in.) • Width (in.) • Depth (in.) • Weight (lbs) 42 7/8 39 20 143 NOTE: Due to improvements, specifications in this operating guide are subject to change without notice. HITACHI SERVICE HOTLINE To locate an authorized HITACHI service facility in the - Hitachi 43GX01B | Owners Guide - Page 55
San Diego, CA 92154 In Canada, please contact 1-800-HITACHI (1-800-448-2244) During business hours Monday-Friday EST 9:00AM-7:00PM Saturday EST 9:00AM-5:00PM HITACHI Canada Inc Digital Media Division 6740 Campobello Road Mississauga, Ont. L5N 2L8 NOTES (blank page for consumer notes) QR43622
-
 1
1 -
 2
2 -
 3
3 -
 4
4 -
 5
5 -
 6
6 -
 7
7 -
8
-
9
-
10
-
11
-
12
-
13
-
14
-
15
-
16
-
17
-
18
-
19
-
20
-
21
-
22
-
23
-
24
-
25
-
26
-
27
-
28
-
29
-
30
-
31
-
32
-
33
-
34
-
35
-
36
-
37
-
38
-
39
-
40
-
41
-
42
-
43
-
44
-
45
-
46
-
47
-
48
-
49
-
50
-
51
-
52
-
53
-
54
-
55
 |
 |

PROJECTION COLOR TV
43GX01B
OPERATING GUIDE
TABLE OF CONTENTS
IMPORTANT
..............................................................................................................................
2
SAFETY TIPS
.............................................................................................................................
3
PICTURE CAUTIONS
................................................................................................................
6
ACCESSORIES
..........................................................................................................................
6
REMOTE CONTROL BATTERY INSTALLATION AND REPLACEMENT
..............................
7
HOW TO SET UP YOUR NEW HITACHI PROJECTION TV
.....................................................
8
HOOK-UP CABLES AND CONNECTORS
.................................................................................
9
FRONT PANEL CONTROLS
....................................................................................................
10
FIRST TIME USE
.....................................................................................................................
11
REAR SPEAKER TERMINAL CONNECTIONS
.......................................................................
12
EXTERNAL CONNECTIONS
...................................................................................................
13
CONNECTING EXTERNAL VIDEO SOURCES
.......................................................................
14
AUDIO SYSTEM SET-UP
........................................................................................................
16
THE GENIUS REMOTE CONTROL (CLU-436UI)
....................................................................
17
HOW TO USE THE GENIUS REMOTE TO CONTROL YOUR TV
..........................................
18
HOW TO USE THE REMOTE TO CONTROL YOUR TV
.........................................................
20
PICTURE-IN-PICTURE (PIP)
...................................................................................................
21
USING THE REMOTE TO CONTROL VCR FUNCTIONS
.......................................................
24
USING THE REMOTE TO CONTROL CABLE BOX/SATELLITE
............................................
25
FUNCTIONS
.............................................................................................................................
25
CABLE/SATELLITE, VCR, AUDIO AND DVD CODES (CLU-436UI)
.......................................
27
VCR BRAND
.........................................................................................................................
27
DVD BRAND
.........................................................................................................................
28
CABLE BRAND
.....................................................................................................................
29
SATELLITE BRAND
...................................................................................................
CODES
29
AUDIO BRAND
......................................................................................................................
30
ULTRATEC OSD
......................................................................................................................
30
SET UP
....................................................................................................................................
31
CUSTOM
..................................................................................................................................
37
INFO
.........................................................................................................................................
49
CARE OF YOUR HITACHI PROJECTION TV
.........................................................................
51
AND YOUR REMOTE CONTROL
............................................................................................
51
RECEPTION PROBLEMS
........................................................................................................
52
USEFUL INFO
..........................................................................................................................
53
NOTES
.....................................................................................................................................
55