Hitachi 50V500G Owners Guide - Page 7
Front Panel Controls
 |
View all Hitachi 50V500G manuals
Add to My Manuals
Save this manual to your list of manuals |
Page 7 highlights
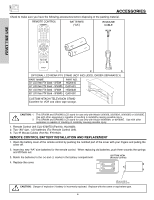
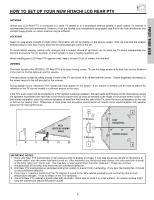
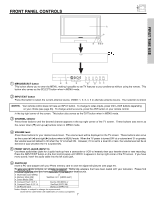
FIRST TIME USE FRONT PANEL CONTROLS ቨ ቨ PUSH PUSH PHOTO MC INPUT 5 S-VIDEO VIDEO L/MONO R AUDIO VOL- VOL+ CH- CH+ INPUT MENU ̇ ̈ ̄ ̆ EXIT SELECT ቢ MENU/SELECT button ቧቮ ቦ ብ ቤ ባቢ This button allows you to enter the MENU, making it possible to set TV features to your preference without using the remote. This button also serves as the SELECT button when in MENU mode. ባ INPUT/EXIT button Press this button to select the current antenna source, VIDEO: 1, 2, 3, 4, 5 or alternate antenna source. Your selection is shown NOTES: Your remote control does not have an INPUT button. To change to video inputs, press VID1~VID5 buttons depending on your choice (see page 33). To change antenna source, press the ANT button on your remote control. in the top right corner of the screen. This button also serves as the EXIT button when in MENU mode. ቤ CHANNEL selector Press these buttons until the desired channel appears in the top right corner of the TV screen. These buttons also serve as the cursor down (̄) and up (̆) buttons when in MENU mode. ብ VOLUME level Press these buttons for your desired sound level. The volume level will be displayed on the TV screen. These buttons also serve as the cursor left (̇) and right (̈) buttons when in MENU mode. When the TV power is turned OFF at a volume level 31 or greater, the volume level will default to 30 when the TV is turned ON. However, if it is set to a level 30 or less, the volume level will be at the level it was set when the TV is turned ON. ቦ FRONT INPUT JACKS (INPUT 5) Use these audio/video jacks for a quick hook-up from a camcorder or VCR to instantly view your favorite show or new recording. Press the INPUT/EXIT button on the front control panel until VIDEO: 5 appears in the top right corner of the TV screen. If you have mono sound, insert the audio cable into the left audio jack. ቧ PHOTO MC Insert a PC card adapter with your Photo memory card to view the digital still pictures (see page 27). To MvieemwoyryouCrarddigital pictures, an adapTetesrteids Sreaqmupirleesd. Below are adapters that have been tested with your television. Please find o1u. St ewchuircehDmigietaml (oSrDy)card you have Daanzdzleac4qinui1re(DitMfr-9o4m00y)our local source. 2. Multimedia Card (MMC) or 3. Memory Stick (MS) SanDisk 4 in 1 (SDDR-6507) 4. Smart Media (SM) 5. Compact Flash I (CF I) Dazzle (DM-9000) or 6. Compact Flash II (CF II) SanDisk (SDCF-38) 7. xD Picture Card Olympus (MAPC-10) Notes: Adapter is subject to change for improvement. Some terms used herein are trademarks of various companies. 7
-
 1
1 -
 2
2 -
 3
3 -
 4
4 -
 5
5 -
 6
6 -
 7
7 -
 8
8 -
 9
9 -
 10
10 -
 11
11 -
 12
12 -
13
-
14
-
15
-
16
-
17
-
18
-
19
-
20
-
21
-
22
-
23
-
24
-
25
-
26
-
27
-
28
-
29
-
30
-
31
-
32
-
33
-
34
-
35
-
36
-
37
-
38
-
39
-
40
-
41
-
42
-
43
-
44
-
45
-
46
-
47
-
48
-
49
-
50
-
51
-
52
-
53
-
54
-
55
-
56
-
57
-
58
-
59
-
60
-
61
-
62
-
63
-
64
-
65
-
66
-
67
-
68
-
69
-
70
-
71
-
72
-
73
-
74
-
75
-
76
-
77
-
78
-
79
-
80
-
81
-
82
-
83
-
84
 |
 |
