Hitachi CPRS55 Operating Guide
Hitachi CPRS55 - PERFORMA Home Theater Projector Manual
 |
UPC - 050585150690
View all Hitachi CPRS55 manuals
Add to My Manuals
Save this manual to your list of manuals |
Hitachi CPRS55 manual content summary:
- Hitachi CPRS55 | Operating Guide - Page 1
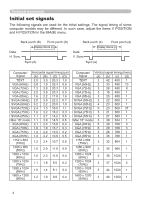
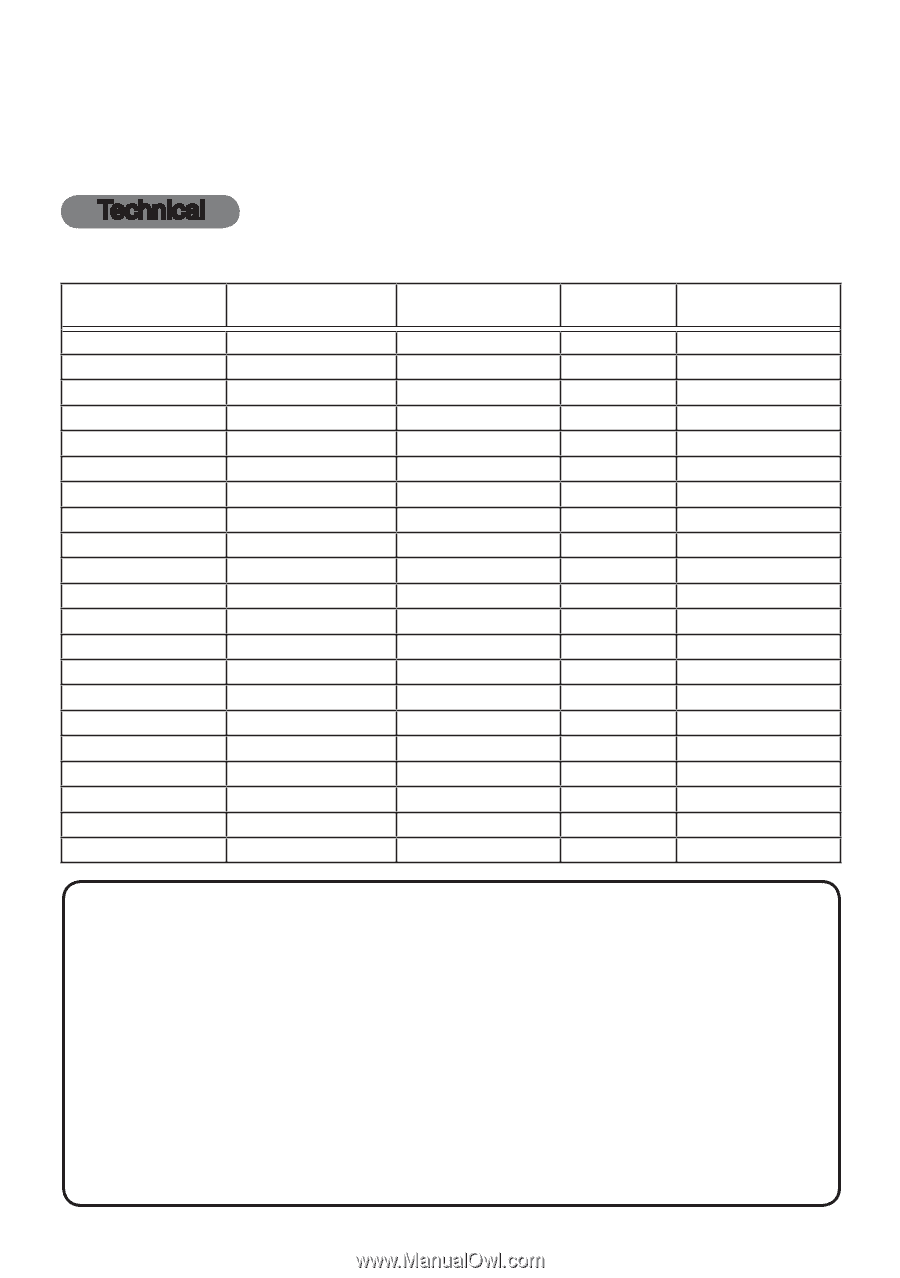
Projector CP-RS55 User's Manual - Operating Guide Technical Example of computer signal Resolution (H x V) H. frequency ( 60Hz) NOTE • Be sure to check jack type, signal level, timing and resolution before connecting this projector to a computer. • Some computers may have multiple display screen - Hitachi CPRS55 | Operating Guide - Page 2
1280 x 1024 (60Hz) 1.0 2.3 11.9 0.4 1280 x 1024 (75Hz) 1.1 1.8 9.5 0.2 1280 x 1024 (85Hz) 1.0 1.4 8.1 0.4 1600 x 1200 (60Hz) 1.2 1.9 9.9 0.4 Computer/ Vertical signal timing (lines) Signal (a) (b) (c) (d) TEXT 3 42 400 1 VGA (60Hz) 2 33 480 10 VGA (72Hz) 3 28 480 9 VGA (75Hz - Hitachi CPRS55 | Operating Guide - Page 3
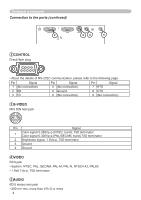
Connection to the ports Technical (continued) CONTROL RGB 1 K S-VIDEO VIDEO AUDIO 1 RGB D-sub 15pin RGB signal Pin Signal 1 Video Red 2 Video Green 3 Video Blue 4 (No connection) 5 Ground 6 Ground Red 7 Ground Green 8 Ground Blue 9 (No connection) 10 Ground 11 (No connection) 12 - Hitachi CPRS55 | Operating Guide - Page 4
Technical (continued) Connection to the ports (continued) CONTROL 2 RGB K S-VIDEO VIDEO 34 AUDIO 5 2 CONTROL D-sub 9pin plug 98 76 54 321 • About the details of RS-232C communication, please refer to the following page. Pin Signal 1 (No connection) Pin - Hitachi CPRS55 | Operating Guide - Page 5
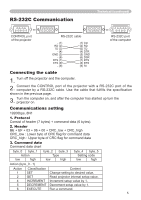
RS-232C port of the computer Connecting the cable 1. Turn off the projector and the computer. 2. Connect the CONTROL port of the projector with a RS-232C port of the computer by a RS-232C cable. Use the cable that fulfills the specification shown in the previous page. 3. Turn the computer on, and - Hitachi CPRS55 | Operating Guide - Page 6
Operation cannot be guaranteed when the projector receives an undefined command or data. • Provide an interval of at least 40ms between the response code and any other code. • The projector outputs test data when the power supply is switched ON, and when the lamp is lit. Ignore this data. • Commands - Hitachi CPRS55 | Operating Guide - Page 7
Command Data CRC Action Type Setting Code Power Set Input Source Set Error Status Turn Air flow error) (Lamp time error) 09 00 10 00 (Filter missing error)(Inner Sencer error) 03 00 (Lamp error) 07 00 (Cool error) BRIGHT BRIGHT Reset CONTRAST CONTRAST Reset MODE Set GAMMA Set User - Hitachi CPRS55 | Operating Guide - Page 8
Technical (continued) Command table (continued) Names Operation Type User Gamma Point 1 User Gamma Point 2 User Gamma Point 3 User Gamma Point 4 User Gamma Point 5 User Gamma Point 6 User Gamma Point 7 User Gamma Point 8 COLOR TEMP Set COLOR TEMP GAIN R COLOR TEMP GAIN G COLOR TEMP GAIN B COLOR - Hitachi CPRS55 | Operating Guide - Page 9
Command table (continued) Names Operation Type COLOR TEMP OFFSET B COLOR COLOR Reset TINT TINT Reset SHARPNESS SHARPNESS Reset PROGRESSIVE Set MY MEMORY Load Set MY MEMORY Save Set ASPECT Set Get Increment Decrement Get Increment Decrement Execute Get Increment Decrement Execute Get Increment - Hitachi CPRS55 | Operating Guide - Page 10
Technical (continued) Command table (continued) Names Operation Type OVER SCAN OVER SCAN Reset V POSITION V POSITION Reset H POSITION H POSITION Reset H PHASE H SIZE H SIZE Reset AUTO ADJUST COLOR SPACE Set SYNC ON G Set VIDEO FORMAT Set FRAME LOCK Set Get Increment Decrement Execute Get - Hitachi CPRS55 | Operating Guide - Page 11
INVERT Get Get Increment Decrement TURN OFF TURN ON Get ENGLISH FRANÇAIS DEUTSCH ESPAÑOL ITALIANO NORSK NEDERLANDS PORTUGUÊS MENU POSITION H MENU POSITION H Reset SVENSKA PУCCKИЙ SUOMI POLSKI TÜRKÇE Get Get Increment Decrement Execute Technical (continued) Header BE EF 03 06 00 BE EF 03 06 00 BE - Hitachi CPRS55 | Operating Guide - Page 12
START UP Set My Screen LOCK Set Message Set AUTO SEARCH Set AUTO POWER OFF LAMP TIME LAMP TIME Reset FILTER TIME FILER TIME Reset MAGNIFY FREEZE Set Get Increment Decrement Execute Get Increment Decrement My Screen ORIGINAL BLUE WHITE BLACK Get TURN OFF TURN ON Get My Screen ORIGINAL TURN
-
 1
1 -
 2
2 -
 3
3 -
 4
4 -
 5
5 -
 6
6 -
 7
7 -
8
-
9
-
10
-
11
-
12
 |
 |
1
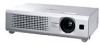
Projector
CP-RS55
User's Manual – Operating Guide
Technical
Example of computer signal
Resolution (H x V)
H. frequency (kHz)
V. frequency (Hz)
Rating
Signal mode
720 x 400
37.9
85.0
VESA
TEXT
640 x 480
31.5
59.9
VESA
VGA (60Hz)
640 x 480
37.9
72.8
VESA
VGA (72Hz)
640 x 480
37.5
75.0
VESA
VGA (75Hz)
640 x 480
43.3
85.0
VESA
VGA (75Hz)
800 x 600
35.2
56.3
VESA
SVGA (56Hz)
800 x 600
37.9
60.3
VESA
SVGA (60Hz)
800 x 600
48.1
72.2
VESA
SVGA (72Hz)
800 x 600
46.9
75.0
VESA
SVGA (75Hz)
800 x 600
53.7
85.1
VESA
SVGA (85Hz)
832 x 624
49.7
74.5
Mac 16” mode
1024 x 768
48.4
60.0
VESA
XGA (60Hz)
1024 x 768
56.5
70.1
VESA
XGA (70Hz)
1024 x 768
60.0
75.0
VESA
XGA (75Hz)
1024 x 768
68.7
85.0
VESA
XGA (75Hz)
1152 x 864
67.5
75.0
VESA
SXGA (75Hz)
1280 x 960
60.0
60.0
VESA
SXGA (60Hz)
1280 x 1024
64.0
60.0
VESA
SXGA (60Hz)
1280 x 1024
80.0
75.0
VESA
SXGA (75Hz)
1280 x 1024
91.2
85.0
VESA
SXGA (85Hz)
1600 x 1200
75.0
60.0
VESA
UXGA (60Hz)
NOTE
• Be sure to check jack type, signal level, timing and resolution
before connecting this projector to a computer.
• Some computers may have multiple display screen modes. Use of some of
these modes will not be possible with this projector.
• Depending on the input signal, full-size display may not be possible in some
cases. Refer to the number of display pixels above.
• Although the projector can display signals with resolution up to UXGA
(1600x1200), the signal will be converted to the projector’s panel resolution
before being displayed. The best display performance will be achieved if the
resolutions of the input signal and projector panel are identical.
• Automatically adjustment may not function correctly with some input signals.
• The image may not be displayed correctly when the input sync signal is a
composite sync or a sync on G.