Hitachi CPX2510 User Manual
Hitachi CPX2510 - XGA LCD Projector Manual
 |
UPC - 050585151680
View all Hitachi CPX2510 manuals
Add to My Manuals
Save this manual to your list of manuals |
Hitachi CPX2510 manual content summary:
- Hitachi CPX2510 | User Manual - Page 1
Projector CP-X2010/CP-X2510/CP-X3010 User's Manual (detailed) Operating Guide Thank you for purchasing this projector. WARNING ►Before using this product, please read all manuals for this product. Be sure to read "Safety Guide" first. After reading them, store them in a safe place for future - Hitachi CPX2510 | User Manual - Page 2
3 IMAGE menu 29 ASPECT, OVER SCAN, V POSITION, H POSITION, Part names 4 Projector 4 H PHASE, H SIZE, AUTO ADJUST EXECUTE Control panel 5 INPUT menu 31 Rear panel 5 PROGRESSIVE, VIDEO NR, COLOR SPACE, Remote control 6 COMPONENT, VIDEO FORMAT, COMPUTER IN, FRAME LOCK, RESOLUTION Setting up - Hitachi CPX2510 | User Manual - Page 3
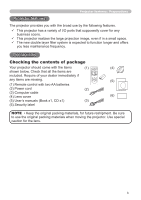
ENTER RESET (4) (5) (2) Power cord (2) (3) Computer cable (4) Lens cover (6) (5) User's manuals (Book x1, CD x1) (3) (6) Security label NOTE • Keep the original packing materials, for future reshipment. Be sure to use the original packing materials when moving the projector. Use special - Hitachi CPX2510 | User Manual - Page 4
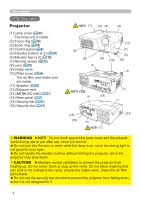
Part names Part names Projector (1) Lamp cover (53) The lamp unit is inside. (2) Focus ring (18) (3) Zoom ring (18) (4) Control panel (5) (5) Elevator buttons (x 2) (18) (6) Elevator feet (x 2) (18) (7) Remote sensor (12) (8) Lens (57) (9) Intake vents (10) Filter cover (55) The air filter - Hitachi CPX2510 | User Manual - Page 5
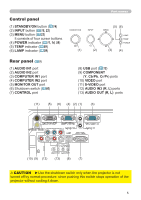
POWER indicator (11, 14, 59) (5) TEMP indicator (59) (6) LAMP indicator (59) Rear panel (9) (1) AUDIO IN1 port (2) AUDIO IN2 port (3) COMPUTER IN1 port (4) COMPUTER IN2 port (5) MONITOR OUT port (6) Shutdown switch (60) (7) CONTROL port Part only when the projector is not turned off by - Hitachi CPX2510 | User Manual - Page 6
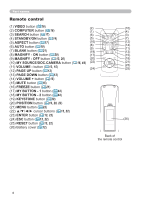
Part names Remote control (1) VIDEO button (16) (2) COMPUTER button (16) (2) (1) (3) SEARCH button (17) (6) (4) STANDBY/ON button (14) (5) (5) ASPECT button (17) (16) (6) AUTO button (10) (4) (3) (7) (12) (14) (11) (13) (15) (18) (21) (23) (25) (26) Back of the remote control 6 - Hitachi CPX2510 | User Manual - Page 7
30 cm or more between the sides of the projector and other objects such as walls. • For the case of installation in a special state such as ceiling mount, the specified mounting accessories (64) and service may be required. Before installing the projector, consult your dealer about your installation - Hitachi CPX2510 | User Manual - Page 8
fied, and leave installing and removing the projector with the mounting accessories to the service personnel. • Read and keep the user's manual of the mounting accessories used. CAUTION ►Avoid placing the projector in smoky, humid or dusty place. Placing the projector in such places could cause fire - Hitachi CPX2510 | User Manual - Page 9
your devices Be sure to read the manuals for devices before connecting them to the projector. Make sure that all the devices Turn off all devices and unplug their power cords prior to connecting them to projector. Connecting a live device to the projector may generate extremely loud noises or other - Hitachi CPX2510 | User Manual - Page 10
with screws. • When connecting a laptop PC to the projector, be sure to activate the PC's external RGB output. (Set the laptop PC to CRT display or to simultaneous LCD and CRT display.) For details on how this is done, please refer to the instruction manual of the corresponding laptop PC. • When the - Hitachi CPX2510 | User Manual - Page 11
, consult your dealer to get a new one. • Only plug the power cord into an outlet whose voltage is matched to the power cord. The power outlet should be close to the projector and easily accessible. Remove the power cord for complete separation. • Never modify the power cord. Using the security bar - Hitachi CPX2510 | User Manual - Page 12
of the battery cover, remove it. 1 2 3 2. Align and insert the two AA batteries (HITACHI MAXELL, Part No.LR6 or R6P) according to their plus and minus terminals as indicated in the remote control. 3. Replace the battery cover in the direction of the arrow and snap it back into place. WARNING - Hitachi CPX2510 | User Manual - Page 13
). - This function is activated only when the projector is working properly. This function is not available while the lamp is warming up (the POWER indicator blinks green), and while adjusting the volume and display, correcting for keystone, zooming in on the screen, using the BLANK function - Hitachi CPX2510 | User Manual - Page 14
projector or the remote control. The projection lamp will light up and POWER MY SOURCE/ VIDEO COMPUTER DOC.CAMERA ASPECT AUTO SEARCH BLANK MAGNIFY FREEZE ON PAGUEP VOLUME 㧗 DOWN OFF KEYSTONE MY BUTTON MUTE 1 2 POSITION MENU ESC ENTER RESET indicator will begin blinking in green - Hitachi CPX2510 | User Manual - Page 15
● When the projector is in the standby mode, the volume can be ENTER adjusted if is not selected for the AUDIO OUT STANDBY and NOESRC MAL isRESET selected to the STANDBY MODE in the SETUP menu (35). Temporarily muting the sound MUTE button 1. Press MUTE button on the remote control. A dialog - Hitachi CPX2510 | User Manual - Page 16
IN1 port first. DOWN OFF KEYSTONE MY BUTTON MUTE 1 2 POSITION MENU ESC ENTER RESET 1. Press VIDEO button on the remote control. Each time you press the button, the projector switches its input port from the current port as below. COMPONENT (Y, Cb/Pb, Cr/Pr) S-VIDEO VIDEO ● While - Hitachi CPX2510 | User Manual - Page 17
in above order repeatedly till an input signal is detected. Selecting an aspect ratio 1. Press ASPECT button on the remote control. Each time you press the button, the projector switches the mode for aspect ratio in turn. For a computer signal NORMAL 4:3 16:9 16:10 For a video signal - Hitachi CPX2510 | User Manual - Page 18
the elevator feet. 4. After making sure that the elevator feet are locked, put the projector down gently. 5. If necessary, the elevator feet can be manually twisted to make more precise adjustments. Hold the projector when twisting the feet. 1 5 To loose an elevator foot, push the elevator button - Hitachi CPX2510 | User Manual - Page 19
or DISABLE is selected for the AUTO ADJUST item of the SERVICE item in the OPTION menu (45).MY SOURCE/ VIDEO COMPUTER DOC.CAMERA ASPECT AUTO SEARCH BLANK Adjusting the position 1. Press POSITION button on the remote control when no menu is indicated. The "POSITION" indication will - Hitachi CPX2510 | User Manual - Page 20
the ON button of MAGNIFY on the remote control. The "MAGNIFY" indication will appear on the screen and the projector will go into the MAGNIFY mode. When the ON button of MAGNIFY is pressed first after the projector is started, the picture will be zoomed twice. The indication will disappear in several - Hitachi CPX2510 | User Manual - Page 21
a long time, the LCD panel might possibly be burned in. Do not leave the projector in the FREEZE mode for too long. ● Images might appear degraded when this function is operated, but it is not a malfunction. Temporarily blanking the screen 1. Press BLANK button on the remote control. The BLANK - Hitachi CPX2510 | User Manual - Page 22
will appear. EASY MENU has priority to appear just after powered on. While the projector is displaying any menu, the MENU button on the projector works as the cursor buttons. 2. In the EASY MENU appear. (3) Use the buttons as instructed in the OSD to operate the item. (continued on next page) 22 - Hitachi CPX2510 | User Manual - Page 23
) cannot be reset. ● In the ADVANCED MENU, when you want to return to the previous display, press the ◄ cursor button or ESC button on the remote control. Indication in OSD (On Screen Display) The meanings of the general words on the OSD are as follows. Indication EXIT RETURN CANCEL or NO OK - Hitachi CPX2510 | User Manual - Page 24
mode according to the projected source. NORMAL CINEMA DYNAMIC BOARD(BLACK) DAYTIME WHITEBOARD BOARD(GREEN) PICTURE MODE NORMAL CINEMA DYNAMIC BOARD(BLACK) BOARD(GREEN) WHITEBOARD DAYTIME GAMMA 1 DEFAULT 2 DEFAULT 3 DEFAULT 4 DEFAULT 4 DEFAULT 5 DEFAULT 6 DEFAULT COLOR TEMP 2 MID 3 LOW - Hitachi CPX2510 | User Manual - Page 25
counts usage time of the air filter. A dialog is displayed for confirmation. Selecting the OK using the ► button performs resetting. See the FILTER TIME item in OPTION menu (43). LANGUAGE Using the ◄/► buttons changes the display language. See the LANGUAGE item in SCREEN menu (37). ADVANCED MENU - Hitachi CPX2510 | User Manual - Page 26
CONTRAST Description Using the ◄/► buttons adjusts the brightness. Dark Light Using the ◄/► buttons adjusts the contrast. Weak Strong Using the The darkest tone at the left end of the test pattern cannot be controlled with any of equalizing adjustment bar. • Lines or other noise might appear - Hitachi CPX2510 | User Manual - Page 27
PICTURE menu Item Description Using the ▲/▼ buttons switches the color temperature mode. 1 HIGH 1 CUSTOM 2 MID 2 CUSTOM 6 CUSTOM 3 LOW 6 Hi-BRIGHT-3 3 CUSTOM COLOR TEMP COLOR TINT SHARPNESS 5 CUSTOM 5 Hi-BRIGHT-2 4 CUSTOM 4 Hi-BRIGHT-1 To adjust CUSTOM Selecting a mode whose - Hitachi CPX2510 | User Manual - Page 28
is available only for CP-X2510 or CP-X3010. Using the ▲/▼ cursor buttons changes the active iris control mode. PRESENTATION THEATER the PRESENTATION or THEATER modes are selected. If this occurs select OFF. This projector has 4 memories for adjustment data (for all the items of the PICTURE menu - Hitachi CPX2510 | User Manual - Page 29
and component video signal. • When this adjustment is too large, certain degradation may appear at the frame area of the picture. In such a case, please adjust small. Using the ◄/► buttons adjusts the vertical position. Down Up • Over-adjusting the vertical position may cause noise to appear on - Hitachi CPX2510 | User Manual - Page 30
, the picture may not be displayed correctly. In such a case, please reset the adjustment by pressing the RESET button on the remote control during this operation. • Images might appear degraded when this function is selected for the AUTO ADJUST item of the SERVICE item in the OPTION menu (45). 30 - Hitachi CPX2510 | User Manual - Page 31
the optimum mode. • The AUTO operation may not work well at some signals. In such a case, it might be good to select a suitable mode except AUTO. Using the ▲/▼ buttons switches the required for a SCART RGB input to the projector. For details, contact your dealer. (continued on next page) 31 - Hitachi CPX2510 | User Manual - Page 32
input a sync on G signal or component signal from the port. • In the AUTO mode, the picture may be distorted with certain input signals. In such a case, remove the signal connector so that no signal is received and select the SYNC ON G OFF, and then reconnect the signal. Set the frame lock - Hitachi CPX2510 | User Manual - Page 33
COMPUTER IN1 and COMPUTER IN2 input signals can be set on this projector. (1) In the INPUT menu select the RESOLUTION using the ▲/▼ vertical (VERT) resolutions using CUSTOM ↓ the buttons. This function is may not support all resolutions. (5) Move the cursor to OK on screen and press the - Hitachi CPX2510 | User Manual - Page 34
well. • When V:INVERT or H&V:INVERT is selected to the MIRROR item in the SETUP menu, if the projector screen is inclined or angled downward, this function may not work correctly. • When the zoom adjustment is set to the TELE (telephoto focus), this function may be excessive. This function should be - Hitachi CPX2510 | User Manual - Page 35
SAVING NORMAL When SAVING is selected, the power consumption in the standby mode is lowered with some functional restriction as below: • When SAVING is selected, the RS-232C communication control is disabled except to turn the projector on while the projector is in the standby mode. • When SAVING - Hitachi CPX2510 | User Manual - Page 36
AUDIO menu AUDIO menu From the AUDIO menu, items shown in the table below can be performed. Select an item using the ▲/▼ cursor buttons, and press the ► cursor button or the ENTER button to execute the item. Then perform it according to the following table. Item VOLUME SPEAKER AUDIO SOURCE - Hitachi CPX2510 | User Manual - Page 37
or INPUT button to save the language setting. Using the buttons adjusts the menu position. To quit the operation, press the MENU button on the remote control or keep no operation for about 10 seconds. Using the ▲/▼ buttons switches the mode for the blank screen. The blank screen is a screen for the - Hitachi CPX2510 | User Manual - Page 38
when the image is displayed. The image will freeze and the frame for capturing will appear. To stop performing, press the RESET button on the remote control. 2. Using the buttons adjusts the frame position. Please move the frame to the position of the image which you want to use. The frame may - Hitachi CPX2510 | User Manual - Page 39
SCREEN menu Item MyScreen Lock MESSAGE Description Using the ▲/▼ buttons turns on/off the MyScreen lock function. ON OFF When the ON is selected, the item MyScreen is locked. Use this function for protecting the current MyScreen. • This function cannot be selected when the ON is selected to the - Hitachi CPX2510 | User Manual - Page 40
SCREEN menu Item SOURCE NAME TEMPLATE Description Each input port for this projector can have a name applied to it. (1) Use the ▲/▼ buttons on the SCREEN menu to select SOURCE NAME and press the ► or ENTER button. The SOURCE - Hitachi CPX2510 | User Manual - Page 41
video source supporting C.C. feature to utilize this function. It may not work properly, depending on equipment or signal source. In this case, please turn which is for additional information such as news reports or a TV program guide. The information covers the entire screen. Not all of the C.C. - Hitachi CPX2510 | User Manual - Page 42
the items LAMP TIME and FILTER TIME. Then projector is suspended from the ceiling projector is supplied with the power after the power was cut while the lamp was on. • This function does not work as long as the power has been supplied to the projector while the lamp is off. • After turning the lamp - Hitachi CPX2510 | User Manual - Page 43
If one of the projector's buttons or the remote control buttons is pressed or one of the commands (except get commands) is transmitted to the CONTROL port during the corresponding time, projector will not be turned off. Please refer to the section "Turning off the power" (14). The lamp time is the - Hitachi CPX2510 | User Manual - Page 44
item is to assign one of the following functions to MY BUTTON 1/2 on the remote control (6). (1) Use the ▲/▼ buttons on the MY BUTTON menu to select a MY (This item is available only for CP-X2510 or CP-X3010.) • PICTURE MODE: Changes the PICTURE MODE (24). • FILTER RESET: Displays the filter time - Hitachi CPX2510 | User Manual - Page 45
the SERVICE menu. Select an item using the ▲/▼ buttons, and press the ► button or the ENTER button on the remote control to execute the item. FAN SPEED Using the ▲/▼ buttons switches the rotation speed of the cooling fans. The HIGH is the mode for use at highlands etc. Note that the projector is - Hitachi CPX2510 | User Manual - Page 46
remote control. REMOTE FREQ. (1) Use the ▲/▼ button to change the projector's remote sensor frequency setting (4). 1:NORMAL 2:HIGH (2) Use the ◄/► button to change the projector's remote the items LAMP TIME, FILTER TIME, LANGUAGE, FILTER MESSAGE and SECURITY settings are not reset. CANCEL OK 46 - Hitachi CPX2510 | User Manual - Page 47
on the remote control for about 3 seconds or press and hold the INPUT button for 3 seconds while pressing the ► button on the projector. (2). The 10 digit Inquiring Code will be displayed. Contact your dealer with the 10 digit Inquiring Code. Your password will be sent after your user registration - Hitachi CPX2510 | User Manual - Page 48
note of the password during this time. Pressing the ENTER button on the remote control or ► button on the projector will return to MyScreen PASSWORD on/off menu. When a password is set . Your password will be sent after your user registration information is confirmed. (continued on next page) 48 - Hitachi CPX2510 | User Manual - Page 49
box will be displayed. 1-3 Input a 4 part PIN code using the COMPUTER or INPUT button. will activate only when the projector is started after AC power is turned off. • Please projector will turn off. 3-2 Contact your dealer with the 10 digit Inquiring Code. Your PIN Code will be sent after your user - Hitachi CPX2510 | User Manual - Page 50
Pressing the ENTER button on the remote control or the ► button on the projector will return to the TRANSITION projector is started after turning off the AC power. • This feature may not function properly if the projector user registration information is confirmed. 50 (continued on next page) - Hitachi CPX2510 | User Manual - Page 51
make note of the password during this time. Pressing the ENTER button on the remote control or ► button on the projector will return to the MY TEXT PASSWORD on/off menu. 2 Turning off the Your password will be sent after your user registration information is confirmed. (continued on next page) 51 - Hitachi CPX2510 | User Manual - Page 52
When it is set ON, the MY TEXT will be displayed on the START UP screen and the INPUT_ INFORMATION when the INFORMATION on the SERVICE menu is chosen. • This function is available only when the MY TEXT PASSWORD function is set to the OFF. MY TEXT WRITING (1) Use the ▲/▼ buttons - Hitachi CPX2510 | User Manual - Page 53
: DT01021 lamp cover 3 Replacing the lamp 1. Turn the projector off, and unplug the power cord. Allow the projector to cool for at least 45 minutes. 2. Prepare a new lamp. If the projector is mounted on a ceiling, or if the lamp has broken, also ask the dealer to replace the lamp. In case of - Hitachi CPX2510 | User Manual - Page 54
gas that from the comes out of the projector vents, or get it in your eyes or mouth. power • Before replacing the lamp, turn the projector off and unplug the power outlet cord, then wait at least 45 minutes for the lamp to cool sufficiently. Handling the lamp while hot can cause burns, as well as - Hitachi CPX2510 | User Manual - Page 55
type will come together with a replacement lamp for this projector. 1. Turn the projector off, and unplug the power cord. Allow the projector to sufficiently cool down. Filter cover 2 2. Use a vacuum cleaner on and around the filter cover. 3. While supporting the projector with one hand, use your - Hitachi CPX2510 | User Manual - Page 56
or the like, internal temperatures rise and could cause a fire, a burn or malfunction to the projector. NOTE • Please replace the air filter when it is damaged or too soiled. • When you replace the projection lamp, please replace the air filter. An air filter of specified type will come together with - Hitachi CPX2510 | User Manual - Page 57
for the cabinet and remote control Incorrect care could have adverse influence such as discoloration, peeling paint, etc. 1. Turn the projector off, and unplug the power cord. Allow the projector to cool sufficiently. 2. After making sure that the projector is cool adequately, lightly wipe with gauze - Hitachi CPX2510 | User Manual - Page 58
matter, etc. should occur. In such cases, immediately disconnect the power plug from the power outlet. After making sure that the smoke or odor has stopped, contact to your dealer or service company. Otherwise if a problem occurs with the projector, the following checks and measures are recommended - Hitachi CPX2510 | User Manual - Page 59
"Power on/off". Blinking In Green Lighting In Green Turned off Turned off Turned off Turned off The projector is warming up. Please wait. The projector is in an on state. Ordinary operations may be performed. Blinking In Orange Blinking In Red Blinking In Red or Lighting In Red Blinking In Red - Hitachi CPX2510 | User Manual - Page 60
, please set FAN SPEED of SERVICE item in OPTION menu to HIGH (45). Lighting In Green Simultaneous blinking in Red It is time to clean the air filter. Please immediately turn the power off, and clean or change the air filter referring to the section "Cleaning and replacing the air filter". After - Hitachi CPX2510 | User Manual - Page 61
Cases not involving a machine defect The electrical power cord is not plugged in. Correctly connect the power cord. The main power source has been interrupted during operation such as by a power outage (blackout), etc. Please disconnect the power plug from the power outlet, and allow the projector - Hitachi CPX2510 | User Manual - Page 62
. 26 The computer cannot detect the projector as a plug and play monitor. Make sure that the computer can detect a plug and play 10 monitor using another plug and play monitor. The BLANK screen is displayed. Press BLANK button on the remote control. 21 Video screen The FREEZE function - Hitachi CPX2510 | User Manual - Page 63
Troubleshooting Phenomena that may be easy to be mistaken for machine defects (continued) Phenomenon Cases not involving a machine ECO MODE item in the SETUP 34 menu. The lamp is approaching the end of its product lifetime. Replace the lamp. Pictures appear blurry. Either the focus and/or - Hitachi CPX2510 | User Manual - Page 64
(R, L RCA x2 Others USB USB-B x1 CONTROL D-sub 9 pin x1 Lamp: DT01021 Filter set: MU06481 Mounting accessary: HAS-3010 (Bracket for ceiling mount) HAS-204L (Fixing adaptor for low ceilings) HAS-304H (Fixing adaptor for high ceilings) Soft case: CA3010 * For more information, please consult your - Hitachi CPX2510 | User Manual - Page 65
Specifications (continued) Specifications 98 113 288 317 [unit: mm] 65
-
 1
1 -
 2
2 -
 3
3 -
 4
4 -
 5
5 -
 6
6 -
 7
7 -
8
-
9
-
10
-
11
-
12
-
13
-
14
-
15
-
16
-
17
-
18
-
19
-
20
-
21
-
22
-
23
-
24
-
25
-
26
-
27
-
28
-
29
-
30
-
31
-
32
-
33
-
34
-
35
-
36
-
37
-
38
-
39
-
40
-
41
-
42
-
43
-
44
-
45
-
46
-
47
-
48
-
49
-
50
-
51
-
52
-
53
-
54
-
55
-
56
-
57
-
58
-
59
-
60
-
61
-
62
-
63
-
64
-
65
 |
 |
1
Projector
CP-X2010/CP-X2510/CP-X3010
User's Manual (detailed)
Operating Guide
Thank you for purchasing this projector.
►
Before using this product, please read all manuals for this
product. Be sure to read “
Safety Guide
” first. After reading them, store them in a
safe place for future reference.
WARNING
• The information in this manual is subject to change without notice.
• The manufacturer assumes no responsibility for any errors that may appear in
this manual.
• The reproduction, transfer or copy of all or any part of this document is not
permitted without express written consent.
NOTE
Trademark acknowledgment
Various symbols are used in this manual. The meanings of these symbols are
described below.
About this manual
WARNING
CAUTION
This symbol indicates information that, if ignored, could possibly
result in personal injury or even death due to incorrect handling.
This symbol indicates information that, if ignored, could possibly
result in personal injury or physical damage due to incorrect
handling.
Please refer to the pages written following this symbol.
• Mac
®
is a registered trademark of Apple Inc.
• Windows
®
is a registered trademark of Microsoft Corporation in the U.S. and/or
other countries.
• VESA and DDC are trademarks of the Video Electronics Standard Association.
All other trademarks are the properties of their respective owners.
NOTICE
This entry notices of fear of causing trouble.