Hitachi DZ-GX20MA Owners Guide - Page 93
Recording Subject Using Large Magnification Digital Zoom
 |
UPC - 050585223646
View all Hitachi DZ-GX20MA manuals
Add to My Manuals
Save this manual to your list of manuals |
Page 93 highlights
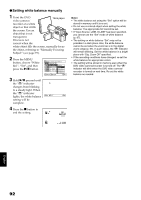
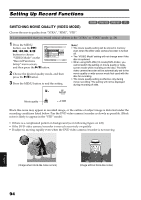
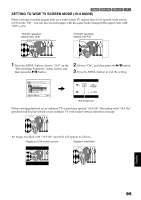
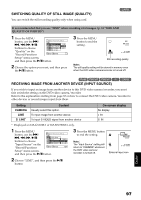
USING THE ELECTRONIC IMAGE STABILIZER (EIS) When you use zoom (see page 57) to record a magnified subject image, it will correct fuzziness in the recorded image. 1 Press the MENU button, choose "EIS" on the "Camera Functions Setup" menu screen, and then press the A button. Came ra Func t i ons Set u p P r o g r am AE Wh i t e Ba l . EIS On Di g . Zoom Of f MIC.F i l ter ENTER RETURN RAM 2 Choose the "On" or "Off", and then press the A button. 3 Press the MENU button to end the setting. ●Checking EIS On or Off You can check EIS On or Off by the on-screen information display. EIS FINE 0:00:00 REM 3 0 MIN 8 : 0 0 AM 9/3 0 /2005 After recording with EIS set to "Off", it is recommended that you return the setting to "On" and then turn the DVD video camera/ recorder off, unless you normally record with "Off" setting. Note: • The EIS setting will be stored in memory even when the DVD video camera/recorder is turned off. • It is recommended that you specify "EIS Off" when using the DVD video camera/recorder on a desk or tripod. • When "EIS On" is specified, there will be a slight difference between the actual movement and the movement on screen. • Gross camera shake may not be entirely corrected even if "EIS On" is specified: Firmly hold the DVD video camera/recorder with both hands. • EIS may not operate correctly when the tele or wideconversion lens is used. • EIS cannot be used when recording photos on DZGX20MA or DZ-MV780MA. RECORDING SUBJECT USING LARGE MAGNIFICATION (DIGITAL ZOOM) See page 57 for setting on digital zoom. REDUCING WIND NOISE DURING RECORDING (MIC.FILTER) When recording sound from the microphone built into this DVD video camera/recorder, you can reduce wind noise in recording. If "MIC.Filter: ON" is specified, the low-frequency components in the sound picked up by microphone will be cut off during recording: This makes it easier to hear the target voice or sound during playback. 1 Press the MENU button, choose "MIC.Filter" on the "Camera Functions Setup" menu screen, and then press the A button. Camer a F u nc t i on s S e t u p P r o g r am AE Wh i t e Ba l . EIS D i g . Zoom MIC.F i l t er On Of f ENTER RETURN RAM 2 Choose the desired option, and then press the A button. 3 Press the MENU button to end the setting. 0:00:00 REM 3 0 MIN Note: FINE 8 : 0 0 AM 9/3 0 /2005 • You can also use the onscreen display to confirm Microphone filter icon that the MIC.Filter has been set. • The MIC.Filter setting will be stored in memory even when the DVD video camera/recorder is turned off. • The MIC.Filter function will work only during movie recording. • The microphone filter function works only with the built-in microphone: It will not function when using an external microphone (p. 78). 93 English
-
 1
1 -
2
-
3
-
4
-
5
-
6
-
7
-
8
-
9
-
10
-
11
-
12
-
13
-
14
-
15
-
16
-
17
-
18
-
19
-
20
-
21
-
22
-
23
-
24
-
25
-
26
-
27
-
28
-
29
-
30
-
31
-
32
-
33
-
34
-
35
-
36
-
37
-
38
-
39
-
40
-
41
-
42
-
43
-
44
-
45
-
46
-
47
-
48
-
49
-
50
-
51
-
52
-
53
-
54
-
55
-
56
-
57
-
58
-
59
-
60
-
61
-
62
-
63
-
64
-
65
-
66
-
67
-
68
-
69
-
70
-
71
-
72
-
73
-
74
-
75
-
76
-
77
-
78
-
79
-
80
-
81
-
82
-
83
-
84
-
85
-
86
-
87
-
 88
88 -
 89
89 -
 90
90 -
 91
91 -
 92
92 -
 93
93 -
 94
94 -
 95
95 -
 96
96 -
 97
97 -
 98
98 -
99
-
100
-
101
-
102
-
103
-
104
-
105
-
106
-
107
-
108
-
109
-
110
-
111
-
112
-
113
-
114
-
115
-
116
-
117
-
118
-
119
-
120
-
121
-
122
-
123
-
124
-
125
-
126
-
127
-
128
-
129
-
130
-
131
-
132
-
133
-
134
-
135
-
136
-
137
-
138
-
139
-
140
-
141
-
142
-
143
-
144
-
145
-
146
-
147
-
148
-
149
-
150
-
151
-
152
-
153
-
154
-
155
-
156
-
157
-
158
-
159
-
160
-
161
-
162
-
163
-
164
-
165
-
166
-
167
-
168
-
169
-
170
-
171
-
172
-
173
-
174
-
175
-
176
-
177
-
178
-
179
-
180
-
181
-
182
-
183
-
184
-
185
-
186
-
187
-
188
-
189
-
190
-
191
-
192
-
193
-
194
-
195
-
196
-
197
-
198
-
199
-
200
 |
 |