Hitachi X1250 Lens Replacement Manual
Hitachi X1250 - XGA LCD Projector Manual
 |
UPC - 050585150638
View all Hitachi X1250 manuals
Add to My Manuals
Save this manual to your list of manuals |
Hitachi X1250 manual content summary:
- Hitachi X1250 | Lens Replacement Manual - Page 1
to unlock the lamp cover and then grasp the projecting part of the lamp cover to lift it open. Lamp cover Important Operation Instructions wsygEtiti, ,LWarning L\ • Before replacing the projector lens, be sure to read this manual and the operation manual of the LCD projector for use with - Hitachi X1250 | Lens Replacement Manual - Page 2
front panel. (1) Place the front panel on the projector. 8. Reattach the lamp cover to complete the lens replacement. (1) Align the two tabs on the lamp cover with the receiving areas on the projector. (2) Press the lamp cover into place at the three indicated locations. (1) (2) \ a ) 9. Attach
-
 1
1 -
 2
2
 |
 |

Lens
Replacement
Manual
This
manual
describes
the
procedure
for
replacing
the
following
lenses.
Lens
Model
Fixed
short
focal
length
projection
lens
FL
-501
Short
focal
length
projection
lens
SL
-502
Normal
projection
lens
NL-500
Long
focal
length
projection
lens
LL
-503
Ultra
long
focal
length
projection
lens
UL
-504
Supplied
Accessories
The
following
accessories
are
included
with
each
lens.
Lens
Model
Supplied
accessories
Fixed
short
focal
length
projection
lens
FL
-501
Fixed
short focal
length
projection
lens,operation
manual,
lens
replacement
manualtouver
x
2
Short
focal
length
projection
lens
-",,
SL-g,
Short
focal
length
projection
lens.operation
manual
lens
replacement
manual,
louver
x
2
Normal
pro
jection
lens
NL-500
Normal
projection
lens,
lens
replacement
manual,
operation
manual
Long
focal
length
projection
lens
LL
-503
Long
focal
length
projection
lens,
lens
cap,
lens
replacement
manual,
operation
manual,
String
Ultra
long
focal
length
projection
lens
UL
-504
Ultra
long
focal
length
projection
lens,
lens
cap,
lens
replacement
manual,
operation
manual.
String
Important
Safety
Instructions
(Always
follow
these
instructions.
Please
read
this
-
section
on
important
safety
instructions
before
replacing
the
projector
lens.
To
prevent
accidents
during
lens
replacement
and
ensure
product
safety
after
replacing
the
lens,
be
sure
to
follow
the
safety
instructions
described
herein.
•These
symbols
indicate
actions
that
can
result
in
injury
or
damage
if
these
operations
are
not
followed
correctly.
Warning
This
symbol
Indicates
that
there
is
a
possibility
of
serious
injury
or
even
death
if
the
operation
is
not
followed
correctly.
Caution
This
symbol
indicates
that
there
is
a
possibility
of
physical
injury
or
damage
to
equipment
if
the
operation
is
not
followed
correctly.
•These
symbols
indicate
the
types
of
precautions
that
must
followed.
This
symbol
indicates
that
caution
must
be
taken.
This
symbol
warns
of
possible
electrical
shock.
&
This
symbol
warns
of
possible
high
heat,
This
symbol
indicates
an
action
0
that
must
not
be
performed.
Important
Operation
Instructions
,LWarning
L\
•
Before
replacing
the
projector
lens,
be
sure
to
read
this
manual
and
the
operation
manual
of
the
LCD
projector
for
use
with
this
lens.
To
ensure
safe
operations
and
the
continued
safety
of
this
product,
be
sure
to
follow
all
of
the
safety
instructions
written
in
this
manual
and
the
operation
manual
of
the
LCD
projector.
.A
•
Do
not
place
the
lens
in
a
location
subject
to
direct
sunlight
or
other
strong
lighting
or
near
heat
-radiating
equipment.
This
can
cause
a
fire
due
to
the
properties
of
the
lens.
It
can
also
cause
injury
or
damage
to
the
lens.
O
II
Do
not
subject
the
lens
to
shocks.
This
can
cause
injury
or
damage
to
the
lens.
,
A
III
Be
sure
to
unplug
the
LCD
projector
before
replacing
the
lens.
The
inside
of
the
LCD
projector
has
areas
of
high
voltage
which
can
cause
electrical
shock.
,
L
•
Do
not
touch
the
fan
of
the
LCD
projector
during
operation.
This
can
cause
injury.
III
Before
replacing
the
lens,
be
sure
to
turn
off
and
unplug
the
LCD
projector,
and
allow
at
least
45
minutes
for
the
projector
to
fully
cool.
Replacing
the
lens
while
the
LCD
projector
is
hot
can
cause
burns.
•
When
removing
the
louver,
first
shut
off
the
projector
and
wait
approximately
ten
minutes.
Removing
while
the
cooling
plate
is
still
hot
may
result
in
burns.
Qi
•
When
attaching,
take
care
so
that
dust
not
enter
inside.
Continued
use
with
dust
inside
may
result
in
fire
or
electric
shock.
Z\
Caution
•
When
replacing
the
lens,
do
not
touch
the
LCD
panels
or
polariz-
ing
plates
of
the
LCD
projector
or
subject
them
to
shocks.
This
can
cause
damage
to
the
equipment.
It
can
also
cause
a
misalign-
ment
of
the
optical
adjustment
and,
therefore,
require
readjustments.
Z\
•
When
replacing
the
lens,
be
careful
not
to
damage
the
connectors
or
wires
inside
the
LCD
projector.
This
can
cause
damage
to
the
equipment.
Be
careful
not
to
pull
on
the
connectors
or
wires
or
get
them
caught
in
the
circuit
board
or
case.
A
•
After
replacing
the
lens,
part
of
the
lens
and
louver
may
stick
out
from
the
LCD
projector.
Transporting
the
LCD
projector
in
the
original
projector
shipping
box
can
cause
damage
to
the
equipment.
Follow
these
Instructions
II
Do
not
touch
the
lens
directly
with
your
hands
or
fingers.
This
can
dirty
the
lens
and
cause
deterioration
in
image
quality.
•
The
lens
is
a
precision
optical
device.
Carefully
handle
the
lens
without
subjecting
it
to
shocks
or
vibrations.
X
When
resting
the
lens
on
a
surface,
place
the
lens
face
down
on
a
soft
cloth.
Replacing
the
Lens
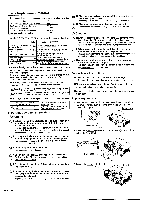
1.
Slide
the
lamp
cover
lock
in
the
direction
of
the
arrow
to
unlock
the
lamp
cover
and
then
grasp
the
projecting
part
of
the
lamp
cover
to
lift
it
open.
Lamp
cover
wsygEtiti,
Lamp
cover
lock
2.
Remove
the
two
screws
on
the
bottom
of
the
projector
and
then
pull
off
the
front
panel.
0
Front
bezel
3.
Loosen
the
screw
on
the
lens
door.
Lens
door
QR58433