HoMedics AR-35 Downloadable Instruction Book - Page 6
Do Not Use Water Or Any Household Cleaners Or Detergents
 |
View all HoMedics AR-35 manuals
Add to My Manuals
Save this manual to your list of manuals |
Page 6 highlights
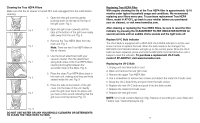
Cleaning the True HEPA Filters Make sure that the air cleaner is turned OFF and unplugged from the outlet before cleaning. 1. Open the rear grill cover by gently pushing down on the tab on the top of the grill cover. Fig. 5 Fig. 5 2. Open the grill cover outward until the tabs at the bottom of the grill cover easily slide away from the unit. Fig. 6 3. Remove the True HEPA filters from the main unit. Fig. 7 Fig. 6 Note: There are two True HEPA filters in this air cleaner. 4. Use the brush attachment with your vacuum cleaner. Run the attachment Fig. 7 along both sides of the True HEPA filters, cleaning thoroughly between the accordion folds of the filters. Fig. 8 5. Place the clean True HEPA filters back in Fig. 8 the main unit, making sure they are firmly seated inside the unit. Fig. 9 6. Place the tabs at the bottom of the grill cover into the base of the unit. Gently push the grill cover back into place until Fig. 9 you hear a click sound indicating that the grill cover is firmly latched. Fig. 10 Fig. 10 DO NOT USE WATER OR ANY HOUSEHOLD CLEANERS OR DETERGENTS TO CLEAN THE TRUE HEPA FILTERS. 10 Replacing True HEPA Filter With regular cleaning the life of the True HEPA filter is approximately 12-18 months under typical household usage and conditions. We recommend replacing your filters every year. To purchase replacement True HEPA filters, model # AT-OFL, go back to your retailer (where you purchased your air cleaner), or visit www.homedics.com. After cleaning or replacing the True HEPA filters, be sure to reset the filter indicator by pressing the CLEAN/RESET FILTER INDICATOR BUTTON for several seconds until an audible chime sounds and the light turns off. Replace UV-C Bulb Indicator The UV-C Bulb is equipped with a REPLACE UV-C BULB indicator to let the user know it is time to replace the bulb. When the bulb needs to be changed, the REPLACE UV-C BULB indicator will light up on the control panel. Once the UV-C bulb has been replaced, press and hold the REPLACE UV-C BULB button until it beeps to reset the indicator. To purchase a replacement UV-C bulb, model # PP-AROTUV, visit www.homedics.com. Replacing the UV-C Bulb 1. Unplug unit and allow bulb to cool. 2. Open and remove the rear grill cover. 3. Remove the upper True HEPA filter. 4. Use a screwdriver to remove two screws and detach the metal UV-C bulb cover. 5. Grasp the UV-C bulb firmly and pull it from the bulb socket. 6. Replace the new UV-C bulb and push it into the bulb socket. 7. Replace the metal UV-C bulb cover. 8. Replace the rear grill cover. NOTE: UV-C bulb contains Mercury (Hg). Dispose of according to Local, State and Federal Law / www.lamprecycle.org 11
-
 1
1 -
 2
2 -
 3
3 -
 4
4 -
 5
5 -
 6
6 -
 7
7 -
 8
8 -
 9
9 -
 10
10 -
 11
11 -
 12
12 -
13
-
14
 |
 |
