Honeywell CT1800 Owner's Manual - Page 7
Caution
 |
View all Honeywell CT1800 manuals
Add to My Manuals
Save this manual to your list of manuals |
Page 7 highlights
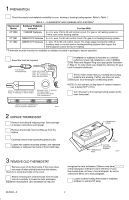
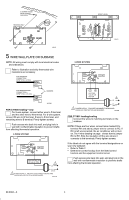
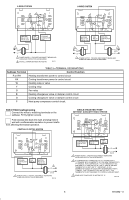
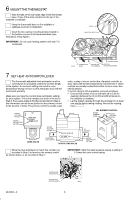
8 INSTALL CLOCK BATTERIES Power is supplied to the clock by two AAA alkaline batteries (included). Install clock batteries in thermostat as shown. Once a year, or when batteries are dead, replace with two new AAA alkaline batteries. We recommend Energizer® batteries. Other types of batteries are more likely to leak, which could damage the clock. The thermostat itself will operate without batteries, but will not operate as a fuel saver. BATTERY LOCATION FOR (2) AAA BATTERIES; INSTALL WITH POSITIVE ENDS UP 9 SET CLOCK Adjust the clock by moving the minute hand in clockwise direction. Do not reverse the minute hand. When time is correctly set, the Time Indicator Arrow (see illustration) must point to the correct time and the corresponding daytime (light) or nighttime (dark) portion of the program dial. M9619 PROGRAM INDEX WHEEL TIME INDICATOR ARROW M2499 10 ATTACH THERMOSTAT COVER Make sure the packing inserts in the thermostat base have been removed, as explained in Step 2. Place the two tabs on upper edges of cover into the mounting slots in the thermostat base. Swing cover downward until it engages catch at bottom of base. M9618 11 CHECKOUTTHERMOSTAT OPERATION AND SETTEMPERATURE CONTROL LEVERS The two levers on top of the thermostat control the low and high temperature for energy savings and comfort control as shown in the illustration. LOW TEMPERATURE (BLUE MARK) SET LEVER HIGH TEMPERATURE (RED MARK) SET LEVER CAUTION Do not check operation by shorting across terminals of relay or valve coil; this will burn out the thermostat heat anticipator, which will void the warranty. 50 60 70 80 M859 Heating-Only System Turn on power to the furnace. 7 69-0394-3
-
 1
1 -
 2
2 -
 3
3 -
 4
4 -
 5
5 -
 6
6 -
 7
7 -
 8
8
 |
 |
