Honeywell CT87 Owner's Manual - Page 1
Honeywell CT87 Manual
 |
View all Honeywell CT87 manuals
Add to My Manuals
Save this manual to your list of manuals |
Page 1 highlights
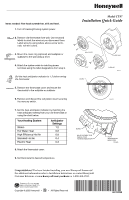
Items needed: Pan head screwdriver, drill and level. 1. Turn off Heating/Cooling system power. 2. Remove old thermostat from wall. Use enclosed labels to mark the wires as you disconnect them. Label wires by using letters above screw terminals, not wire colors. 3. Mount the cover ring (optional) and wallplate or subbase to the wall using a level. 4. Attach the system wires to matching screw terminals using the label designations from step 2. 60 90 Set the heat anticipator indicator to 1.2 before wiring 70 80 90 the thermostat. 60 70 80 5. Remove the thermostat cover and mount the thermostat to the wallplate or subbase. 6. Remove and discard the red plastic insert securing the mercury switch. 7. Set the heat anticipator indicator by matching the heat anticipator setting from your old thermostat or using the chart below. Your Heating System Steam Hot Water Heat High Efficiency Hot Air Standard Hot Air Electric Heat Anticipator Settings 1.2 0.8 0.8 0.4 0.3 8. Attach the thermostat cover. 9. Set thermostat to desired temperature. Model CT87 Installation Quick Guide WALLPLATE CT87 LEVEL COVER RING SUBBASE M20111 M20112 1.0.8 .6 .5 .4 .3 .2 SCALE .15 .12 HOLE SUITABLE FOR PENCIL POINT TO MOVE INDICATOR HEAT ANTICIPATOR INDICATOR M1368A Congratulations! You have finished installing your new Honeywell thermostat! For additional information refer to Installation Instructions or contact Honeywell Customer Relations at www.honeywell.com/yourhome or 1-800-468-1502. Copyright © 2005 Honeywell • • All Rights Reserved 69-1552ES
-
 1
1 -
 2
2
 |
 |