Honeywell Econostat Owner's Manual
Honeywell Econostat Manual
 |
View all Honeywell Econostat manuals
Add to My Manuals
Save this manual to your list of manuals |
Honeywell Econostat manual content summary:
- Honeywell Econostat | Owner's Manual - Page 1
Español: Página 11 T822/T827 Series Thermostat This manual covers the following models*: T822K,L • T827K * Images are for reference only and may not represent the actual thermostat. Pre-installation checklist Check package contents: • Thermostat • Wall anchors & screws (2 each) Before you begin - Honeywell Econostat | Owner's Manual - Page 2
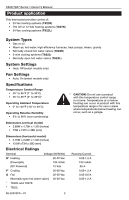
T822/T827 Series • Owner's Manual Product application This thermostat provides control of: • 24 Vac heating systems (T822K) • 750 mV or 12 Vdc heating systems (T827K) • 24 Vac cooling systems (T822L) System Types • Gas or - Honeywell Econostat | Owner's Manual - Page 3
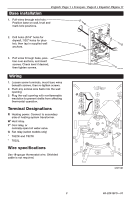
Français : Page 6 • Español: Página 11 Base installation 1. Pull wires through wire hole. Position base on wall, level Plug the wall opening with nonflammable insulation to prevent drafts from affecting thermostat operation. Terminal Designations R Heating power. Connect to secondary side of - Honeywell Econostat | Owner's Manual - Page 4
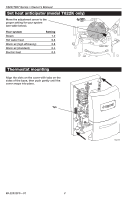
• Owner's Manual Set heat anticipator (model T822K only) Move the adjustment arrow to the proper setting for your system (see table below). Your system Steam Hot water heat Warm air (high efficiency) Warm air (standard) Electric heat Setting 1.2 0.8 0.8 0.4 0.3 M27307 Thermostat mounting Align - Honeywell Econostat | Owner's Manual - Page 5
to set desired indoor temperature. Note: Temperature scale varies by model. 5-year limited warranty Honeywell warrants this product to be free from defects in the workmanship or materials, under normal use and service, for a period of five (5) years from the date of purchase by the consumer. If - Honeywell Econostat | Owner's Manual - Page 6
Français : Page 6 Manual de Uso Español: Página 11 Série T822/T827 Thermostat Employez ce manuel pour les modèles suivants* : T822K,L • T827K * Les images sont à titre de référence seulement et peuvent ne pas correspondre au thermostat. Éléments nécessaires à l'installation Vérifiez le contenu - Honeywell Econostat | Owner's Manual - Page 7
ñol: Página 11 Application du produit Ce thermostat fournit la commande des systèmes suivants : • Systèmes de chauffage de 24 V c.a. (T822K) • Systèmes de chauffage de 750 mV ou 12 V c.d. (T827K) • Systèmes de refroidissement 24 V c.a. (T822L) Types d'installations • Chauffage de gaz ou de pétrole - Honeywell Econostat | Owner's Manual - Page 8
l'isolant ininflammable pour empêcher les courants d'air de perturber le fonctionnement du thermostat. Désignation des bornes R Alimentation chauffage. Raccorder au côté secondaire du transformateur de l'installation de chauffage. W1 Relais de chauffage. Y2 Relais du refroidissement, ou vanne à eau - Honeywell Econostat | Owner's Manual - Page 9
chaude 0.8 Air chaud (à haute efficacité) 0.8 Air chaud (standard) 0.4 Air chaud électrique 0.3 M27307 Montage du thermostat Alignez les fentes du couvercle avec les languettes du thermostat, puis poussez doucement jusqu'à ce que le couvercle s'emboîte en place. Languette M27308 9 69 - Honeywell Econostat | Owner's Manual - Page 10
. Le service clients décidera si le produit doit être renvoyé à l'adresse suivante : Honeywell Return Goods, Dock 4 MN103860, 1885 Douglas Dr.N., Golden Valley, MN 55422, ou si un produit de remplacement peut vous être envoyé. Cette garantie ne couvre pas les frais de démontage ou de réinstallation - Honeywell Econostat | Owner's Manual - Page 11
de Uso Español: Página 11 T822/T827 Series Tehremrmosotsattaot Este manual cubre los modelos siguientes*: T822K,L • T827K * Imágenes solo de referencia, pueden ón correcta. ® Marca registrada en EE.UU. Patentes pendientes. Copyright © 2008 Honeywell International Inc. Todos los derechos reservados - Honeywell Econostat | Owner's Manual - Page 12
T822/T827 Serie • Manual de Uso Aplicación del producto Este termóstato proporciona el control de los sistemas siguientes: • Sistemas de calefacción de 24 V CA (T822K) • Sistemas de calefacción - Honeywell Econostat | Owner's Manual - Page 13
English: Page 1 • Français : Page 6 • Español: Página 11 Instalación de placa de montaje 1. Tire de los cables a través de su orificio. Posicione en la pared la placa de montaje, nivélelo y marque las posiciones de los orificios. 2. Taladre orificios en las posiciones marcadas (3/16" para - Honeywell Econostat | Owner's Manual - Page 14
T822/T827 Serie • Manual de Uso Ajuste el anticipador del calor (T822K solamente) Mueva la flecha al ajuste apropiado para su sistema (véase la tabla abajo). Su sistema Sistema - Honeywell Econostat | Owner's Manual - Page 15
los daños incidentales o consecuentes, de manera que tal vez esta limitación no se aplique en su caso. ÉSTA ES LA ÚNICA GARANTÍA EXPRESA DE HONEYWELL RESPECTO DE ESTE PRODUCTO. LA DURACIÓN DE LAS GARANTÍAS IMPLÍCITAS, INCLUSO LA DE COMERCIABILIDAD Y DE APTITUD PARA UN USO PARTICULAR, SE LIMITA POR - Honeywell Econostat | Owner's Manual - Page 16
-1502 Besoin d'aide? Pour obtenir de l'aide et apprendre à faire fonctionner votre produit Honeywell, veuillez consulter le site Web http://yourhome.honeywell.com ou vous adresser aux Services à la clientèle de Honeywell en composant le 1 800 468-1502 ¿Necesita ayuda? Consulte sobre este producto en
-
 1
1 -
 2
2 -
 3
3 -
 4
4 -
 5
5 -
 6
6 -
 7
7 -
8
-
9
-
10
-
11
-
12
-
13
-
14
-
15
-
16
 |
 |
Owner’s Manual
English: Page 1
Mode d’emploi
Français : Page 6
Manual de Uso
Español: Página 11
T822/T827 Series
Thermostat
® U.S. Registered Trademark. Patents pending.
Copyright © 2008 Honeywell International Inc.
All rights reserved.
69-2251EFS-01
Check package contents:
•
Thermostat
•
Wall anchors & screws (2 each)
Before you begin, make sure you have:
•
No. 2 Phillips & small pocket screwdrivers
•
Hammer
•
Level (optional)
•
Pencil
•
Drill and bit (3/16” for drywall, 7/32” for
plaster)
Pre-installation checklist
This manual covers the following models*:
T822K,L • T827K
* Images are for reference only and may not represent the actual thermostat.
Must be installed by a trained, experienced technician
Read these instructions carefully. Failure to follow these instructions
can damage the product or cause a hazardous condition.
CAUTION: ELECTRICAL HAZARD
Can cause electrical shock or equipment damage. Disconnect power before
beginning installation.
MERCURY NOTICE
If this product is replacing a control that contains mercury in a sealed tube, do not
place the old control in the trash. Contact your local waste management authority for
instructions regarding recycling and proper disposal.