Honeywell HCM645 Owners Manual - Page 6
Power, Step 1: Power, Step 2: Output / Fan Speed Control, Step 3: Set Humidity - hcm 645
 |
UPC - 092926343088
View all Honeywell HCM645 manuals
Add to My Manuals
Save this manual to your list of manuals |
Page 6 highlights
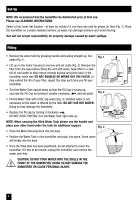
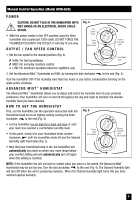
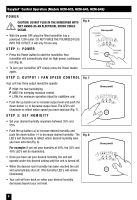
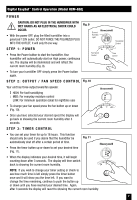
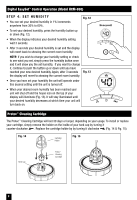
EasySet™ Control Operation (Models HCM-635, HCM-645, HCM-646) POWER CAUTION: DO NOT PLUG IN THE HUMIDIFIER WITH WET HANDS AS AN ELECTRICAL SHOCK COULD OCCUR. • With the power OFF, plug the filled humidifier into a polarized 120V outlet. DO NOT FORCE THE POLARIZED PLUG INTO THE OUTLET; it will only fit one way. Fig. 6 Humidistat Control STEP 1: POWER Power • Press the Power button to start the humidifier. Your Button humidifier will automatically start on High power, continuous run (Fig. 6). • To turn your humidifier OFF simply press the Power button again. S T E P 2 : O U T P U T / F A N S P E E D C O N T R O L Fig. 7 Your unit has three output levels/fan speeds: HIGH: For fast humidifying MED: For everyday moisture control LOW: For minimum operation (ideal for nighttime use) • Push the up button (+) to increase output level and push the down button (-) to decrease output level. The LED's will illuminate to reflect which speed you have selected (Fig. 7). STEP 3: SET HUMIDITY • Set your desired humidity anywhere between 35% and 55%. • Push the up button (+) to increase desired humidity and push the down button (-) to decrease desired humidity. The LED's will illuminate to reflect which desired humidity level you have selected (Fig. 8). Fig. 8 For example: If you set your humidity at 40%, the 35% and 40% LED's will be illuminated. • Once you have set your desired humidity, the unit will operate under this desired setting until the unit is turned off. • When the desired room humidity has been reached the unit will automatically shut off. (The humidity LED's will remain illuminated) • Your unit will turn back on when your desired humidity decreases beyond your set level. Fan Speed Control 6
-
 1
1 -
 2
2 -
 3
3 -
 4
4 -
 5
5 -
 6
6 -
 7
7 -
 8
8 -
 9
9 -
 10
10 -
 11
11 -
 12
12
 |
 |
