Honeywell IS215TCE Installation Instructions - Page 2
RÉglage De La LevÉe De Doute
 |
View all Honeywell IS215TCE manuals
Add to My Manuals
Save this manual to your list of manuals |
Page 2 highlights
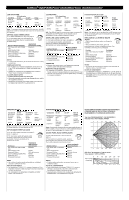
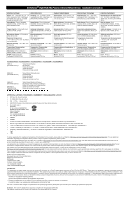
IntelliSense IS215TCE-MIC Passive Infrared Motion Sensor - Installation Instruction LED OPERATION LED Indication Condition S1 ON S1 OFF warm up slow blink slow blink (2 minutes) normal off off alarm on for 3 off seconds trouble fast blink fast blink Relay closed closed open for 3 seconds - - Note: To enable a detection area sensitivity walk test, the LED will remain active for 10 minutes after switch S1 is moved to the OFF position. SETTING AUDIO VERIFICATION 1. For audio verification, see Step 4 on page 1. 2. For best audio clarity, set Potentiometer to minimum acceptable volume. See table below for initial setting. Interface Module Examples DSC Power 832 with PC5900 AVU APEX Destiny 6100 Honeywell Galaxy Dycon CS5030 CSL5000 AVU Honeywell UVCM Honeywell Dimension Approximate Potentiometer Setting Maximum Minimum 30% of Maximum Minimum Maximum Maximum NOTES ! If using audio verification, do not mount the sensor in a noisy environment. COMPLIANCE NOTES ! For TS 50131-2-2 compliant installations, mount sensor at 2.3m (7.5ft), set sensitivity to H (High), and install cover screw. ! Suitable for connection to an EN60950 Class II Limited Power Source in European installations. UL COMPLIANCE NOTES ! Product must be tested once each year. ! Wiring the terminals incorrectly may damage this unit, and/or the equipment wired to it. ! Microphone functionality and output voltage have not been investigated by Underwriter's Laboratories Inc. LED WERKING LED Aanwijzing Voorwaard S1 AAN S1 UIT en Opwarmen Langzaam Langzaam (2 minuten) knipperen knipperen normaal uit uit alarm 3 sec. AAN uit storing Snel knipperen Snel knipperen Relais gesloten gesloten 3 seconden open - - N.B.: De LED blijft nog 10 minuten actief nadat schakelaar S1 is geplaatst in de OFF positie, om het bepalen van de gevoeligheid via een looptest mogelijk te maken. INSTELLEN AUDIO-VERIFICATIE 1. Voor audio-verificatie, zie Stap 4 op pagina 1. 2. Voor beste audio kwaliteit, potentiometer instellen op minimum aanvaardbaar niveau. Zie lijst hieronder voor advies instellingen. Interface Module DSC Power 832 met PC5900 AVU APEX Destiny 6100 Honeywell Galaxy Dycon CS5030 CSL5000 AVU Honeywell UVCM Honeywell Dimension Advies intelling Potentiometer Maximum Minimum 30% van Maximum Minimum Maximum Maximum OPMERKING ! Monteer deze sensor niet in een lawaaierige omgeving wanneer audio verificatie wordt toegepast. DE NOTA'S VAN DE NALEVING ! In TS50131-2-2 installaties: monteer de unit op 2,3 m. hoogte, selecteer hoge gevoeligheid en plaats dekselschroef. ! Geschikt voor aansluiting op een EN 60950 Class II Voeding in Europese installaties. Fonctionnement de la LED Indication de la LED Condition S1 ON S1 OFF Chauffe (2 minutes) normal alarme flash lent éteinte allumée 3 secs flash lent éteinte éteinte défaut flash rapide flash rapide Relais d'alarme fermé fermé ouvert durant 3 secs - - Note: Pour réaliser un test de détection, la LED restera active durant 10 minutes après que le commutateur S1 ait été placé sur la position OFF. RÉGLAGE DE LA LEVÉE DE DOUTE AUDIO 1. Pour la levée de doute audio, voir l'étape 4 à la page 1. 2. Pour la meilleure clarté audio, placez le potentiomètre au volume acceptable minimum. Voir le tableau ci-dessous pour le préréglage. Centrale DSC Power 832 avec PC5900 AVU APEX Destiny 6100 Honeywell Galaxy Dycon CS5030 CSL5000 AVU Honeywell UVCM Honeywell Dimension Préréglage Maximum Minimum 30% du Maximum Minimum Maximum Maximum NOTES ! Si la levée de doute audio est utilisée, éviter d'installer le détecteur dans un endroit bruyant. NOTES DE CONFORMITÉ ! En référentiel TS 50131-2-2, installation à 2.30 m, choisir la sensibilité haute, et mettre en place la vis de capot (fournie).. ! Compatible pour un raccordement à une alimentation régulée EN 60950 Classe II. FUNZIONI DEI LED Indicazioni LED Condizione S1 ON S1 SPENTO Accensione lampeggio lampeggio (2 minuti) lento lento normale spento spento allarme on per 3 spento secondi guasto lampeggio lampeggio veloce veloce Relè chiuso chiuso aperto per 3 secondi - - Nota: Per abilitare il test di copertura, il LED rimarrà attivo per 10 minuti dopo che S1 sarà spostato su OFF. IMPOSTAZIONI VERIFICA AUDIO 1. Per la verifica audio ambientale consultare il punto 4 a pagina 1. 2. Per una buona qualità del segnale audio impostare il potenziometro al livello minimo accettabile. Verificare la tabella per le impostazioni iniziale. Interfaccia DSC Power 832 with PC5900 AVU APEX Destiny 6100 Honeywell Galaxy Dycon CS5030 CSL5000 AVU Honeywell UVST Honeywell Dimension Impostazioni approssimative potenziometro Massimo Minimo 30% del massimo Minimo Massimo Massimo FUNCINAMIENTO DEL LED LED Indicación Condiciones S1 ON S1 OFF Estabilización (2 minutos) normal alarma problema Parpedeo lento off on 3 segundos parpedeo rápido Parpedeo lento off off parpedeo rápido Relé de Alarma cerrado cerrado Abierto 3 segundos - - Nota: Para permitir determinar la zona supervisada durante el test de andado, el LED permanece activo 10 minutos después de que el el microinterruptor S1 se pone a OFF. AJUSTE PARA AUDIO VERIFICACIÓN 1. Para audio verificación, vea Paso 4 en la página 1. 2. Para mejorar la calidad de audio, ajuste el potenciómetro en el volumen mínimo aceptable. Vea la tabla siguiente para el ajuste inicial. Módulo Inteface DSC Power 832 con PC5900 AVU APEX Destiny 6100 Honeywell Galaxy Dycon CS5030 CSL5000 AVU Honeywell UVCM Honeywell Dimension Ajuste aproximado del potenciómetro Máximo Mínimo 30% del máximo Mínimo Máximo Máximo DETECTION PATTERNS / DETECTIE PATRONEN / COUVERTURE DE DETECTION / SCHEMI DI RILEVAMENTO / PATRON DE DETECCIÓN Top View / BOVENAANZICHT / VUE DE DESSUS / Vista dall' Alto / VISTA DESDE ARRIBA Side View / ZIJAANZICHT / VUE DE COTE / Vista Laterale / VISTA LATERAL NOTE ! Se si utilizza la verifica audio ambientale non installare il sensore in ambienti rumorosi. NOTE DI CONFORMITA' ! Per installazioni TS 50131-2-2, montare il sensore a 2.3 m, impostare il sensore in alta sicurezza e bloccare il coperchio con una vite (Inclusa). ! Per connessioni con alimentatori compatibili EN 60950 Classe II in contesto EU. NOTAS ! Si utiliza audio verificación, no monte el sensor en un ambiente ruidoso. NOTAS DE CONFORMIDAD ! Para instalaciones que cumplen TS50131-2-2: monte el detector a una altura de 2.3m (7'6"), seleccione alta sensibilidad y coloque el tornillo de la tapa. ! Adecuado para conectarlo con una fuente de alimentación EN60950 Clase II en instalaciones Europeas.
-
 1
1 -
 2
2 -
 3
3 -
 4
4
 |
 |
