Honeywell RCWL200A1007/N Owner's Manual
Honeywell RCWL200A1007/N - H1ywell Able Wireless Door Chime Manual
 |
UPC - 085267333993
View all Honeywell RCWL200A1007/N manuals
Add to My Manuals
Save this manual to your list of manuals |
Honeywell RCWL200A1007/N manual content summary:
- Honeywell RCWL200A1007/N | Owner's Manual - Page 1
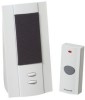
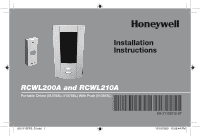
Installation Instructions RCWL200A and RCWL210A Portable Chime (51375SL; 51376SL) With Push (51381SL) 69-2112EFS_D.indd 1 69-2112EFS-07 12/10/2009 12:05:44 PM - Honeywell RCWL200A1007/N | Owner's Manual - Page 2
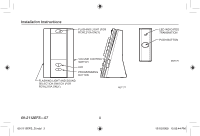
Installation Instructions FLASHING LIGHT (FOR RCWL210A ONLY) VOLUME CONTROL SWITCH LED PROGRAMMING BUTTON FLASHING LIGHT AND SOUND SELECTION SWITCH (FOR RCWL210A ONLY) M27177 69-2112EFS-07 ii 69-2112EFS_D.indd 2 LED INDICATES TRANSMITION PUSH BUTTON M27176 12/10/2009 12:05:44 PM - Honeywell RCWL200A1007/N | Owner's Manual - Page 3
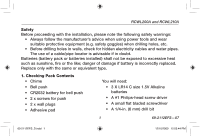
and RCWL210A Safety Before proceeding with the installation, please note the following safety warnings: • Always follow the manufacturer's advice when using power tools and wear suitable protective equipment (e.g. safety goggles) when drilling holes, etc. • Before drilling holes in walls, check for - Honeywell RCWL200A1007/N | Owner's Manual - Page 4
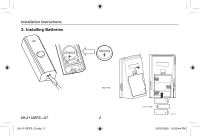
Installation Instructions 2. Installing Batteries CR2032 + CR2032 + M27182 69-2112EFS-07 2 69-2112EFS_D.indd 2 - LR14 C SIZE - + + - M27178 12/10/2009 12:05:44 PM + - Honeywell RCWL200A1007/N | Owner's Manual - Page 5
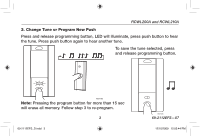
RCWL200A and RCWL210A 3. Change Tune or Program New Push Press and release programming button, LED will illuminate, press push button to hear the tune. Press push button again to hear another tune. To save the tune selected, press and release programming button. M27183 Note: Pressing the program - Honeywell RCWL200A1007/N | Owner's Manual - Page 6
Installation Instructions 4. Install Back Cover Using Screws or Adhesive Pad Provided TOP 69-2112EFS-07 69-2112EFS_D.indd 4 Note: Before final installation adjust distance and posi- TOP - Honeywell RCWL200A1007/N | Owner's Manual - Page 7
5. Volume Adjustment RCWL200A and RCWL210A 69-2112EFS_D.indd 5 5 69-2112EFS-07 12/10/2009 12:05:45 PM - Honeywell RCWL200A1007/N | Owner's Manual - Page 8
Installation Instructions 6. Strobe and Sound Selections Light and sound selection (applicable to RCWL210A only). 69-2112EFS-07 69-2112EFS_D.indd 6 M27180 6 12/10/2009 12:05:45 PM - Honeywell RCWL200A1007/N | Owner's Manual - Page 9
RCWL200A and RCWL210A 7. Low Battery Indication Tune + 2 beeps + 2 LED flashes = change batteries in chime. Tune + 3 beeps + 3 LED flashes = change battery in push. + - + BEEP2 + x 2 + BEEP3 + x 3 69-2112EFS_D.indd 7 - + + - CR2032 + 7 CR2032 + M27181 69-2112EFS-07 12/10/2009 12:05:45 - Honeywell RCWL200A1007/N | Owner's Manual - Page 10
Installation Instructions Specification Operating Temperature RF Frequency - US Range (open field) Sound Level (typical) RF Power Battery Type Battery Life (5 operations/day) Water Proof Tunes Chime 32°F to 104°F 0°C to +40°C 345MHz 200 ft (61 m) 82dBA @ 3 ft (1m) LR14 C size 12 - Honeywell RCWL200A1007/N | Owner's Manual - Page 11
RCWL200A and RCWL210A Troubleshooting Two 'beep' sounds are heard and LED flashes twice after the normal chime sound... This indicates a low battery in the chime. Install new batteries, type LR14 C size alkaline batteries. Three 'beep' sounds are heard and LED flashes three times after the normal - Honeywell RCWL200A1007/N | Owner's Manual - Page 12
Installation Instructions Troubleshooting The chime does not sound... • Check the chime switch position. • Check that the volume control is not at the minimum setting. Chime does not play - Honeywell RCWL200A1007/N | Owner's Manual - Page 13
is required; this does not affect your statutory rights. If you require further information about your product, call the Honeywell helpline at 1-800-468-1502. Declaration Honeywell hereby declares that this product complies with Part 15 of the FCC rules and Industrial Canada standards. This device - Honeywell RCWL200A1007/N | Owner's Manual - Page 14
Environmental and Combustion Controls 1985 Douglas Drive, Golden Valley, MN 55422 www.honeywell.com Printed in U.S.A. on recycled paper containing at least 10% post-consumer paper fibers. ® U.S. Registered Trademark. © 2009 Honeywell International Inc. 69-2112EFS-07 M.S. Rev. 12-09 69-2112EFS_D.indd - Honeywell RCWL200A1007/N | Owner's Manual - Page 15
Directives d'installation RCWL200A et RCWL210A Carillon portatif (51375SL; 51376SL) et sonnette (51381SL) 69-2112EFS_C.indd 13 8/15/2008 7:50:59 AM - Honeywell RCWL200A1007/N | Owner's Manual - Page 16
Directives d'installation STROBOSCOPE (RCWL210A SEULEMENT) BOUTON DE RÉGLAGE DU VOLUME BOUTON DE SÉLECTION DU SON ET DU STROBOSCOPE (RCWL210 SEULEMENT) VOYANT BOUTON DE PROGRAMMATION MF27177 69-2112EFS-07 14 69-2112EFS_D.indd 14 VOYANT - CONFIRME LA TRANSMISSION DU SIGNAL SONNETTE MF27176 - Honeywell RCWL200A1007/N | Owner's Manual - Page 17
RCWL200A and RCWL210A Sécurité Avant de commencer l'installation, veuillez respecter les consignes de sécurité suivantes : • Toujours suivre les recommandations du fabricant lorsqu'on utilise des appareils électriques et toujours se servir d'un équipement protecteur (par ex. des lunettes de - Honeywell RCWL200A1007/N | Owner's Manual - Page 18
Directives d'installation 2. Insertion des piles CR2032 + CR2032 + M27182 69-2112EFS-07 16 69-2112EFS_D.indd 16 - LR14 C SIZE - + + - M27178 12/10/2009 12:05:46 PM + - Honeywell RCWL200A1007/N | Owner's Manual - Page 19
RCWL200A and RCWL210A 3. Modifier la mélodie ou programmer une nouvelle sonnette Appuyer sur le bouton de programmation et le relâcher; le voyant s'allumera, et il faudra ensuite appuyer sur le bouton de la sonnette pour entendre la mélodie. Appuyer à nouveau sur le bouton de la sonnette pour - Honeywell RCWL200A1007/N | Owner's Manual - Page 20
Directives d'installation 4. Installation de la plaque arrière à l'aide de vis ou du tampon adhésif fourni HAUT 69-2112EFS-07 69-2112EFS_D.indd 18 Remarque : Avant d'installer la sonnette, HAUT ajuster sa position et vérifier la distance entre la sonnette et le carillon pour optimiser le - Honeywell RCWL200A1007/N | Owner's Manual - Page 21
5. Réglage du volume RCWL200A and RCWL210A 69-2112EFS_D.indd 19 19 69-2112EFS-07 12/10/2009 12:05:46 PM - Honeywell RCWL200A1007/N | Owner's Manual - Page 22
Directives d'installation 6. Sélection du stroboscope et du son Sélection du stroboscope et du son (RCWL210A seulement. 69-2112EFS-07 69-2112EFS_D.indd 20 M27180 20 12/10/2009 12:05:46 PM - Honeywell RCWL200A1007/N | Owner's Manual - Page 23
RCWL200A and RCWL210A 7. Indicateur de piles faibles Mélodie + 2 bips + voyant qui clignote 2 fois = remplacer les piles du carillon. Mélodie + 3 bips + voyant qui clignote 3 fois = remplacer les piles de la sonnette. + - + BEEP2 + x 2 + BEEP3 + x 3 69-2112EFS_D.indd 21 - + CR2032 + - Honeywell RCWL200A1007/N | Owner's Manual - Page 24
Directives d'installation Caractéristiques techniques Température de service Fréquence RF - ÉtatsUnis Portée (à ciel ouvert) Niveau sonore (type) Puissance émise Type de pile Durée de vie de la pile (5 déclenchements/jour) Infiltration d'eau Mé - Honeywell RCWL200A1007/N | Owner's Manual - Page 25
RCWL200A and RCWL210A Dépannage Deux bips retentissent et le voyant clignote deux fois après le carillon normal... Ce signal indique que les piles du carillon sont faibles. Installer des piles alcalines neuves de type LR14, de taille C. Trois bips retentissent et le voyant clignote trois fois apr - Honeywell RCWL200A1007/N | Owner's Manual - Page 26
Directives d'installation Dépannage Le carillon ne sonne pas... • Vérifier la position de l'interrupteur du carillon. • Vérifier que le volume n'est pas réglé au minimum. Le carillon ne fait pas entendre la mélodie sélectionnée... Le carillon n'a pas appris la mélodie sélectionnée. Suivre les étapes - Honeywell RCWL200A1007/N | Owner's Manual - Page 27
Mise au rebut et recyclage. Prière de recycler partout où les services adéquats existent. Communiquer avec la municipalité ou le détaillant pour obtenir des conseils en matière de recyclage. Déclaration Par la présente, Honeywell déclare que ce carillon sans fil est conforme aux exigen-ces de - Honeywell RCWL200A1007/N | Owner's Manual - Page 28
la loi. Pour obtenir de plus amples informations concernant notre produit, prière de communiquer avec les Services à la clientèle de Honeywell en composant le 1-800-468-1502. Honeywell International Inc. SRA, Régulateurs d'ambiance et de combustion 1985 Douglas Drive, Golden Valley, MN 55422 www - Honeywell RCWL200A1007/N | Owner's Manual - Page 29
Instrucciones de Instalación RCWL200A y RCWL210A Campanilla portátil (51375SL; 51376SL) con pulsador (51381SL) 69-2112EFS_C.indd 27 8/15/2008 7:51:01 AM - Honeywell RCWL200A1007/N | Owner's Manual - Page 30
Instrucciones de Instalación LUZ ESTROBOSCÓPICA (PARA RCWL210A ÚNICAMENTE) INTERRUPTOR DE CONTROL DE VOLUMEN LED BOTÓN DE PROGRAMACIÓN LUZ ESTROBOSCÓPICA E INTERRUPTOR DE SELECCIÓN DE SONIDO (PARA RCWL210 ÚNICAMENTE) MS27177 69-2112EFS-07 28 69-2112EFS_D.indd 28 LED - INDICA ACTIVACIÓN DE - Honeywell RCWL200A1007/N | Owner's Manual - Page 31
RCWL200A y RCWL210A Seguridad Antes de proceder con la instalación, por favor observe las siguientes advertencias sobre seguridad: • Siempre siga las recomendaciones del fabricante cuando utilice herramientas eléctricas y utilice equipo protector adecuado (por ej.: gafas de seguridad) cuando - Honeywell RCWL200A1007/N | Owner's Manual - Page 32
Instrucciones de Instalación 2. Instalación de baterías CR2032 + CR2032 + M27182 69-2112EFS-07 30 69-2112EFS_D.indd 30 - LR14 C SIZE - + + - M27178 12/10/2009 12:05:47 PM + - Honeywell RCWL200A1007/N | Owner's Manual - Page 33
RCWL200A y RCWL210A 3. Cambie la melodía o programe el pulsador nuevo Presione y suelte el botón de programación, el LED se iluminará, presione el pulsador para escuchar la melodía. Presione el botón pulsador nuevamente para escuchar otra melodía. Para guardar la melodía seleccionada presione - Honeywell RCWL200A1007/N | Owner's Manual - Page 34
Instrucciones de Instalación 4. Instale la cubierta posterior utilizando tornillos o la almohadilla adhesiva que se suministra PARTE SUPERIOR 69-2112EFS-07 69-2112EFS_D.indd 32 Nota: Antes de la instalación final regule la distancia PARTE SUPERIOR y la posición entre el pulsador y la campanilla - Honeywell RCWL200A1007/N | Owner's Manual - Page 35
5. Regulación de volumen RCWL200A y RCWL210A 69-2112EFS_D.indd 33 33 69-2112EFS-07 12/10/2009 12:05:48 PM - Honeywell RCWL200A1007/N | Owner's Manual - Page 36
Instrucciones de Instalación 6. Luz estroboscópica y surtido de sonidos Luz y surtido de sonidos (aplica a RCWL210A únicamente). 69-2112EFS-07 69-2112EFS_D.indd 34 M27180 34 12/10/2009 12:05:48 PM - Honeywell RCWL200A1007/N | Owner's Manual - Page 37
RCWL200A y RCWL210A 7. Indicación de batería baja Melodía + 2 pitidos + 2 destellos del LED = cambio de baterías en la campanilla. Melodía +3 tonos +3 destellos del LED = cambie las baterías de la campanilla. + - + BEEP2 + x 2 + BEEP3 + x 3 69-2112EFS_D.indd 35 - + CR2032 + CR2032 + - Honeywell RCWL200A1007/N | Owner's Manual - Page 38
Instrucciones de Instalación Especificación Temperatura de funcionamiento Frecuencia RF - US Alcance (campo abierto) Nivel de sonido (promedio) Potencia RF Tipo de batería Vida de la batería (5 activaciones por día) A prueba de lluvia Melodías Campanilla 32°F a 104°F 0°C a +40°C 345MHz 200 ft (61 - Honeywell RCWL200A1007/N | Owner's Manual - Page 39
RCWL200A y RCWL210A Localización y solución de problemas Se escuchan dos "tonos" y el LED destella dos veces después del sonido normal de la campanilla... Esto indica batería baja en la campanilla. Instale nuevas baterías, tipo LR14 tamaño C alcalinas. Se escuchan tres "tonos" y el LED destella - Honeywell RCWL200A1007/N | Owner's Manual - Page 40
Instrucciones de Instalación Localización y solución de problemas La campanilla no suena... • Verifique la posición del interruptor de la campanilla. • Verifique que el control de volumen no esté en la posición mínima. La campanilla no reproduce la melodía seleccionada... La campanilla podría no - Honeywell RCWL200A1007/N | Owner's Manual - Page 41
necesaria; esto no afecta sus derechos legales. Si necesita mayor información sobre su producto, llame a la línea de ayuda de Honeywell al 1-800-468-1502. Declaración Honeywell por la presente declara que este producto cumple con la Parte 15 de las regulaciones FCC y las normas industriales de Canad - Honeywell RCWL200A1007/N | Owner's Manual - Page 42
Instrucciones de Instalación 69-2112EFS-07 40 69-2112EFS_D.indd 40 12/10/2009 12:05:48 PM - Honeywell RCWL200A1007/N | Owner's Manual - Page 43
RCWL200A y RCWL210A 69-2112EFS_D.indd 41 41 69-2112EFS-07 12/10/2009 12:05:48 PM - Honeywell RCWL200A1007/N | Owner's Manual - Page 44
and Combustion Controls 1985 Douglas Drive, Golden Valley, MN 55422 www.honeywell.com Impreso en los EE. UU., en papel reciclado que contiene por lo menos un 10% de fibras de papel reciclable. ® Marca registrada de los EE. UU. © 2009 Honeywell International Inc. 69-2112EFS-07 M.S. Rev. 12-09 69
-
 1
1 -
 2
2 -
 3
3 -
 4
4 -
 5
5 -
 6
6 -
 7
7 -
8
-
9
-
10
-
11
-
12
-
13
-
14
-
15
-
16
-
17
-
18
-
19
-
20
-
21
-
22
-
23
-
24
-
25
-
26
-
27
-
28
-
29
-
30
-
31
-
32
-
33
-
34
-
35
-
36
-
37
-
38
-
39
-
40
-
41
-
42
-
43
-
44
 |
 |
Installation
Instructions
RCWL200A and RCWL210A
Portable Chime (51375SL; 51376SL) With Push (51381SL)
69-2112EFS-07
69-2112EFS_D.indd
1
12/10/2009
12:05:44 PM